


I need a break from color field painters. Dr. Seuss is just the thing, don’t you think?
I’m sure you’ve heard of Dr. Seuss, author and illustrator of more than 40 picture books including The Cat in the Hat, Green Eggs and Ham, and The Lorax (my favorite). You’ve probably read at least a few of his books. But did you know that he created works of art that were never meant to be used in his books?
At night, when he wasn’t working on his books, Dr. Seuss loved to paint and sculpt. He created this art only for himself. He didn’t mean for others to see it, though he probably knew that eventually people would. I love Dr. Seuss’ illustrations and I was thrilled to find that there were more pictures to look at.
The Secret Art of Dr. Seuss is a collection of Dr. Seuss’ artwork. Some of you may be interested to read the introduction which was written by Maurice Sendak, author and illustrator of Where the Wild Things Are. The Secret Art of Dr. Seuss is full of the wacky characters you’d expect from Dr. Seuss. There are lots of cats, of course, and many creatures not found in nature. I think my favorite piece in the book is the Impractical Marshmallow-Toasting Device. You’ll have to check out the book for yourself to see what that device looks like!
I hope you enjoy this discovery as much as I did. Have a great weekend!
Return to main page.
Friday, June 6, 2008
Thursday, June 5, 2008
Use a Compass to Create Your Own Stella Masterpiece
Sorry for the posting delay. We had tornados yesterday and a lot of the area lost power. I did my best to stay out of the apartment as long as possible. Not to worry: everything’s fine now.
A note to parents/teachers: For your enjoyment, I am posting a second math-related project inspired by Frank Stella’s work. This one is perfect for practicing using a compass. Compasses can be tough to use at first and when students need to create circles of specified size it can be even tougher. This is a fun and artistic way to practice.
Begin by teaching the students a new term: concentric. Concentric circles are two or more circles within each other that have the same center point. Concentric arcs are two or more arcs lined up next to each other that share a center point.
Supplies Needed:
Paper
Pencil
Compass
Colored Pencils or Crayons
Black Marker (optional)
Place your compass point somewhere on your paper and create a large circle. Your parent or teacher may ask that the circle be a certain size. Make sure it will fit on the page before you begin. If you’re doing this project on your own, choose for yourself what size you want your largest circle to be.
Now, set your compass to a smaller size. Place the point in exactly the same place on the page. Remember that concentric circles must share a center point.
Continue to create smaller and smaller circles inside the large circle.
When you’ve created as many circles as will fit inside your large circle, move your compass to another point on the paper and decorate the blank spaces with concentric arcs or smaller concentric circles.
Finally, color the spaces between the circles with colored pencil or crayon. If you wish, trace the pencil lines with black marker to make them stand out.
Return to main page.
Wednesday, June 4, 2008
Use Geometry to Create Your Own Stella Masterpiece
It’s easy and entertaining to use Frank Stella’s art to review geometry. The project below can be fun for elementary students in grades 1-5 with only small adjustments depending on the level of the students.
Supplies Needed:
Posterboard
Construction Paper
Pencil
Scissors
Glue Stick
(Optional) Geometric Stencils
A note to parents/teachers: I recommend creating some stencils out of cardstock if you plan to do this project with children in 1st or 2nd grade. Even older kids may benefit from tracing the shapes rather than drawing their own. Draw circles, triangles, squares, rectangles, hexagons, and octagons onto cardstock, cut out, and make the stencils available to the kids. You can easily adapt this project to your kids and situation by creating fewer shapes (ex: only circles, triangles, and squares) or more shapes (including trapezoids and parallelograms).
Choose which shapes to use in your artwork. You may choose to use as many or as few of each shape as you’d like. Trace the stencils onto colored construction paper and cut out your shapes. Older kids can practice drawing their own shapes onto construction paper and cutting them out.
Arrange your shapes onto your posterboard. When you are pleased with the art you have created, glue the shapes in place.
Cut away any extra posterboard to create a shaped canvas just like Frank Stella.
Another note to parents/teachers: You may wish to have the kids write an explanation of which shapes they used. Ask them to write how many of each shape they used and something about each of those shapes. For instance, if you’ve been learning that circles are enclosed shapes with no sides, have the kids write that. If you’ve been learning how to find area and perimeter, have the kids measure the shapes they used in their art and figure out the area and perimeter of each.
Check back tomorrow for another math-related Frank Stella project.
Return to main page.
Tuesday, June 3, 2008
Frank Stella
Today our look at color field painters continues...
Because Frank Stella is still alive and painting, I’m not going to say much about his life. He was born in 1936 in Massachusetts. He attended Princeton University where he studied history. He was also interested in art and he visited museums and painted. After graduation he moved to New York where he still lives.
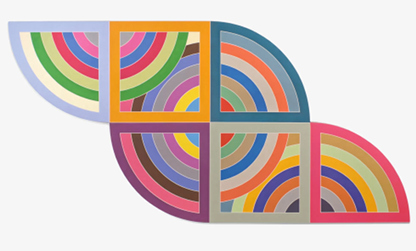
Stella’s paintings are meant to be objects themselves. He does not mean to portray any subject you would recognize and he doesn’t try to paint emotion onto canvas. He wants each painting to be a unique paint-on-canvas (or wood, or aluminum, etc.) object.
Many of Stella’s early paintings are extremely orderly. You’ll notice straight or curved lines that repeat in patterns. For example, look at Sunset Beach Sketch and Harran II. Can you guess which painting Stella created using a protractor?
Stella began painting on strangely shaped canvases which were often better suited to his creations. Check out Sunapee I, for example.
Soon, Stella’s paintings began to take on 3D shapes. He started attaching pieces of canvas to wood and building his paintings outward using aluminum and fiberglass. Look at The Pequod Meets the Bachelor which was made from aluminum and magnesium.
Finally Stella started to create sculpture. Click here for one 10 ton example.
Stella’s paintings can easily be used to review some simple math concepts. Tomorrow I’ll post a fun project that can be enjoyed by elementary school children of any age.
Return to main page.
Because Frank Stella is still alive and painting, I’m not going to say much about his life. He was born in 1936 in Massachusetts. He attended Princeton University where he studied history. He was also interested in art and he visited museums and painted. After graduation he moved to New York where he still lives.
Stella’s paintings are meant to be objects themselves. He does not mean to portray any subject you would recognize and he doesn’t try to paint emotion onto canvas. He wants each painting to be a unique paint-on-canvas (or wood, or aluminum, etc.) object.
Many of Stella’s early paintings are extremely orderly. You’ll notice straight or curved lines that repeat in patterns. For example, look at Sunset Beach Sketch and Harran II. Can you guess which painting Stella created using a protractor?
Stella began painting on strangely shaped canvases which were often better suited to his creations. Check out Sunapee I, for example.
Soon, Stella’s paintings began to take on 3D shapes. He started attaching pieces of canvas to wood and building his paintings outward using aluminum and fiberglass. Look at The Pequod Meets the Bachelor which was made from aluminum and magnesium.
Finally Stella started to create sculpture. Click here for one 10 ton example.
Stella’s paintings can easily be used to review some simple math concepts. Tomorrow I’ll post a fun project that can be enjoyed by elementary school children of any age.
Return to main page.
Monday, June 2, 2008
GeeArt
I wrote a post for today but then I found an amazing website that you must see. You'll have to wait until tomorrow to read more about color field painting. I don't want to distract you from playing with this great interactive art site.
The GeeArt website includes funny cartoons in which colorful penguin-like creatures and polar bears talk about art. There are also games and fun quizzes about art. You have to subscribe to use all 16 lessons included on the site, but you can try one out for free. My favorite part about the trial lesson is when Vincent van Gogh and Johannes Vermeer face off in a fastest painter contest. It's pretty funny.
Go check it out for yourself. I'd love to hear what you think.
Return to main page.
Subscribe to:
Posts (Atom)


