Monday, December 24, 2007

Create Your Own Edible Painting

Merry Christmas Eve! This is the last project before Christmas so enjoy. Paint a few of these while you’re baking other cookies for a little edible art.

Supplies Needed:

Sugar Cookie Dough
Rolling Pin
Parchment Paper
Cookie Cutter
Light Corn Syrup
Food Coloring
Paintbrushes
Small Cups

Bake your sugar cookies according the direction on the package. You can, instead, use your own recipe or buy undecorated sugar cookies already made from the grocery store. If you bake your own, let them cool completely before painting on them.

Pour some light corn syrup into several small cups. You’ll want about a teaspoon in each. Squeeze one drop of food coloring into each cup and stir to make your paints. To make the black color I just mixed one drop of each color (and two drops of red) to one of the cups. The other colors are standard food coloring colors.

Use a clean paintbrush, preferably one that has never been used, and paint your cooled sugar cookies. The paint is very sticky and you must wash the paintbrush in the sink between each color. For this reason, it would be useful to have a different paintbrush for each color.

Please note that the colors run together if you don’t wait for the paint to dry between each; however, the paint dries extremely slowly. I painted mine all in one sitting and I think they came out fine.


Also note that the Jackson Pollock inspired cookies are very messy to make. Place a cookie on a plate, set it in the sink, and then splatter paint like I did (shown in the picture below). Have a parent help you with this one.
Below are pictures of my cookie masterpieces, inspired by Frank Lloyd Wright stained-glass windows, Jackson Pollock, and Piet Mondrian. I thought I had posted on Wright stained-glass but I guess not. So below the cookie, notice the inspiration.


I think they turned out quite nicely. Use any artist for inspiration or paint your own pictures using the fun recipe.

Return to main page.

Friday, December 21, 2007

The Wright 3 by Blue Balliett

I know I said I’d post on a topic related to yesterday’s post, the painting demonstration but I want to show you a specific picture that I can’t seem to find. Last week I had a computer crash and, while I am certain I have those pictures backed up somewhere, I’m sure where there are. So it will have to wait for another time.

It’s been awhile since I posted a book review and I have come across a novel, meant for ages 8-12, in which a Frank Lloyd Wright house is a character. Sounds pretty cool, huh? It’s called The Wright 3, by Blue Balliett, and is the sequel to Chasing Vermeer.

Robie House, a Wright-designed house in Chicago, Illinois, is being threatened with demolition. Petra, Calder, and Tommy must learn to get along as a trio and use their diverse talents to save to house. But they aren’t the only ones determined to save the Wright’s creations; Robie House itself is determined to fight back.

Balliett does an excellent job of providing details about Robie House and about Frank Lloyd Wright. I recommend, however, that you bookmark this page so you can look at the pictures of Robie House, shown below, as you read.


Return to main page.

Thursday, December 20, 2007

Painting Demonstration

I have been quite busy this week, finishing up the school year at the middle school where I have been working, making last minute Christmas preparations, and getting ready for a trip to Florida where I will spend the holidays with my family. These things add up to a short post today. I didn't want to leave you completely art-less so here's something I have been waiting to share with you at the right moment.

I came across a website a few months ago where some
painting demonstrations had been posted. I found it very interesting to see all the steps that go into creating a realistic painting. Notice that the artist, William Whitaker, first drew a rough sketch of the painting and then slowly filled everything in, layering paint onto paint. It must have taken a long time to fully polish a painting like this!

There are a few other demonstrations on the site but you should look at
this one especially. It seems that you would paint the background first and then layer the girl on top but that's not the best way to do it, as you can see in the demonstration. If you were to paint the background first, the colors and textures of the paint would show through the foreground subject (the girl).

Tomorrow I'll post on a related topic.

Return to main page.

Wednesday, December 19, 2007

Color Your Own Christmas Ornament

This project was more difficult than I expected so you’ll see pictures of the ornament I made but the directions will modify the project to make it simpler.

Supplied Needed:

White Tissue Paper
Crayons
White Glue
Water
Container with a pour-spout
Paintbrush
Glass Ornament
Glitter
Scissors
Tweezers

Draw a pattern onto the tissue paper using your crayons. I drew music notes but you would be better off drawing one larger picture like a Christmas tree or a bell. Cut out the picture. You should cut away as much of the excess tissue paper as possible. Remove the metal cap from your glass ornament and set it aside. Paint a thin coat of white glue onto the inside of the ornament where you would like the image to appear.

Push the picture into the ornament with your tweezers. Stick it to the glue so the drawing shows through the glass. Use the back of your paintbrush the secure the picture to the ornament. Make the image as smooth as possible.

In your container, mix 1/3 white glue with 2/3 water. Pour the mixture into the ornament and shake it so the glue coats the inside. Dump out the extra glue mixture.

Pour some glitter into the ornament and shake. The glitter will stick to the inside of the ornament. Dump out the extra glitter.

Replace the metal cap and tie some ribbon or attach a hanger to your ornament.

Tuesday, December 18, 2007

Frank Lloyd Wright

Frank Lloyd Wright was an American architect, probably the most famous American architect, born in 1867. Wright wanted his buildings to rise naturally from the land that surrounded them, as you’ll see. His buildings are often low to the ground and comprised of straight lines forming geometrical patterns. They are not symmetrical. Remember the ideas of the de stijl movement in the Netherlands? Wright greatly influenced those artists and architects.

He began his architectural career in Oak Park, Illinois where he designed the Unity Temple and many homes. Since I have been to Oak Park and seen these buildings, they will be the main focus of this post.
The image above is Unity Temple. I visited during a hot summer day and was the only person in the building so I was allowed to wander as I pleased. It’s impossible to describe the feeling in that building but I’ll try. There is a spirituality but it is not like that found in most churches. It is not as dark inside because the walls are wood and the stained-glass windows are mostly clear with colored geometrical patterns. Steps can be found in each corner of the chapel and the building exists on three levels, though it feels like only one floor from which you can somehow float upward. Wright designed the pews and light fixtures, as well as the building itself and the stained-glass windows. Below is a picture of the interior.
The next few images come from the neighborhoods surrounding Unity Temple and are all Wright-designed homes. The first was Wright’s own home and studio when he lived in Illinois. When I visited, some work was being done to restore the front of the home but you should notice the sculptures above the door. Yep: designed by Frank Lloyd Wright. They’re called “The Bolders.”


One of the most recognized homes that Wright designed is Falling Water, shown below. Notice how the building seems to fit into the land perfectly. The river actually runs underneath part of the house. Much of the building, as you can see, is made from stones that match those found in the river and the beams are brown like trees that surround the house.
Finally, the last picture I’ll show you today is of the Guggenheim Museum in New York City. It spirals out of the ground on the corner of a city block. There is no nature to be found here... or is there. When you step inside it is like entering a seashell. The green glass is the ceiling of the building and the spiraling ramps direct you through the building, beginning at the top and traveling downward.
I had originally planned to create a Wright-inspired ginger bread house as a project to tie-in to this article but last night on the Food Network someone built Falling Water and that convinced me of how difficult that project would really be. Still, you should check it out if you get a chance. The show will be replayed on Dec. 22 at 6:00pm and Dec. 23 at 3:00pm (Eastern Standard Time). It’s quite impressive.

As an interesting side note, Frank Lloyd Wright’s son, John Lloyd Wright, invented Lincoln Logs in 1918.

EDITED TO ADD: Create Your Own Edible Painting, includes a cookie inspired by Frank Lloyd Wright's stained-glass designs

EDITED TO ADD: The Wright 3 by Blue Balliett, book review

Return to main page.

Monday, December 17, 2007

Create Your Own Palm Frond Rudolph

Today I’d like to recognize the insane snow storm that hit the north eastern US this weekend with this tropical Christmas craft. I do not live in the south (though I was not affected by the storm, either) so these photos are courtesy of my mother. Not to worry, though; I’ve made my share of palm frond Rudolphs. I won’t steer you wrong.

Supplies Needed:

Palm Frond
Googley Eyes
Red Pom
Glue Gun and Glue Stick
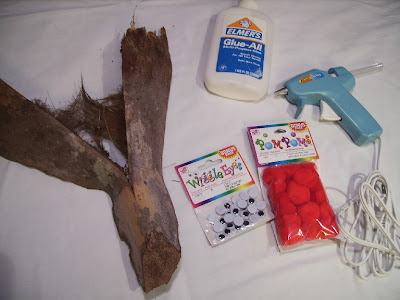
I’m not sure why there is white glue and a glue gun in this picture. You could use either so take your pick. Begin by collecting your supplies, including taking a palm frond from a palm tree. If the trees have recently been pruned, you may find the perfect frond on the ground just waiting for you to turn it into a masterpiece. If not, you’ll want an adult to help you retrieve one. Make sure the frond comes from the right kind of palm tree. See the picture below for help. (Yes, that’s my parent’s back yard... lucky, huh?)
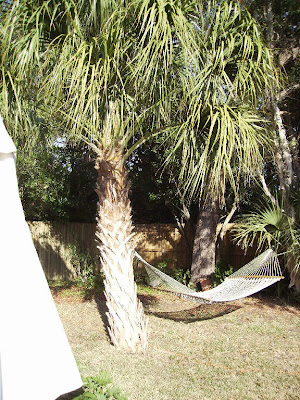
Attach the goggley eyes and the pom to the palm frond. If you use hot glue you won’t have to wait more than a moment for it to dry but if you use white glue be sure everything is firmly attached before you handle your Rudolph.
If you wish to hang it, hot glue a loop of ribbon to the back. Hang and enjoy!

Thanks, Mom, for the lovely photos!

Click here for more Christmas crafts.

Return to main page.

Friday, December 14, 2007

Paint Your Own Christmas Ornament

Today’s Christmas craft is a simple one, guaranteed to produce beautiful and unique ornaments every time. And it can be enjoyed by crafters of all ages.

Supplies Needed:

Glass ball ornament
Glass paint
Yes, that’s it. Gather your supplies and cover your workspace with newspaper. I chose to use red, green, and white paints and I think my ornament came out well. You can use any colors and glass paint comes in more colors that you can imagine. Silver and gold would be good additions to any ornament. Go crazy!

Remove the top of the ornament, the part that allows you to hang it on the tree, and set it aside.

Hold the ornament so the opening is angled, though still with an upright tilt. Squeeze some paint into the ornament so it runs down the inside. Glass paint is rather thick and will take a while to make it to the bottom of the ornament. There’s no need to wait for it to finish its journey before adding the next color. Squeeze as many colors into the ball as you’d like, rotating the ornament each time for a paint-free space.

Now cover the opening with your thumb and gently tap the ornament against your other palm to speed the paint along. Turn the ornament so the paint runs across the entire inside and there is no clear space left. Add more paint if you need to.

Place the top back on and enjoy your one-of-a-kind ornament. Add a piece of ribbon as a hanger if you choose, or just use a metal one.
A side note: You can use regular craft paint for this project since you won’t be washing the ornament or eat off of it, however, eventually the paint will begin to separate. The ornament pictured below was painted about ten years ago, by my estimation, and you can see that pigment (that is the color) is separating from the binder (the liquid that the color is mixed with to create paint). I still like it though, and hang it on my tree every year.
Click the following links for a paper ornament project, and a candy cane ornament project.

Return to main page.

Thursday, December 13, 2007

Create Your Own Mondrian Masterpiece

Piet Mondrian wanted to find the heart of the things around him so that he could paint it onto his canvas. As he grew older, he art became simpler. The result, for you, is an easy-to-copy style. Today, learn to make your own Mondrian-inspired painting.

Supplies Needed:

Heavy sketch paper (white)
Paints in red, yellow, blue, and black
Paintbrush
Water (for rinsing the brush)
Ruler
Construction paper
Scissors
Pencils

Begin by drawing lines on your paper with your pencil. Use your ruler to make sure the lines are straight horizontal or vertical by measuring from the sides and marking several points along the line before drawing it. Use your imagination to decide where to draw the lines.

Next, fill in some of the squares formed by your intersecting lines with red, yellow, or blue paint. Make sure to leave some of the squares white. If your colors aren’t perfectly within the lines, that’s okay; you’ll paint your black lines next and they’ll cover the edges.

You will now paint over the pencil lines with black paint. The other colors need to dry first and in the meantime, you can make a stencil for painting the black lines. This will make them look crisp.

Cut a sheet of construction paper in half. Place the outer edges together. The edges that you just cut will be to the outside now. Cut a strip from another sheet of construction paper and then cut the strip in half. You’ll use this strip to connect the two halves of your construction paper.

You want to leave an opening about half an inch thick so measure a half an inch somewhere in the middle of the strip and mark it off. Do the same to the second strip. Now tape one strip to each end of the half-sheets of construction paper with the straight edges faces into the gap.

Mark the center of the gap by drawing a line on each strip. Now line up the pencil lines on your painting with these lines and use your stencil to paint black lines where the pencil lines used to be. You may need to fill in your lines a few at a time and let them dry before filling in a few more. You don’t want to set your stencil in wet paint.

Alternatively, you could use a thick black marker to draw the lines but paint will look better.

After you have painted all the lines, your masterpiece is complete! Let it dry, hang, and enjoy.

Return to main page.

Wednesday, December 12, 2007

Piet Mondrian

Piet Mondrian was born in the Netherlands in 1872. He was influenced by many artistic styles and even helped found an artistic movement called De Stijl. He died in 1944, have created about 250 paintings in his lifetime.

The paintings that Piet Mondrian is most famous for are rectangles of white and primary colors, dissected by black lines. He did not always paint this way, however. Mondrian’s first paintings depicted scenes found in real life. They were done in a style similar to impressionism. As his style grew and changed, he stopped using any colors besides the three primaries: red, yellow, and blue. The painting shown below is Avond. This is the first painting in which Mondrian used only primary colors but you can still see the influence of impressionism.

Mondrian soon became interested in cubism. Cubism, which I have not yet posted about, is an artistic style in which the subject is broken into meaningful pieces and rearranged in a new order to show the most important parts of the object. The painting shown below, Still Life with Ginger Pot, was painted by Mondrian in the cubist style. Because of the influence of cubism, Mondrian’s paintings became more and more abstract. Mondrian moved to Paris in 1912 so he could further study cubism.
In 1914 Mondrian returned home just before World War I broke out. He was stuck there for the duration of the war (1914-1919). During this time he became friends with some other artists and together they began the new movement, De Stijl, which I posted about yesterday. The movement was called De Stijl because that was the name of the journal that Mondrian and his friends started. They called the movement neoplasticism and today both names are correct.
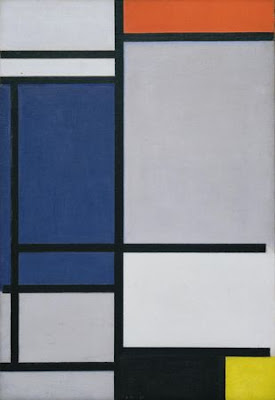
The members of the De Stijl movement were searching to paint an even more honest truth than the cubists. They believed the essence, the foundation of all things could be found in the simplest form: straight lines and primary colors. So Mondrian began painting pieces like the one shown above, Composition.

Tomorrow I’ll teach you to make your own Mondrian-inspired painting.

EDITED TO ADD: Create Your Own Edible Mondrian Painting,
Create Your Own Mondrian Masterpiece

Return to main page.

Tuesday, December 11, 2007

De Stijl

De Stijl (sounds like ‘duh style’) was an artistic movement in the Netherlands from 1917 to around 1928. Artists such as Piet Mondrian, who you’ll learn about tomorrow, wanted to simplify the subjects of their painting as much as possible until they were left with only lines and simple colors. They used only red, yellow, and blue, and black, white, and grey.

De Stijl was confined to the Netherlands because the country did not involve itself in World War I so the Dutch couldn’t leave the country during the war. The art produced in other countries still influenced the de stijl movement, though.

In this 1921 painting, entitled Composition, you can see the simple colors and lines. Notice how few black lines there are in this painting, yet how beautiful the effect.
These ideas were used not only in paintings, but in architecture as well. Look at this house, for instance, designed by Gerrit Rietveld. It is completely black and white with details in primary colors, and uses only rectangles formed by horizontal and vertical lines. The inside also uses simple lines. If you’ve ever seen a Frank Lloyd Wright designed building, you may be thinking that this house reminds you of his work. You’d be right to think that because Wright’s designs from the 1900s and 1910s influenced the later work of these Dutch architects. (You’ll learn about Wright next week.)

Return to main page.

Monday, December 10, 2007

Create Your Own Paper Ornament

This Christmas ornament is easy to make and can be slipped into a Christmas card as a nice pre-Christmas gift for your friends and family.

Supplies Needed:

Green construction paper
Patterned wrapping paper
Tape
Scissors
Ruler
Pencil
Glue stick
Ribbon


Use your ruler and pencil to mark strips of various widths on your wrapping paper. Cut them out. Thinner strips will look better. I cut mine too thin.

Line up the strips in an order different than the sheet of wrapping paper. Try to alternate the colors. Attach the strips to a piece of tape.

Draw a circle on your sheet of green construction paper. Draw a smaller circle inside. Add a rectangle and a loop at the top to make it look like an ornament. Cut out the ornament and remove the inner circle. I cut out the inside of the loop with scissors but a hole punch would be easier.

Trace your ornament onto more green construction paper and cut out a second. Do not remove the inner circle.

Tape the strips of wrapping paper to the construction paper with the hole in it. The strips should show through the hole.

Use your glue stick to attach the back to the ornament.

Tie a piece of ribbon to the loop so the ornament can be hung. Place it on your tree or slide it into a Christmas card and send it to a loved one.

Return to main page.

Friday, December 7, 2007

Create Your Own Candy Cane Rudolph and Santa

You’ve probably seen candy cane Rudolphs but you can create a host of other candy cane characters if you use your imagination.

Rudolph:

Supplies Needed:

Candy Cane
Red Pipe Cleaner
Red Pom
Two Googley Eyes
Ribbon
Glue
Scissors
Wrap the pipe cleaner around the bend in the candy cane. You should complete two wraps and then twist at the top. Bend the pipe cleaner so it looks like antlers. If you have extra length, snip it off.

Tie the ribbon in a bow around the reindeer’s neck. If you tie it tightly enough there will be no need for glue but you can add a dab if you’d like to secure the ribbon.

Glue the eyes to create the face and then glue the pom to the end to make Rudolph’s glowing red nose. I used white glue but a hot glue gun would be more effective. Just be sure to get help from an adult first.

Santa:

Supplies Needed:

Candy Cane
Two Red Pipe Cleaners
White Pom
Two Googley Eyes
Ribbon
Glue
Scissors
White Paint
Small Paintbrush
Wrap a pipe cleaner twice around the bend in the candy cane. Bend it into the outline of a pointed, red Santa hat. Wrap the second pipe cleaner to fill in the hat. Tuck in the ends. Use a bit of glue to attach the white pom to the end of the hat.

Use a small piece of ribbon to make a belt around the center of the candy cane. Use a hot glue gun to secure it. I used double sided tape but it didn’t hold well. Make sure a parent helps you with the glue gun.

Attach the googley eyes with dabs of glue.
___________

You can create any number of characters from candy canes. Try making elves using green candy canes and pipe cleaners. If you have other ideas, leave comments so others might enjoy them, too.

Happy crafting and have a great weekend!

Return to main page.

Thursday, December 6, 2007

The View From My Window

Before we get to our regular programming, I thought I'd show two comparative pictures.

This is the view from my window just two short weeks ago. Thanksgiving was warm and breezy but it smelled like fall and the leaves were swirling throughout the yard.


This is the view tonight. We got about six inches of snow, by my estimation--the good, sticky packing snow, perfect for snowball fights.


Today's art: And so that we might remember those summer months, check out Scott Wade's website. Wade creates art on dirty car windshields. I'd like the Mona Lisa sketched into my windshield. It would liven up the whitewash caused by the crust of snow!

Tomorrow I'll post a Christmas craft to get you through the weekend. Enjoy your Thursday!

Return to main page.

Wednesday, December 5, 2007

Create Your Own Picasso-Inspired Collage

The great thing about creating art is that you never have to show it to anyone if you don’t like the way it turns out. Thus, I am not posting a photo of my collage. I hope you have better luck with your Picasso-inspired musical collages.

Supplies Needed:

Poster board
Colored papers
Sheet music
Newspaper
Paints
White glue
Water
Paintbrush

Cut shapes from your colored papers. You could cut pieces of musical instruments in any colors you’d like or cut music notes. Cut out pieces from your sheet music (do a search for sheet music and print something out if you don’t have any music you can cut up) and use words from newspaper headlines if you want your collage to say something.

Choose what kind of paper you want to use for your background. Picasso often used wallpaper but wrapping paper will work well also. If you don’t have either, tear up pieces of construction paper to make your own background.

Mix a little glue with water to thin it. This will make your paper turn out less wrinkled after you glue it down.

Brush on enough glue to hold the background. Stick it to the poster board. Arrange your collage pieces on top of the background and, when you like the way the collage looks, glue down all the pieces.

You can add paint to your collage, too. Maybe you want to accentuate some of the notes in your sheet music with red paint. Or you could add guitar strings. Use your imagination.

Good luck!

Click here for a Matisse-inspired collage project.

Return to main page.

Tuesday, December 4, 2007

Picasso's musical collages

Thank you to all who commented on my noveling adventure. Your support really means a lot. Now that's recovered a bit I can post properly again.

Picasso was born in 1881 in Spain. Picasso’s father was a painter and sculptor and began Picasso’s art education at an early age. Picasso lived in Paris for much of his life where he lived passionately until his death in 1973. His art grew and changed throughout his life and he was key in forming several important artistic movements. I could and will write posts on each of Picasso’s “periods,” as they are called.

Music influenced many of Picasso’s pieces, including his collages. Today’s post will be on these musical collages.

Picasso used wallpaper, cloth, and sheet music in his musical collages as well as paint. He used wallpaper most often to create the background and then cut the sheet music, cloth, paper scraps, and newspaper into the shape of guitars or pieces of guitars. Then he combined the shapes on the collage to represent a guitar.

Look at the collages shown below and think about what you might want to use in your own collage. Tomorrow I’ll post a Picasso inspired collage project.


Glass of Vieux Marc, Glass, Guitar, and Newspaper:

Guitar, Sheet Music, and Wine Glass:

Guitar and Sheet Music:

Return to main page.

Monday, December 3, 2007

Create Your Own Christmas Candle Holder

This is a fun project that can be enjoyed by all ages. These festive candle holders can be used as decorations in your own home or can be given as homemade gifts.

Supplied Needed:

Glass paint
Glass candleholder
Paintbrush
Palette
Cotton balls
Rubbing Alcohol
Protect your work space with newspaper. Use the cotton balls to wipe the candleholder with rubbing alcohol. Once you have wiped the candleholder, don’t touch the area you intent to paint.

Find an image to paint. You could go online and print something out, use a stamp (like I did), take a picture from a magazine, or draw your own picture. Tape the picture to the inside of the glass.

Now trace the image onto your glass with the paint.
Younger kids will enjoy experimenting freeform on the candle holder. Even just painting dots of red, green, and white is fun.

When you’ve finished, have an adult light a tea light and drop it into the candle holder for you. I recommend a Christmas-y scented candle like cinnamon.


Return to main page.

Friday, November 30, 2007

NaNoWriMo 2007 WINNER!!

I am an official NaNoWriMo Winner! I have written 50,000 words in one month!
And I got this pretty winner's icon. Cool, huh?


My total NaNoWriMo Word Count:


50024 / 50000 words. 100% done!

And with 3 1/2 hours to spare!

Create Your Personal Advent Calendar

An advent calendar is a calendar that counts down the days to Christmas beginning on December 1. Each day you pop open one of the flaps and read part of the story of Christmas. Since today is the last day of November (I know, where did the month go?), create your own advent calendar to chronicle your personal journey to Christmas.

Supplies Needed:

Two sheets of poster board (any color but I recommend one red and one green)
Ruler
Pencil
Craft Knife
Gel Pen
Tape
(Eventually, you’ll also need glue)

Begin by measuring and drawing 24 boxes onto the top sheet of poster board. The boxes can vary in size but you’ll want them to be large enough to fit pieces of photographs.

Have an adult help you cut three sides of each box. Each box should become a window that can be folded open. Number the outside of each box. You can also decorate the boxes with Christmas-themed pictures from magazines or your own drawings.

On the inside of each flap, write an activity that you’d like to do on that day. This can be anything from shopping to wrapping gifts to cookie baking to making ornaments.

Each day of December, open one of the flaps and complete the activity written on the inside. Take a photo of yourself and your family completing the activity. At the end or as the month progresses, tape a photo so it shows through the corresponding box when the flap is open. When you’re finished the calendar, glue the second sheet of poster board to the back of the first to hide the backs of the photos.

Next year, take out your personal advent calendar and remember the times you shared with your family. If you create a new calendar each year you’ll be able to see how you grew and you’ll be able to share memories every year.


Return to main page.

My Current NaNoWriMo Word Count:

47647 / 50000 words. 95% done!
ALMOST THERE!!!

Thursday, November 29, 2007

Create Your Own Matisse Collage

Yesterday you read about Henri Matisse who created large, bold collages late in his life. Today, make your own collage in the style of Matisse.

Supplies Needed:

Acrylic Craft Paints
Poster board
Thick/textured sketch paper
White glue
Plastic Cups
Paintbrush
Scissors

Look around your house or outside and choose a subject. For example, a pine tree. Choose what colors you’d like to use in your collage. Remember, the colors you choose don’t have to be the natural colors of your subject. You might choose to create a pine tree in warm tones: red, orange, yellow, magenta. Or you might use all the colors of the rainbow to create orange slices. You can even use one color for the whole collage like the one by Matisse shown above, Blue Nude. Go crazy. Be creative. This is what art is all about.

When you’ve chosen your colors, paint one sheet of sketch paper in each color. If you’re using all one color, you’ll need to paint a few sheets to have enough material to make your collage.

Let the paint dry.

Cut your sheets of painted paper into shapes. If I were making a pine tree I might use triangles as branches or long rectangles placed at angle and overlapping in the center. Lay your shapes in the desired pattern on the poster board.

Mix some glue with a little water in your plastic cup. Use a paintbrush to apply the glue to the back of each shape and attach your pattern to the poster board. Paint a layer of glue over the top of the collage as well. This will seal the shapes and give the whole collage a smooth finish.

Return to main page.

My Current NaNoWriMo Word Count:

45336 / 50000 words. 91% done!

I’m struggling to write those last few thousand words.

Wednesday, November 28, 2007

NaNovel Excerpt 2

In celebration of finishing: another excerpt from the novel.
__________
Henri held the oil lamp and lighter in one hand and Emily’s wrist in the other. There was a restaurant straight across the boulevard and Henri didn’t bother to wait for the horses to trot their carriages out of his way before pulling Emily onto the cobbles. They hurried into the restaurant, making a scene, and one of the waiters took Emily into the kitchen to soak her hand in a tub of cool water.

“Your hand will keep burning unless you cool it off,” Henri explained, “so let it soak for a few minutes. “Do you have any clean cloths?” he asked the waiter. “Here, I’ll pay you.” He shoved his hand into his pocket and searched frantically, finally pulling out a few coins.

“No need, monsieur. Take the cloth. She needs it, we can see.”

“Thank you so much. Thank you.” Henri took the cloth.

“Emily, how’s your hand?” Andy asked. “Does it hurt any less?”

Emily nodded. “I think it’s cooling down.” She swished her hand slowly through the bucket of water. “Much better.” She pulled her hand out of the water and patted it dry on her apron before holding it out for Henri to wrap. Her hand was still very tender but her excitement about unsealing the cave occupied her mind more than the pain.

When Henri finished, Emily inspected the dressing. “Thanks. Ready to go?”

“You sure you’re okay?” Andy asked.

“Yes.” She took his arm with her good hand and began to walk toward the front of the restaurant. “Thank you, monsieurs,” she said to the waiters.
__________
My Current NaNoWriMo Word Count:

43633 / 50000 words. 87% done!
Started book 3!

Tuesday, November 27, 2007

Henri Matisse

Henri Matisse, born in 1869, began his working life doing administrative tasks for a court. As a gift, his mother gave him his first art supplies and he fell in love with painting.

He studied art in Paris where he painted mostly landscapes and still lifes. He was successful at this and the state even bought five of his paintings. In 1898, he discovered impressionism. A friend and fellow painter, John Peter Russell introduced him to the work of the impressionists including van Gogh who was still unknown and Gauguin. Matisse’s style changed completely following this discovery and color took center-stage in his paintings.

This love of color evolved into Fauvism, in which natural scenes are portrayed in unnatural, usually extremely bright, colors.

By the end of his life Matisse was thoroughly interested in patterns and from this interest came his
collages. Made from boldly hand-painted paper cut into shapes, Matisse’s collages were usually large works of simplicity. He create a book, Jazz, illustrated with these collages.


Shown below are two paintings by Matisse, Two Figures Reclining in a Landscape and The Red Madrass Headress. Notice the difference in style and color use.


EDITED TO ADD: Create Your Own Matisse Collage

Return to main page.

NaNoWriMo Word Count:


41902 / 50000 words. 84% done!
Yes: still behind but...
I FINISHED MY NOVEL!!!!!!

Monday, November 26, 2007

Collages

You have probably made a collage before by cutting out magazine pictures and gluing them to another sheet of paper to create a new picture or pattern. Many artists have also used this technique in their paintings. These artists include Pablo Picasso and Henri Matisse, who I’ll post articles and projects on during the next two weeks.

Picasso was the first to use collage in painting. In 1912 he glued a piece of cloth with a chair caning pattern, the woven part of the seat, to his painting Still Life with Chair Caning (shown below). This allowed him to use 3D to portray the things he saw.

For Matisse, collages were a way he could continue to create art when he fell sick late in his life. He hand-painted pieces of white paper with bold, solid colors and arranged them into pictures. The collages, such as Iccarus shown below, were then used in his book, Jazz.

Return to main page.

Current NaNoWriMo Word Count:

40552 / 50000 words. 81% done!
It’s the final countdown! Just 5 more days.