Friday, February 27, 2009

Create Your Own Seussian Birthday Adventure

If you’re about to complete this project in celebration of Dr. Seuss’ birthday, you have read Happy Birthday to You!. So you know what Dr. Seuss would do on his birthday if he could do anything in the whole world. What would you do?

Supplies Needed:

White Paper
Pencil
Markers
Dr. Seuss’ picture book illustrations were completed in pen and ink, so let’s use markers for our illustrations. The result will be pretty close.

Think about what you would do if you lived in Katroo and could have any wish in the world on your birthday. I would have a party on a pair of hot air balloons.

Draw your birthday adventure. Remember, you can celebrate with imaginary creatures or travel to anyplace in your imagination. It’s all up to you.

When you’re happy with your drawing, color it in with marker. You’ll want to outline most things in black first. If you look at Dr. Seuss’ drawings, he outlines in black, too.
Finally, write a few rhyming lines about your birthday adventure.

If you and your friends each create a page, you can put them together into your own birthday book.

Happy Birthday to You!
_____

Create Your Own Cat in the Hat Summary Hat

I guess I wouldn’t call this an art project. But it is an artistic way to present a summary. And it’s a great way to celebrate Dr. Seuss’ birthday on Monday.

Supplies Needed:

White Construction Paper
Red Construction Paper
Pencil
Glue Stick
Scissors

First, read Dr. Seuss’ The Cat in the Hat. Write a sentence each about the beginning, the rising action, the climax, the falling action, and the conclusion. You’ll use this later when you write your summary.

Draw a funky hat on your sheet of white paper. When you like what you’ve drawn, cut it out. Turn your hat over to the clean side. You don’t want all those pencil lines to show.
Cut out five strips of red construction paper and lay them across your white hat in stripes. Glue down the left end of each strip. Remember to press down on the glued section for about ten seconds before you move on to the next strip. Trim the extra red paper.

Flip up the first red strip and neatly copy your sentence about the beginning of the story. Then flip up the second red strip and copy your sentence about the rising action. Continue, in order, to write your summary sentences under the red strips.
Write the title of the book and the author's name on the brim of the hat.

Return to main page.

Thursday, February 26, 2009

Dr. Seuss

Wow. It’s Thursday already, huh? How’d your week go?

In celebration of his upcoming birthday (Monday), this week’s illustrator is Dr. Seuss. I have to assume that you have read some of his books or, at the very least, seen some of the movies made from his stories. So instead of reviewing a bunch of his books, I’m going to tell you a few fun facts about him, and then say a little about two books that will be used for the projects I’ll post tomorrow.

Dr. Seuss wasn’t always Dr. Seuss. He was born Theodor Seuss Geisel. In 1921 he went to Dartmouth College, where he wrote for the Dartmouth Jack-O-Lantern, the College’s humor magazine. He got into some trouble and, as punishment, the school told him that he could no longer work on the magazine. Well, Theodor didn’t like that option. He continued to write for the magazine under a new pen name—Seuss. The “Dr.” was added after he graduated.

In 1954, a study showed that children weren’t learning to read in school because they thought the books they were reading were boring. Dr. Seuss and his editor came up with a list of the most important words for kids to know how to read and Dr. Seuss wrote a rhyming story using only those words. He had written quite a few books that were well-liked and popular before this, but The Cat in the Hat was special. And kids liked it. It was a book they wanted to read again and again.

Interestingly, Dr. Seuss, though one of the most-beloved and well-known children’s book authors, never won a Caldecott Medal. Three of his books—McElligot’s Pool, Bartholomew and the Oobleck, and If I Ran the Zoo—were runners up, what we now call Caldecott Honor books.
_______
Since Monday is Dr. Seuss’ birthday, is there really a better book to read than his Happy Birthday to You!? This is the story of a place called Katroo where people can do as they wish on their birthdays. The Great Birthday Bird swoops into your home and takes you on a full-day birthday adventure. In Katroo, on your birthday, you can do anything you want. You can eat any food, make a mess, take home an exotic pet, and stay up all night at your birthday party where there are fireworks and a boat-sized birthday cake. Sounds like a great birthday to me!

The second project tomorrow will feature The Cat in the Hat. The story begins with two bored children on a rainy day. When the Cat in the Hat strolls into their home, he turns a boring day into a fun-filled adventure. But the cat’s antics create a huge mess that the children worry will never be cleaned up before their mom gets home.

Return to main page.

Friday, February 20, 2009

Create Your Own Graeme Base Creature

Yesterday you read about a few of Graeme Base’s picture books. Hopefully you’re read at least a few.

Graeme Base does a lot of research for each of his illustrations. He learns about the direction a zebras stripes run, the way a toucan’s beak is colored, the way a rhino’s legs bend. He takes that information and adds his own ideas to create illustrations that are full of fun and fantasy.

Today, create your own imaginary animal (without all the research!). This is simple project but you’ll need a big imagination to complete it.

(You should know that Graeme Base doesn’t use oil pastels to create his illustrations. He uses paint and sometimes colored pencils on top. He does use tracing paper to make different versions of his drawings before painting the final product, though.)

Supplies Needed:

Thin Paper (such as sketch paper)
Pencil
Oil Pastels
Q-Tips
It’s completely up to you what you want to draw. Maybe you want to combine a hippo with a canary. Maybe you want to draw a dog that can breathe underwater. Maybe you’ll create something completely new that no one has ever heard of before. It’s completely up to you.

Start by sketching your creature. When you’re completely happy with it, trace over the lines so they’re nice and dark. Lay another sheet of thin paper over your sketch and tape the two sheets together.
Now color your drawing using oil pastels. Because oil pastel smears pencil, your artwork will come out much cleaner if you don’t color straight onto the pencil drawing.

Remember that you can blend oil pastels together by rubbing over them with a Q-Tip. Experiment with the pastels by blending different colors together. Your imaginary animal can be any colors you want so you can’t make a mistake with color. Continue to play with the pastels until you are happy with your creation. If you and several of your friends are all creating imaginary creatures, you might think about cutting out your animals and using a glue stick to attach them to one background page. Then you’ll have a forest full of creatures!

When you’ve finished, name your creature and write a story about it. This would be especially fun if you and a group of friends worked together on a story starring all of your creatures.

Return to main page.

Thursday, February 19, 2009

Graeme Base

Graeme Base is one of those illustrators who covers every millimeter of page with color. Every time you read a book by Graeme Base you will discover something new in the illustrations. I have not, unfortunately, had the pleasure of reading every book Graeme Base has ever written, but I have read quite a few. Today, I’d like to share a few of my favorites.

Uno’s Garden tells the story of a man named Uno who moves into the forest and builds a small house. When he arrives, there are all kinds of amazing animals, created and named by Graeme Base. There are Moopaloops, and Lumpybums, Snagglebites and Flipperflaps, and one completely ordinary Snortlepig. But over time, people move into the forest and put up buildings. The plants and animals slowly disappear until there are none left. Eventually the people realize their mistake—they have thrown off the balance between humans and nature. Over generations, they put the forest back in order so the plants and animals can return.

Not only is this a wonderful story with fantastic illustrations, but it teaches about environmental issues as well as natural and manmade resources. Furthermore, in the upper right corner of each page is a tally. Each tally tells, in pictures and numbers, how many of each animal, plant, and building can found in the forest and on the page. The animals increase by one each page, the plants are always the number of animals squared (2 X 2, 3 X 3, etc.), and the buildings double. Would you like a little math with your story book? The tallies turn every page into a seek-and-find. Those are always fun.

The Water Hole also deals with natural resources. In the wilderness there is a large water hole that all the animals want to drink from. First, one rhino drinks from the water hole. He is soon joined by two tigers, then three toucans. Soon, there are hundreds of animals drinking from the water hole. But as the animals drink from the hole, it becomes smaller and smaller (and the dye cut circle in the center of Graeme Base’s genius illustrations becomes smaller and smaller, too).

I especially love the way Graeme Base shows the animals talking. He writes out the noises they make and then translates them in parentheses!

And finally, the very first Graeme Base book I ever read, The Worst Band in the Universe. This book will always hold a special place in my heart. It is much longer than the other two books I talked about today and it is recommended for kids aged 9-12.

On the planet Blipp, no one is allowed to create new music. They can only play ancient music. But Sprocc longs to create and perform new songs.

One day Sprocc plays a new song and the Musical Inquisitor becomes enraged. Sprocc knows that if he cannot create new music on Blipp then it is not the place for him. He leaves his home for a new planet, one where he can play his own music.

On this planet, called Squaag, he finds a contest that seeks the worst band in the universe. He is told that on Squaag it is better to be the worst band than the best, that here the meanings are reversed. As Sprocc soon discovers, though, it’s all a trap.

You’ll have to read the book yourself, though. I don’t want to ruin all the twists of this clever rhyming story. The wacky and aliens and their foreign instruments make the illustrations this book perfectly suited to older children.

There are many more great books by Graeme Base. Among his most beloved are Animalia and Eleventh Hour. Check out any of his books and you will certainly be delighted.

Return to main page.

Wednesday, February 18, 2009

Great Children's Book Illustrators

There are many great children's book illustrators. Sometimes the artwork in picture books blows me away. So it's about time I started posting about some of this great art.

You've already read about Eric Carle and maybe created your own painted tissue paper Valentines. Awhile back, I reviewed a book called The Secret Art of Dr. Seuss, which you may remember. But that's it. Three posts out of 350 were about children's book illustrators...

So in the coming weeks, beginning tomorrow, I will post Fantastic Fiction Friday on Thursday. On Friday, you'll find a project related to that week's illustrator.

I'm so excited about this.

If you've been looking for projects that relate to a specific book or illustrator, leave me a comment. No guarantees, but I'll do my best to post a project for you.

Up first: Graeme Base.

Return to main page.

Tuesday, February 17, 2009

Paint Your Own Aboriginal Boomerang

You learned yesterday that Aboriginal artists in the desert often paint on objects like rocks, water carriers, and boomerangs. Today, paint your own Aboriginal boomerang.

Supplies Needed:

Construction Paper
Pencil
Scissors
Boomerang Tracer (optional)
Paint
Paintbrush
Q-Tips
Cover your workspace.

Choose a piece of construction paper. Any color will work, but I recommend using brown, yellow, orange, or black. I chose to use orange.

If you have a boomerang tracer, trace it onto your construction paper. If not, draw your own boomerang. Look at my example at the bottom of the page to help you with the shape.

Use your paintbrush to paint some shapes onto your boomerang. I drew two watering holes (circles) and some animal tracks (squiggly lines).

Using a different Q-Tip for each color, outline your shapes with dots. When you do this, you are making concentric shapes, just like the Aboriginal desert artists.
Cover your entire boomerang with paint. Let it dry, then hang it and enjoy!

Return to main page.

Monday, February 16, 2009

Aboriginal Art, Part III- Desert Art

Aboriginal artists living in the desert have many of the same beliefs as those living in Arnhem Land and the Kimberley region. If you need to, please refresh your memory on what those beliefs are.

In the 1950s, the Aborigines from several desert areas were moved to Papunya in the center of Australia. The Aborigines were forced to move because the Australian government needed their land to graze cattle on. The government also wanted to mine on the Aborigines’ land. The Aborigines were not happy about the move.

Most Aborigines living in the desert had lost interest in creating art. But in 1971, a teacher encouraged them to paint murals. He brought art supplies to the Aborigines, and children and adults alike began to love creating art. This love of art spread and now many desert artists earn their livings painting.

In Aboriginal desert art, you’ll see a lot of circles. These circles are usually meant to show water holes. Water, as you can imagine, is very important in the desert. Sometimes the circles are holes that have been dug by animals.

Sometimes desert artists paint animals, but you will notice far more animal tracks than actual animals in their art work.

Desert art includes a lot of concentric shapes. This means that the artist paints a shape, then outlines it in another color, then another color, then another color. Usually, these shapes are made up of many tiny dots. You’ve seen dots in Aboriginal art from Arnhem Land and Kimberley, but the desert artists often cover nearly their entire pieces with dots. To me, the dots look like grains of sand. What do you think?

Desert artists are also known for painting on objects such as boomerangs, water carriers, rocks, and even bodies.

Enjoy this gallery and this gallery of Aboriginal art from the desert. If you click on a painting, you can read its story.

Return to main page.

Thursday, February 12, 2009

Aboriginal Art, Part II- The Kimberley Region

In the Kimberley area, Aborigines usually paint on canvas or board. Sometimes they paint on bark like the Aboriginal artists in Arnhem Land that you read about on Tuesday.

Artists in the Kimberley area use natural colors made from natural materials, but they also use manufactured acrylic paints. This means that they can use a wide variety of colors in their paintings.

The Kimberley artists believe many of the same things that artists in Arnhem Land believe. You’ll see a lot of animals in their artwork because they believe, like Arnhem Land Aborigines, that the land was created to look like animals.

They also paint pictures that show weather such as cyclones and dust storms. These paintings don’t look like photographs, though. Sometimes artists choose to show the path a storm takes rather than the storm itself. Sometimes the artist does paint the storm, but in an abstract way.

Aborigines in the Kimberley area have a myth that is often portrayed in art from the area. According to the myth, creatures called Wandjina came out of the sea and sky and left paintings of themselves on rocks. The spirits of the Wandjina are believed to live in the places where their images appear. They were very powerful and could even control weather. Sometimes they brought good luck, but if they were made angry they could create heavy rains or floods or cyclones.

The Wandjina look human, with thick noses, long eyelashes, and halos or spiky hair. They are usually painted on a white background in yellow, red, or black.

Check out this photo gallery of people creating and enjoying artwork from the Kimberley region. See if you can find the painting of Wandjina.

Return to main page.

Wednesday, February 11, 2009

Create Your Own Aboriginal Bark Painting

Yesterday you learned that the Aborigines, the native people of Australia, paint on tree bark. They paint animals, animal tracks, spirits, and scenes that illustrate their beliefs. Today, paint your own animal on “bark,” just like the Aborigines.

Supplies Needed:

Paper Bag
Paints
Paintbrush
Q-Tips (optional)
Like any time you paint, cover your workspace before you begin.

Choose one or two animals that can be found in Australia. I chose a snake and a lizard. Other great options include kangaroos, koala bears, and emu.

The Aborigines paint on the smooth inside of the bark, but my paper bag had some ridges in it. To make it more even, I crumpled up the bag and then smoothed it back out.

Decide on a background color. I chose black but you could pick brown, white, or orange. Paint your “bark” with whichever color you choose. Let it dry before you continue. Mine took about 30 minutes to dry.

Paint your animals onto the bag. Let them dry.
Now add in details and patterns. You may wish to paint stripes onto your animal, or triangles and dots onto the background. (Q-tips are great for making dots.) This is the fun part so go crazy. If you need some inspiration, look at this gallery of bark paintings.

When you have finished your painting, and it has dried, you may decide to tear away any extra paper. That’s why the edges of my painting look fuzzy and brown. This is a great thing to have an adult help you with. You’ll want to be careful not to rip any part of your painting.
Hang your bark painting and enjoy!

Return to main page.

Tuesday, February 10, 2009

Featured!

Plaid Kids Crafts has featured my Eric Carle inspired Valentines post. Check it out, along with many other great arts and craft projects, at their website.
Return to main page.

Valentine Boxes

Just came across this adorable Valentines Day project. I love the little boxes with the drawings on them.

Since I wasn't the only person to wonder about sending unwrapped candy to school, you might want to try individually wrapped hard candies or Starbursts (always a kid-pleaser).

More Aboriginal art to come...

Return to main page.

Aboriginal Art, Part I- Bark Painting

Aborigines have lived in Australia for thousands of years. They are the natives of Australia, just like Native Americans are the natives of the U.S. Aborigines have a long history of creating beautiful art that shows their beliefs, Australian animals, and even the weather that is typical of parts of Australia.

Over the next few days, I’ll be posting about the art of the Aborigines.

A lot of Aboriginal art shows the beliefs of the native Australians. The Aborigines believe that magical creatures lived on earth long before humans did. These creatures created the earth from flat land. Aborigines believe that all the land forms were created in the shapes of animals. For example, rivers were created in the shape of a snake.

In northern Australia, in an area called Arnhem Land, Aboriginal artists often paint on bark. The artists strip the bark off of eucalyptus trees. They let the bark dry and then paint on the inside of the bark. They use natural colors like brown, yellow, white, and orange.


The patterns and designs used in bark painting have been around for a long time. They were painted on bodies during rituals and used to decorate logs during certain ceremonies. Aboriginal artists began painting on pieces of bark about 100 years ago.

The artists paint scenes about the way the land was created. These paintings usually include animals because many of the Aboriginal myths were about animals.

The Aborigines also have myths about spirits who were so skinny they could be broken by wind. They lived in caves and under rocks where they were safe from the wind. They taught the Aborigines to hunt and to paint. These spirits, called Mimis, are found in many Aboriginal bark paintings.

Some paintings show constellations. The Aborigines see different pictures than we do when they look at the stars, though. Their constellation paintings often include animals, too.

You will also see paintings of footprints and paw prints. This is because the Aborigines are good at tracking animals and they are good hunters. The Aborigines hunt for food so hunting is very important to them.

Check out this gallery of Aboriginal bark painting from Arnhem Land.

Tomorrow, create your own Aboriginal bark painting!

Return to main page.

Saturday, February 7, 2009

Sir Cumference and the Great Knight of Angleland by Cindy Neuschwander

I waited until Saturday to post this week’s Fabulous Fiction Friday post not because I forgot, but because I wanted to tell you about a book that is not related to art. Gasp.

But since we were talking about angles yesterday, I thought the story of a knight who uses angles to complete a quest would be a great choice for this week’s book.

Sir Cumference and the Great Knight of Angleland, written by Cindy Neuschwander and illustrated by Wayne Geehan, is the story of Radius and his quest to find his neighbor, King Lell. Armed with only a circular medallion (a compass), Radius travels through a cute little town full of houses whose roofs connect at small angles. He then makes his way through the mountains of Obtuse. Finally, he must solve a series of angle-related challenges to make his way through the castle to rescue King Lell.

This book is full of math puns (which I love), and even includes two dragons that belong to King Lell (the “pair of Lell’s”).

This is a fun story and a great introduction to angles.


Return to main page.

Thursday, February 5, 2009

Art Angles

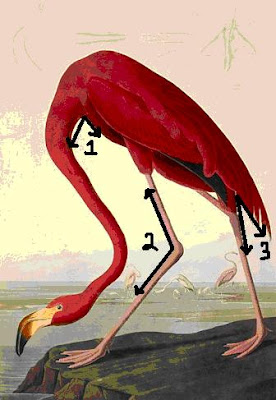
I've been working on a lesson plan for one of my classes and I thought you might be interested in some of the materials I've been preparing. The lesson is meant to teach 3rd graders to indentify right angles, acute angles, and obtuse angles. One of the activities I've been readying is a set of note cards with pictures on them. In the pictures, I've traced some of the angles and numbered them. The students are to tell whether each angle is right, acute, or obtuse. They are then to label each angle ABC. My note cards will be laminated so the students can label them and then erase them. This means I'll be able to reuse them.

Some of my images are photographs of objects like trees, fenses, and planes. Some, of course, are pictures of artwork. The artwork is below. If you want to use the images, copy them into a word document and resize them so they fit on note cards.

In order: 1. John James Audubon's Flamingo, 2. Pierre-Auguste Renoir's Girls at the Piano, 3. Henri Matisse's Jazz, 4. a Greco-Roman bronze sculpture called Boy with Thorn, 5. Gustave Courbet's Cliffs Near Etretat, 6. an Egyptian sculpture of Akhenaten, 7. Andre Derain's The Turning Road, 8. and a color field painting by Piet Mondrian.

Enjoy!


Return to main page.

Wednesday, February 4, 2009

P.S.

I love when you all do my job for me! First Michelle with the project, then, this morning, my mom sent me a link to the Eric Carle Museum of Picture Book Art. If you live in Massachusetts, check it out. I'd love to read comments from anyone who has ever been to this museum.

Create Your Own Eric Carle Inspired Valentines

On Friday I recommended one of Eric Carle’s picture books, Draw Me a Star. Eric Carle is such a fantastic author and illustrator. He wrote and illustrated The Very Hungry Caterpillar and The Tiny Seed, and he illustrated Brown Bear, Brown Bear, What Do You See?. And there are tons more. If you haven’t read any of his books, please do so. You will be delighted.

Michelle left a comment about the slide shows on Eric Carle’s website that shows how he
paints his tissue papers and how he creates his pictures. I had not discovered those, so thanks!

She also linked to a photo of a piece of artwork she created following Carle’s instructions. It’s gorgeous.
Make sure you check it out.

Carle also wrote and illustrated You Can Make a Collage: A Very Simple How-to Book. In this book, put out by Klutz, Carle shows you step-by-step how to create collages using painted tissue paper. The book comes with 72 painted tissue papers to create your own masterpieces with, and the book is full of great ideas for beautiful artwork.

I was inspired by all of this and thought, since Valentines Day is coming up, we might like to make our own Eric Carle inspired cards. Mine came out looking lovely and they weren’t too difficult to make, though it did take time and patience!

Supplies Needed:

Paints
Paintbrush
White Tissue Paper
Small Container
Water
Heart-shaped Tracers
Scissors
Construction Paper
Mod Podge or White Glue thinned with water
Foam Brush

Cover your workspace! I’m serious about this. The paint WILL bleed through the tissue paper.

Lay your tissue paper flat on your workspace

Choose a background color. Squirt some of that paint into your container and mix with about the same amount of water. Use quick, light brush strokes to cover your tissue paper with the paint. If you brush too hard you’ll tear your tissue paper. If this happens, it’s okay. You won’t need every inch of the tissue paper. Just keep going.
Let your tissue paper dry. Eric Carle recommends using this time to paint more sheets of tissue paper in different colors. I only used one sheet but you may want more than one pattern or color. Your tissue paper will need to dry for about 30 minutes.

Choose a second color. Mix the paint with water and brush parts of the tissue paper with it. I painted white slashed across my tissue paper. You may choose to paint zig-zags, dots, or swirls.

Let the tissue paper dry again.

Choose a third color. Mix with water and paint on a new pattern.
I used four colors but you may decide to use only three or try five. It’s all up to you and your imagination. Just remember to let your tissue paper dry after each new layer of paint.
When your finished tissue paper is dry, trace hearts of different sizes onto your paper. Try to fit as many hearts as you can. Carefully cut out the hearts.
Choose construction paper, fold it in half, and cut it into two cards. Repeat until you have as many cards as you wish to make.

Use your foam brush to brush Mod Podge onto the front of your card. White glue mixed will water will also work, but your card will not lay as flat. Stick your hearts in place. Gently brush another layer of Mod Podge over the hearts. Cover the entire front of your card with Mod Podge to make it smooth.
Repeat until you have decorated all of your cards.

Write special Valentines Day messages on the insides of the cards and give them to your friends and family. I’m sure they’ll love them!

Return to main page.