


Seen Art? by Jon Scieszka and Lane Smith is a fun story about a boy who is trying to find his friend in New York City. The confusion starts when the boy asks a passerby, “seen Art?” You see, the boy’s friend’s name is Art! The boy heads into the Museum of Modern Art to look for him and he finds art, just not the Art he was looking for.
Jon Scieszka always writes with a humor that boys love. This book would make a great gift for that kindergarten or first grade art lover on your list. Bundle it with art supplies and maybe some instructions for art projects that you found here at Art Smarts 4 Kids!
Return to main page.
Friday, December 12, 2008
Wednesday, December 10, 2008
Create Your Own Snowman Ornament
I love making Christmas ornaments. This weekend it snowed enough to stick to the ground, if only briefly, and I thought about all the wonderful things that snow allows you to do. And then I realized that there are no snowmen on my Christmas tree! That was an easy problem to solve. Today, create your own snowman Christmas ornament.
Supplies Needed:
Salt Ceramic (see instructions here)
*Salt
*Cornstarch
*Water
Pipe Cleaner
Googley Eyes
Beads
Ribbon
Paint
Small Paintbrush
Scissors
Ask an adult to make some salt ceramic for you. Directions can be found here.
 When the salt ceramic is cool to the touch, mold it into three balls: a large, a medium-sized, and a small. These will be the bottom, middle, and head of your snowman. Your entire ornament should be no longer than four inches. Salt ceramic is heavy and your tree would be able to hold an ornament that is much larger. You can make a larger snowman if you want it to stand up. Just make sure it dries standing.
 Twist the bottom of your pipe cleaner into a knot. Push the pipe cleaner through the large ball, then the medium-sized ball, then the small ball. Twist the top of the pipe cleaner into a hook. Cut off the extra and set it aside.
Choose two googley eyes and press them into the face of your snowman. Add a bead for the nose. Then press three more beads into the middle ball. These are the snowman’s buttons.
Cut the piece of leftover pipe cleaner into two pieces. Push these into the snowman’s body. They are the arms.
Tie a piece of ribbon around the snowman’s neck.
Finally, paint on the snowman’s mouth.
 I chose to make a snow woman, as you can see. You could make a snow woman, a snowman, or even a snow animal by adding ears and painting on whiskers. Let your imagination guide you!
Let the snowman dry. Then hang it on your Christmas tree.
Return to main page.
Supplies Needed:
Salt Ceramic (see instructions here)
*Salt
*Cornstarch
*Water
Pipe Cleaner
Googley Eyes
Beads
Ribbon
Paint
Small Paintbrush
Scissors
Ask an adult to make some salt ceramic for you. Directions can be found here.
When the salt ceramic is cool to the touch, mold it into three balls: a large, a medium-sized, and a small. These will be the bottom, middle, and head of your snowman. Your entire ornament should be no longer than four inches. Salt ceramic is heavy and your tree would be able to hold an ornament that is much larger. You can make a larger snowman if you want it to stand up. Just make sure it dries standing.Twist the bottom of your pipe cleaner into a knot. Push the pipe cleaner through the large ball, then the medium-sized ball, then the small ball. Twist the top of the pipe cleaner into a hook. Cut off the extra and set it aside.Choose two googley eyes and press them into the face of your snowman. Add a bead for the nose. Then press three more beads into the middle ball. These are the snowman’s buttons.
Cut the piece of leftover pipe cleaner into two pieces. Push these into the snowman’s body. They are the arms.
Tie a piece of ribbon around the snowman’s neck.
Finally, paint on the snowman’s mouth.
I chose to make a snow woman, as you can see. You could make a snow woman, a snowman, or even a snow animal by adding ears and painting on whiskers. Let your imagination guide you!Let the snowman dry. Then hang it on your Christmas tree.
Return to main page.
Tuesday, December 9, 2008
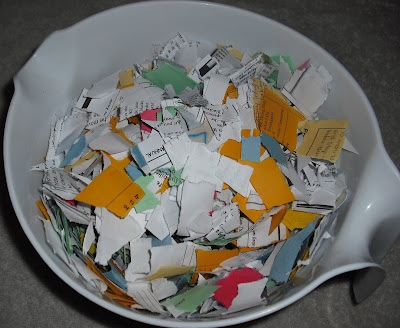
Handmade Gift: Make Your Own Paper
Handmade Gifts are great. Taking the time to make your own gifts shows your loved ones how much you care. It’s also fun!
Today, I’ll show you how to make your own paper. You can then turn that paper into stationery sets or bind it together to create beautiful, handmade journals.
Supplies Needed:
Paper from your recycle bin
Large bowl
Blender
Brownie pan
Acrylic paint
Mesh screen
Towels
Water
Tear your paper into small pieces and place them in your bowl. Squares about 1 inch by 1 inch are fine. Add hot water and soak your paper for about 30 minutes.
 Have and adult help you pour your paper-and-water mixture into your blender. Blend the paper until it becomes thick and pulpy.
Pour the mixture back into the bowl and take it to your protected work space.
 Choose a color for your paper. I decided to make mine blue. Add paint to the pulp and mix with your hands until the pulp is the color you wish your paper to be. Keep in mind that the paper with look lighter after it dries.
Move a few handfuls of the pulp into your brownie pan. Cover with more water.
Cut a piece of screen slightly larger than you want your sheets of paper. You want to use a sturdy piece of screen. I choose a flexible piece of screen and it was difficult to keep the pulp on the screen.
 Dip the screen into the mixture and cover with a thin layer of pulp. Allow the water to drain through the screen, then move your screen to a towel. Flip the screen so the pulp is directly on the towel and the screen is facing up. Fold your towel over the screen and let it soak up some of the water.
 Remove the screen and repeat.
Your paper will need to dry for about a day.
Finally, cut the paper to the size you want, or leave the edges unfinished. You may wish to decorate your paper with a stamp at the top or bottom. Be sure to leave enough room to write on it.
I hope you enjoy creating your own handmade paper gifts and I’m sure your friend or family member will love your creation!
Return to main page.
Today, I’ll show you how to make your own paper. You can then turn that paper into stationery sets or bind it together to create beautiful, handmade journals.
Supplies Needed:
Paper from your recycle bin
Large bowl
Blender
Brownie pan
Acrylic paint
Mesh screen
Towels
Water
Tear your paper into small pieces and place them in your bowl. Squares about 1 inch by 1 inch are fine. Add hot water and soak your paper for about 30 minutes.
Have and adult help you pour your paper-and-water mixture into your blender. Blend the paper until it becomes thick and pulpy.Pour the mixture back into the bowl and take it to your protected work space.
Choose a color for your paper. I decided to make mine blue. Add paint to the pulp and mix with your hands until the pulp is the color you wish your paper to be. Keep in mind that the paper with look lighter after it dries.Move a few handfuls of the pulp into your brownie pan. Cover with more water.
Cut a piece of screen slightly larger than you want your sheets of paper. You want to use a sturdy piece of screen. I choose a flexible piece of screen and it was difficult to keep the pulp on the screen.
Dip the screen into the mixture and cover with a thin layer of pulp. Allow the water to drain through the screen, then move your screen to a towel. Flip the screen so the pulp is directly on the towel and the screen is facing up. Fold your towel over the screen and let it soak up some of the water.Remove the screen and repeat.Your paper will need to dry for about a day.
Finally, cut the paper to the size you want, or leave the edges unfinished. You may wish to decorate your paper with a stamp at the top or bottom. Be sure to leave enough room to write on it.
I hope you enjoy creating your own handmade paper gifts and I’m sure your friend or family member will love your creation!
Return to main page.
Monday, December 8, 2008
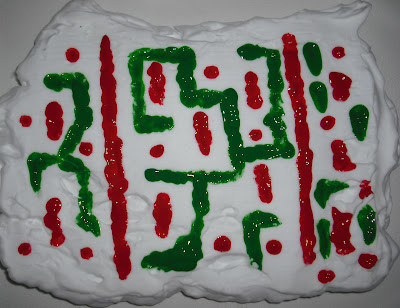
Create Your Own Marbled Christmas Cards
You may remember the marbling project I posted awhile back. I thought red and green marbled paper would make lovely Christmas cards. Mine can out nicely. Try it for yourself.
Supplies Needed:
Foam Shaving Cream
Blank Note Cards or Heavy Paper
Paint
Paintbrush
Cardboard
Plate or Tray
 Spray a layer of shaving cream, about half and inch thick, onto the plate. Use the edge of a piece of cardboard to smooth the surface.
 Paint on the surface of the shaving cream. Just scatter your colors across the top. The pattern doesn’t matter unless you’re trying to create a picture (see below). If you use washable paint for this project, your paint will run together when you remove the shaving cream from the card. I do not recommend it.
 Use the back of your paintbrush to swirl the paint around. When you like the marbled effect, press the front of your card into the shaving cream. Lift the card straight up and set aside.
Allow your card to dry for a few minutes, then use the edge of a clean piece of cardboard to scrape the shaving cream off the note card. Only the paint will remain.
 If you wish to make a picture, like a Christmas tree or a stocking, dab the paint in the general shape you wish to make. Swirl each part of the picture separately. For example, in the Christmas tree card below, I swirled the green, then wiped the end of my brush, then swirled the blue. I didn’t want my colors to mix.
 If you want, decorate your cards with words, glitter, or colored paper.
Place in envelopes and send to your friends and family. They are sure to enjoy these beautiful, handmade cards!
Return to main page.
Supplies Needed:
Foam Shaving Cream
Blank Note Cards or Heavy Paper
Paint
Paintbrush
Cardboard
Plate or Tray
Spray a layer of shaving cream, about half and inch thick, onto the plate. Use the edge of a piece of cardboard to smooth the surface.Paint on the surface of the shaving cream. Just scatter your colors across the top. The pattern doesn’t matter unless you’re trying to create a picture (see below). If you use washable paint for this project, your paint will run together when you remove the shaving cream from the card. I do not recommend it.Use the back of your paintbrush to swirl the paint around. When you like the marbled effect, press the front of your card into the shaving cream. Lift the card straight up and set aside.Allow your card to dry for a few minutes, then use the edge of a clean piece of cardboard to scrape the shaving cream off the note card. Only the paint will remain.
If you wish to make a picture, like a Christmas tree or a stocking, dab the paint in the general shape you wish to make. Swirl each part of the picture separately. For example, in the Christmas tree card below, I swirled the green, then wiped the end of my brush, then swirled the blue. I didn’t want my colors to mix.If you want, decorate your cards with words, glitter, or colored paper.Place in envelopes and send to your friends and family. They are sure to enjoy these beautiful, handmade cards!
Return to main page.
Thursday, December 4, 2008
Create Your Own Striped Christmas Cards
Today you’ll use the method you learned yesterday to make beautiful, handmade Christmas cards that your friends and family will love.
Supplies Needed:
Heavy Paper
Washable Paints
Paintbrush
Spray Bottle
Cookie Sheet
Tape
Pencil
Colored papers
Stamps
Markers
Glitter
 Tape a sheet of heavy paper to your cookie sheet. Use your paint brush to dab blobs of red and green paint across the top of your paper.
Set your spray bottle to mist and sprits the paint with water until it runs down the page. I found that the red paint overpowered the green paint, so I added more dots of green and continued to spray.
 Let your paper dry.
Now for the card making. I used blank note cards but you can use heavy paper, folded in half if you don’t have any blank note cards.
What you do next is completely up to you. Use your imagination to combine your materials and see what you come up with.
 I began by tracing the shape of my note card onto my striped paper. I cut it out and then cut a window out of its center. I then cut a square of green construction paper and used a stamp to print a stocking in the middle. I sprinkled the stocking with glitter while it was still wet, then tapped off the extra. Finally, I glued all the pieces to the front cover of my note card.
 If you have trouble cutting perfect straight lines out of the middle of paper, try cutting abstract shapes instead. Notice my green card with the snowflake and the Christmas tree.
 If you’re careful with your striped paper, you can make five or more cards using the same sheet of paper.
Write your holiday wishes inside your cards, slide them into envelopes, and mail them to your friends and family. They will certainly smile at your thoughtfulness.
More Christmas card ideas to come next week. Check back tomorrow for Fantastic Fiction Friday.
Return to main page.
Supplies Needed:
Heavy Paper
Washable Paints
Paintbrush
Spray Bottle
Cookie Sheet
Tape
Pencil
Colored papers
Stamps
Markers
Glitter
Tape a sheet of heavy paper to your cookie sheet. Use your paint brush to dab blobs of red and green paint across the top of your paper.Set your spray bottle to mist and sprits the paint with water until it runs down the page. I found that the red paint overpowered the green paint, so I added more dots of green and continued to spray.
Let your paper dry.Now for the card making. I used blank note cards but you can use heavy paper, folded in half if you don’t have any blank note cards.
What you do next is completely up to you. Use your imagination to combine your materials and see what you come up with.
I began by tracing the shape of my note card onto my striped paper. I cut it out and then cut a window out of its center. I then cut a square of green construction paper and used a stamp to print a stocking in the middle. I sprinkled the stocking with glitter while it was still wet, then tapped off the extra. Finally, I glued all the pieces to the front cover of my note card.If you have trouble cutting perfect straight lines out of the middle of paper, try cutting abstract shapes instead. Notice my green card with the snowflake and the Christmas tree.If you’re careful with your striped paper, you can make five or more cards using the same sheet of paper.Write your holiday wishes inside your cards, slide them into envelopes, and mail them to your friends and family. They will certainly smile at your thoughtfulness.
More Christmas card ideas to come next week. Check back tomorrow for Fantastic Fiction Friday.
Return to main page.
Wednesday, December 3, 2008
Create Your Own Morris Louis Stripe Painting
Morris Louis created his paintings a little differently, but you can create your own stripe paintings like his.
Supplies Needed:
Cookie Sheet
Heavy Paper
Washable Paints
Paintbrush
Spray Bottle
Tape
Paper Towels
This project is a lot of fun, but it can get messy. Make sure you cover your work space and have paper towels handy.
Use a small piece of tape to attach your paper to the cookie sheet.
Dab blobs of different colored paint in a line across the top of your paper. You don’t need a lot of paint to create stripes.
 Set your spray bottle to a wide spray. Water should mist out of the bottle. Angle your bottle downward and spray the paint blobs until they begin to run. Continue to spray until most of the paint has run down the page.
 Use a paper towel to catch the extra water. You may also want to use a paper towel to blot the bottom of your paper.
Voila! Your very own stripe painting!
Tomorrow I’ll show you how to use this technique to make fun, homemade Christmas cards.
Return to main page.
Supplies Needed:
Cookie Sheet
Heavy Paper
Washable Paints
Paintbrush
Spray Bottle
Tape
Paper Towels
This project is a lot of fun, but it can get messy. Make sure you cover your work space and have paper towels handy.
Use a small piece of tape to attach your paper to the cookie sheet.
Dab blobs of different colored paint in a line across the top of your paper. You don’t need a lot of paint to create stripes.
Set your spray bottle to a wide spray. Water should mist out of the bottle. Angle your bottle downward and spray the paint blobs until they begin to run. Continue to spray until most of the paint has run down the page. Use a paper towel to catch the extra water. You may also want to use a paper towel to blot the bottom of your paper.Voila! Your very own stripe painting!
Tomorrow I’ll show you how to use this technique to make fun, homemade Christmas cards.
Return to main page.
Monday, December 1, 2008
Morris Louis
Morris Louis was born in Baltimore, Maryland in 1912. His name was Morris Louis Bernstein but he dropped the Bernstein in the late 1930s. He studied art at the Maryland Institute of Fine and Applied Arts but he left school before finishing the program.
He went to New York in 1936. Louis helped with some workshops that helped artists use unusual tools, like spray guns, to create art. These workshops helped grow the Abstract Expressionist movement.
Louis didn’t stay in New York for long. In 1940 he moved back to Baltimore and began showing his work. A group of local artists liked his work and convinced him to teach them.
Louis moved to Washington, D.C. in 1952 and started teaching at the Washington Workshop Center of the Arts. He didn’t have many friends in the art world and didn’t travel much to learn about new styles of painting. While in D.C., Louis met artist Kenneth Noland. Noland took Louis to New York where he saw the work of many new artists. One artist, Helen Frankenthaler, really inspired Louis. This painting, Mountains and Sea, especially moved him. Frankenthaler had stained the canvas rather than just painting it. Louis would try this method when he returned to D.C.
Louis began a series of paintings that he called Veils. To create his Veils, Louis poured paint onto a canvas and then poured thin black paint over the colors. Check out this Veil painting.
When he had finished his Veil paintings, Louis didn’t know what to paint next. He wasn’t happy with anything he created and he destroyed about 300 paintings.
Finally, in 1960, Louis began painting another series, called Unfurleds. In these paintings, Louis painted stripes of bright color that began in the upper corners and met at the bottom center in a V-shape. This is a great example on an Unfurled painting.
Morris Louis created one more famous series of paintings, called Stripes. The Stripes paintings featured slightly overlapping stripes of bright colors that began part way down the canvas and ran off the bottom. Louis’ Stripe paintings are my favorites. Check out this one and this one.
Louis died in 1962.
Tomorrow: A Morris Louis project.
Return to main page.
Final NaNoWriMo Update 2008
Now that NaNoWriMo has ended, I want to tell you how I fared in this year's National Novel Writing Month. As you know, I reached 50,000 words on November 25th. Today, I finished the month at 60,040 words! And THE END were the final two! This year was very successful, mainly because there was a great group of other writers in my area who were also working on NaNovels. We helped each other a lot this month with support and encouragement.
In case you're interested, below is a graph that shows my progress throughout NaNoWriMo 2008 in comparision to last year. Can't wait to add a third line next year!

In case you're interested, below is a graph that shows my progress throughout NaNoWriMo 2008 in comparision to last year. Can't wait to add a third line next year!
And now, on to December. May it be filled with art projects.
Saturday, November 29, 2008
Math Curse by Jon Scieszka and Lane Smith
What is this? A bonus post? Hmmm.
Happy Saturday. Saturdays are reserved for those rare times when I want to say something that has nothing to do with art.
I want to recommend a great book by Jon Scieszka and Lane Smith called Math Curse. A boy’s teacher, Mrs. Fibonacci, suggests that “you can think of almost everything as a math problem.” When the boy wakes up the next morning, math is all around him. It’s in his morning routine, it’s at lunch, it’s in social studies, English, and P.E. classes. The boy just can’t escape the math curse!
There are references to math concepts that students won’t learn until middle school or high school but they’re subtle. For instance, though the math teacher’s name is Mrs. Fibonacci, it doesn’t matter that a third grader wouldn’t know what the Fibonacci Sequence is. I think this would be a great book to read to upper-elementary-level math students on the first day of class.
There is another book in this series, Science Verse, that I do not recommend for young students. Unlike Math Curse, when reading Science Verse it is important to understand the upper-level science concepts to find enjoyment in the book. If you read Science Verse to elementary school students, you would have to spend a lot of time explaining ideas.
Enjoy the rest of your weekend!
Return to main page.
___________________________
My Current NaNoWriMo Word Count:
56140 / 60000 words. 94% done!
One more day to go!
Happy Saturday. Saturdays are reserved for those rare times when I want to say something that has nothing to do with art.
I want to recommend a great book by Jon Scieszka and Lane Smith called Math Curse. A boy’s teacher, Mrs. Fibonacci, suggests that “you can think of almost everything as a math problem.” When the boy wakes up the next morning, math is all around him. It’s in his morning routine, it’s at lunch, it’s in social studies, English, and P.E. classes. The boy just can’t escape the math curse!
There are references to math concepts that students won’t learn until middle school or high school but they’re subtle. For instance, though the math teacher’s name is Mrs. Fibonacci, it doesn’t matter that a third grader wouldn’t know what the Fibonacci Sequence is. I think this would be a great book to read to upper-elementary-level math students on the first day of class.
There is another book in this series, Science Verse, that I do not recommend for young students. Unlike Math Curse, when reading Science Verse it is important to understand the upper-level science concepts to find enjoyment in the book. If you read Science Verse to elementary school students, you would have to spend a lot of time explaining ideas.
Enjoy the rest of your weekend!
Return to main page.
___________________________
My Current NaNoWriMo Word Count:
One more day to go!
Thursday, November 27, 2008
Loara Standish
Happy Thanksgiving to those of you Americans! I’ve neglected the art lately, I know. Everything will go back to normal on Monday, when we move from November into the wonderful, much less stressful, December.
In celebration of Thanksgiving, I thought I’d share with you Loara Standish’s sampler. A sampler is a piece of embroidery that women used to make to show how skilled they were with a needle. I, for one, am glad we don’t have to do that anymore! It looks difficult!
Loara Standish was the daughter of Myles Standish. Myles Standish arrived in the New World on the Mayflower and signed the Mayflower compact. He then became the Military Captain of the colony at Plymouth.
To stitch her sampler, Loara Standish sat in her doorway where there was plenty of natural light. Remember, the colonists didn’t have electricity. Imagine having to stop working when dusk settled!
51167 / 60000 words. 85% done!
In celebration of Thanksgiving, I thought I’d share with you Loara Standish’s sampler. A sampler is a piece of embroidery that women used to make to show how skilled they were with a needle. I, for one, am glad we don’t have to do that anymore! It looks difficult!
Loara Standish was the daughter of Myles Standish. Myles Standish arrived in the New World on the Mayflower and signed the Mayflower compact. He then became the Military Captain of the colony at Plymouth.
To stitch her sampler, Loara Standish sat in her doorway where there was plenty of natural light. Remember, the colonists didn’t have electricity. Imagine having to stop working when dusk settled!
 I think she did a lovely job.
Enjoy your holiday [or your Thursday : ) ]!
Return to main page.
________________________________
My Current NaNoWriMo Word Count:
I adjusted my goal from 50,000 to 60,000!
Tuesday, November 25, 2008
NaNoWriMo Winner!
And from the sludge that is her novel, she emerges, just north of the 50,000-word finish line.
She looks around, confused. "What day is it?" she asks.
"Why, it is Tuesday, November 25th."
"November 25th? It isn't time yet. No, no," she mumbles, disappearing back into the sludge. "It isn't time yet."
Yes! I have reached 50,000 words! And look at the pretty winner's badge!

Saturday, November 22, 2008
NaNoWriMo
Just had to post my word count today. I wrote more than 5,000 words today which is more than I've ever written on a novel in one day. And I passed 44,000 words. Woo!
44051 / 50000 words. 88% done!
Last year at this time I had written only 35,182 words (70%). That's right. I was behind schedule last year on the 22nd. (Though I suppose it's only fair to note that Nov. 22, 2007 was Thanksgiving.)
This year I will finish well before Thanksgiving! 50K by Monday night!
Friday, November 21, 2008
Happy Birthday, Rene Magritte!
Today is the anniversary of Rene Magritte's birth. Wish him a happy birthday by learning about his life and art, creating your own Magritte masterpiece, or reading Dinner at Magritte's by Michael Garland!
Dinner at Magritte's by Michael Garland
Dinner at Magritte’s, by Michael Garland, is a great introduction to Surrealism, Rene Magritte, and Salvador Dali.
Pierre lives in the country outside of Paris. He is very bored because there are no other children to play with. One day he goes to visit his neighbor, Rene Magritte, and the evening is anything but boring!
While Pierre watches Magritte paint, Magritte teaches him about how he paints and why he paints the things he does. Pierre, Magritte, and Salvador Dali play croquet, eat dinner, and play charades. Sounds like an ordinary evening but nothing the Surrealists do is ordinary.
In the illustrations, you’ll notice pieces from paintings by Magritte and Dali. Every ordinary activity is shown in surrealistic glory. At one point, Pierre races through the rain as cats and dogs fall from the sky all around him. Later, Salvador Dali joins them for dinner which features flying fish soup with real flying fish.
You’ll discover something new and surprising in the illustrations every time you read this book. And you’ll want to read it over and over.
Return to main page.
________________________________
My Current NaNoWriMo Word Count:
39030 / 50000 words. 78% done!
Pierre lives in the country outside of Paris. He is very bored because there are no other children to play with. One day he goes to visit his neighbor, Rene Magritte, and the evening is anything but boring!
While Pierre watches Magritte paint, Magritte teaches him about how he paints and why he paints the things he does. Pierre, Magritte, and Salvador Dali play croquet, eat dinner, and play charades. Sounds like an ordinary evening but nothing the Surrealists do is ordinary.
In the illustrations, you’ll notice pieces from paintings by Magritte and Dali. Every ordinary activity is shown in surrealistic glory. At one point, Pierre races through the rain as cats and dogs fall from the sky all around him. Later, Salvador Dali joins them for dinner which features flying fish soup with real flying fish.
You’ll discover something new and surprising in the illustrations every time you read this book. And you’ll want to read it over and over.
Return to main page.
________________________________
My Current NaNoWriMo Word Count:
Thursday, November 20, 2008
Create Your Own Magritte Masterpiece
Yesterday you learned about the Surrealist painter, Rene Magritte. The project I’m sharing with you today was inspired by his painting, The Dominion of Light. In The Dominion of Light, Magritte painted night and day in the same painting. He thought that including both night and day in one scene would give the viewer a nice surprise. I think he was right!
Supplies Needed:
Two photos of the same scene taken in different light
Scissors
Glue stick
The pictures I chose I shown below. I printed my pictures onto plain white copy paper instead of photo paper. It’s easier to work with the pictures this way and it’s less expensive.
Supplies Needed:
Two photos of the same scene taken in different light
Scissors
Glue stick
The pictures I chose I shown below. I printed my pictures onto plain white copy paper instead of photo paper. It’s easier to work with the pictures this way and it’s less expensive.

 Look at your pictures and decide which pieces you want to use. I knew I wanted the walkway in my picture but it was buried under snow in the nighttime picture. I also liked the way the tree truck from the nighttime photo fit together with the colorful leaves in the daytime photo.
When you have decided what to keep, cut out your pieces. I recommend keeping one photo complete and adding piece from the other photo on top of it. You do not have to cut straight lines, like I did. Let your imagination guide you.
 Lay your pieces where you want them. When you’re happy with your picture, glue down your pieces.
 Return to main page.
 ________________________________
My Current NaNoWriMo Word Count:
Another slow day yesterday.
I hit a roadblock but I think I’ve
fixed the problem. The write-in
tonight should help.
tonight should help.
Wednesday, November 19, 2008
Rene Magritte
Rene Magritte was a Surrealist painter who was born in Belgium in 1898. He wanted people to look at ordinary things in different ways. He sometimes painted objects in places were they didn’t usually belong, like in Time Transfixed in which a train is coming out of a fireplace. Other times, Magritte confused the foreground (the things at the front of the painting) with the background, like in Blank Signature, The Large Family, and The Seducer.
Magritte did not enjoy school, and he knew he wanted to paint, so he went to the Academie dex Beaux-Arts in Brussels to study art. During this time, he worked to find his own style. He tried cubism and futurism (which I have not yet posted about) but neither would become his style. Instead, he painted in the Surrealist style.
He got married in 1922 and designed wallpaper and posters in order to make enough money to live.
Magritte was not a huge success right away. In 1927 he had a one-man show that did very poorly. Critics did not like his artwork.
He moved to Paris to work with other Surrealists. After three years in Paris he disliked the other Surrealists so much that he moved back to Brussels and burned everything that reminded him the Surrealists. He continued to paint in the Surrealist style and as the Surrealists became more popular, so did Magritte.
He experimented with other styles during his life, including Impressionism and a style he called Vache which poked fun of Fauvism. Magritte, still unhappy about the time he spent in Paris, disliked the French and wanted to annoy them by making fun of their art. He returned to Surrealism at the end of his life.
Magritte died in 1967.
Magritte is well-known for including men in bowler hats in his paintings. He often wore a bowler hat himself and, though you usually can’t see the men’s faces, these paintings are commonly thought of as self-portraits.
I especially like Magritte’s paintings of paintings, like this one and this one.
I should also mention that he created several paintings that included a picture of an object and a sentence that the object wasn't what it seemed to be. For example, he painted a picture of a pipe and the words “Ceci n’est pas une pipe,” which means “This is not a pipe.” He wanted to point out that the names we give things are completely random. Why is a pipe called a pipe? Couldn’t it just as easily have been called a snoolo or a dorbling?
Tomorrow I’ll show you how to make your own Magritte-inspired masterpiece. (I promise. It’s already ready to go.)
Return to main page.
_________________
My Current NaNoWriMo Word Count:
36631 / 50000 words. 73% done!
Tuesday’s NaNoWriMo Word Count:
33784 / 50000 words. 68% done!
Monday’s NaNoWriMo Word Count:
32867 / 50000 words. 66% done!
Magritte did not enjoy school, and he knew he wanted to paint, so he went to the Academie dex Beaux-Arts in Brussels to study art. During this time, he worked to find his own style. He tried cubism and futurism (which I have not yet posted about) but neither would become his style. Instead, he painted in the Surrealist style.
He got married in 1922 and designed wallpaper and posters in order to make enough money to live.
Magritte was not a huge success right away. In 1927 he had a one-man show that did very poorly. Critics did not like his artwork.
He moved to Paris to work with other Surrealists. After three years in Paris he disliked the other Surrealists so much that he moved back to Brussels and burned everything that reminded him the Surrealists. He continued to paint in the Surrealist style and as the Surrealists became more popular, so did Magritte.
He experimented with other styles during his life, including Impressionism and a style he called Vache which poked fun of Fauvism. Magritte, still unhappy about the time he spent in Paris, disliked the French and wanted to annoy them by making fun of their art. He returned to Surrealism at the end of his life.
Magritte died in 1967.
Magritte is well-known for including men in bowler hats in his paintings. He often wore a bowler hat himself and, though you usually can’t see the men’s faces, these paintings are commonly thought of as self-portraits.
I especially like Magritte’s paintings of paintings, like this one and this one.
I should also mention that he created several paintings that included a picture of an object and a sentence that the object wasn't what it seemed to be. For example, he painted a picture of a pipe and the words “Ceci n’est pas une pipe,” which means “This is not a pipe.” He wanted to point out that the names we give things are completely random. Why is a pipe called a pipe? Couldn’t it just as easily have been called a snoolo or a dorbling?
Tomorrow I’ll show you how to make your own Magritte-inspired masterpiece. (I promise. It’s already ready to go.)
Return to main page.
_________________
My Current NaNoWriMo Word Count:
Tuesday’s NaNoWriMo Word Count:
Monday’s NaNoWriMo Word Count:
Friday, November 14, 2008
Counting with Wayne Thiebaud
I posted about Wayne Thiebaud (Tee-Bow) and his tasty food paintings awhile back. I also recommended using the National Gallery of Art's website to teach fractions with Thiebaud's paintings. Today’s book, Counting with Wayne Thiebaud by Susan Goldman Rubin, brings Thiebaud’s art to an even younger audience: those just beginning to count.
This board book makes counting to ten enjoyable and delicious as kids count pieces of pie, ice-cream clowns, candied apples, hot dogs, and many more treats, illustrated with Thiebaud’s paintings.
If you liked Susan Goldman Rubin’s Andy Warhol’s Colors, you’ll like Counting with Wayne Thiebaud, too.
Return to main page.
_________________
My Current NaNoWriMo Word Count:
25149 / 50000 words. 50% done!
Past the halfway point a little ahead
of schedule!
This board book makes counting to ten enjoyable and delicious as kids count pieces of pie, ice-cream clowns, candied apples, hot dogs, and many more treats, illustrated with Thiebaud’s paintings.
If you liked Susan Goldman Rubin’s Andy Warhol’s Colors, you’ll like Counting with Wayne Thiebaud, too.
Return to main page.
_________________
My Current NaNoWriMo Word Count:
Past the halfway point a little ahead
of schedule!
Thursday, November 13, 2008
Kevin Collier
We'll get back to the American Regionalists on Monday. Today I want to share a great website with you instead.
Kevin Collier, an author and illustrator of children's books, has begun a blog that teaches you how to draw. It's really fantastic. Every post is a video teaching you to draw something new. You can learn to draw a whale, a mouse, and several other animals and objects. I especially like the video about how to draw glass.
Also, check out the art from some of his books (here and here).
Return to main page.
_______________
My Current NaNoWriMo Word Count:
23038 / 50000 words. 46% done!
Kevin Collier, an author and illustrator of children's books, has begun a blog that teaches you how to draw. It's really fantastic. Every post is a video teaching you to draw something new. You can learn to draw a whale, a mouse, and several other animals and objects. I especially like the video about how to draw glass.
Also, check out the art from some of his books (here and here).
Return to main page.
_______________
My Current NaNoWriMo Word Count:
Wednesday, November 12, 2008
Grant Wood
Yesterday you learned about Regionalism. Grant Wood was a Realist painter who is most famous for his paintings of the American Midwest, like American Gothic.
Wood was born in 1891 in Iowa. His father was a farmer and his mother was a teacher. After high school, he moved to Minnesota to learn how to work with wood and metal.
The next year, Wood decided to become a teacher. He studied for his teaching certificate at the University of Iowa. He also studied architecture and he painted.
In 1916, Wood went to the Art Institute of Chicago to study art.
He never finished any of his studies, but in 1919 he earned his teaching credentials by teaching in a school in Iowa. He taught middle school and high school art for 6 years and traveled to Europe during the summers. During these trips, Wood studied many European artists. It was during his travels that Wood learned to paint the ordinary as something special.
Wood set up his own studio in Iowa and began painting scenes of the American Midwest. He taught art classes at his studio. He also supported other local artists, musicians, and actors. He even let a local acting group put on performances in his studio.
Wood left his studio and began teaching art at the University of Iowa. Even though Grant Wood was a famous and well-liked artist at the time, many other teachers at the University of Iowa were upset that he hadn’t finished his own college education.
Grant eventually left the University of Iowa. He found a new studio and painted until his death in 1942.
Check out the Iowa state quarter that came out in 2004. Though Grant Wood had been dead for 62 years when the quarter was released, Iowa decided to use one of his designs on the back.
If you want to click through a lot of Grant Wood's art, check out this site which includes 74 of his paintings Notice how they look just a little too simple to be real. It’s almost like a dream version of the American Midwest.
Return to main page.
________________
My Current NaNoWriMo Word Count:
21334 / 50000 words. 43% done!
Wood was born in 1891 in Iowa. His father was a farmer and his mother was a teacher. After high school, he moved to Minnesota to learn how to work with wood and metal.
The next year, Wood decided to become a teacher. He studied for his teaching certificate at the University of Iowa. He also studied architecture and he painted.
In 1916, Wood went to the Art Institute of Chicago to study art.
He never finished any of his studies, but in 1919 he earned his teaching credentials by teaching in a school in Iowa. He taught middle school and high school art for 6 years and traveled to Europe during the summers. During these trips, Wood studied many European artists. It was during his travels that Wood learned to paint the ordinary as something special.
Wood set up his own studio in Iowa and began painting scenes of the American Midwest. He taught art classes at his studio. He also supported other local artists, musicians, and actors. He even let a local acting group put on performances in his studio.
Wood left his studio and began teaching art at the University of Iowa. Even though Grant Wood was a famous and well-liked artist at the time, many other teachers at the University of Iowa were upset that he hadn’t finished his own college education.
Grant eventually left the University of Iowa. He found a new studio and painted until his death in 1942.
Check out the Iowa state quarter that came out in 2004. Though Grant Wood had been dead for 62 years when the quarter was released, Iowa decided to use one of his designs on the back.
If you want to click through a lot of Grant Wood's art, check out this site which includes 74 of his paintings Notice how they look just a little too simple to be real. It’s almost like a dream version of the American Midwest.
Return to main page.
________________
My Current NaNoWriMo Word Count:
Tuesday, November 11, 2008
American Regionalism
In the 1930s, during the Great Depression, many Americans had a difficult time making enough money live. A lot of people lost money when the stock market crashed and many people were fired from their jobs. At this time, people were not very hopeful about the future.
The Regionalist art movement came about at the end of the 1920s. Instead of painting the world as dark, dirty, and hopeless, Regionalists painted hopeful scenes of the American Midwest. The paintings often showed hard working people who were making it through the depression. They gave people hope that the future would be better.
In Europe, abstract art was becoming popular at this time. Regionalists painted more realistic paintings instead. However, Regionalists cared more that the objects in their paintings were easy to recognize than that their paintings looked exactly like what could be seen in real life.
Regionalism fell out of popularity in the mid-1940s.
In the next few days, I’ll post about some of the better known Regionalists, beginning tomorrow with Grant Wood.
Return to main page.
________________
My Current NaNoWriMo Word Count:
20048 / 50000 words. 40% done!
It was a slow day, but a little
progress is better than no progress.
The Regionalist art movement came about at the end of the 1920s. Instead of painting the world as dark, dirty, and hopeless, Regionalists painted hopeful scenes of the American Midwest. The paintings often showed hard working people who were making it through the depression. They gave people hope that the future would be better.
In Europe, abstract art was becoming popular at this time. Regionalists painted more realistic paintings instead. However, Regionalists cared more that the objects in their paintings were easy to recognize than that their paintings looked exactly like what could be seen in real life.
Regionalism fell out of popularity in the mid-1940s.
In the next few days, I’ll post about some of the better known Regionalists, beginning tomorrow with Grant Wood.
Return to main page.
________________
My Current NaNoWriMo Word Count:
It was a slow day, but a little
progress is better than no progress.
Monday, November 10, 2008
Create Your Own Shimmer Painting
This project is a lot of fun and the result is an eye-catching, shimmery masterpiece. You actually don’t need any paint to create this “painting.”
Supplies Needed:
Aluminum Foil
Water
Cup
White Glue
Paintbrush
Tissue Paper
Glitter
Sequins
 Cover your workspace. Ask an adult to cut a piece of aluminum foil for you. Pour a little water into your cup and add about the same amount of glue. Mix the glue and water together. You don’t need a lot of this mixture.
Use your paintbrush to spread a little of the glue mixture across a section of your aluminum foil. Tear off a strip of tissue paper and lay it over the glue. Press it down with your fingers.
Continue to paint on the glue and add strips of tissue paper until you’re happy with your artwork.
 Spread another thin layer of the glue mixture over the tissue paper. Sprinkle glitter onto the “painting.”
You may also choose to add sequins to your masterpiece. You’ll want to use glue rather than the glue mixture to stick on the sequins.
 Enjoy!
Return to main page.
_________________
My Current NaNoWriMo Word Count:
19246 / 50000 words. 38% done!
Supplies Needed:
Aluminum Foil
Water
Cup
White Glue
Paintbrush
Tissue Paper
Glitter
Sequins
Cover your workspace. Ask an adult to cut a piece of aluminum foil for you. Pour a little water into your cup and add about the same amount of glue. Mix the glue and water together. You don’t need a lot of this mixture.Use your paintbrush to spread a little of the glue mixture across a section of your aluminum foil. Tear off a strip of tissue paper and lay it over the glue. Press it down with your fingers.
Continue to paint on the glue and add strips of tissue paper until you’re happy with your artwork.
Spread another thin layer of the glue mixture over the tissue paper. Sprinkle glitter onto the “painting.”You may also choose to add sequins to your masterpiece. You’ll want to use glue rather than the glue mixture to stick on the sequins.
Enjoy!Return to main page.
_________________
My Current NaNoWriMo Word Count:
Friday, November 7, 2008
Look What I Did with a Leaf! by Morteza E. Sohi
Welcome to Fantastic Nonfiction Friday!
Last fall, when the leaves began to change colors, I posted about Lois Ehlert’s Leaf Man and I showed you how to create your own leaf man. I also showed you how to press leaves between wax paper and suggested a few ways to use those pressed leaves.
Today’s book teaches you how to make animals out of leaves. It does a much better job than I could ever do. I recommend it highly.
Morteza E. Sohi’s Look What I Did with a Leaf does more than just show you how to create an elephant, a peacock, a fox, a frog, a rooster, and many more animals using leaves. This book also teaches about the life cycle of a leaf and includes a field guide to many types of leaves that are found throughout the United States.
When learning about the life cycle of a leaf, what kid wouldn’t love taking a leaf walk and creating his or her own leaf animal?
Return to main page.
_________________
12073 / 50000 words. 24% done!
I didn't write a single word yesterday...
But I'm still ahead of schedule going
into the second weekend!
Wednesday, November 5, 2008
Create Your Own Marbled Paper
Yesterday you learned that many paper marblers add size to water to make the water thicker. This allows the paint to float on the top. Rather than floating paint on water, today you’ll paint on shaving cream to make your own marbled paper.
Supplies Needed:
Foam Shaving Cream
Paint
Paintbrush
Cardboard
Paper
Paper plate
 Cover your work space. Ask an adult to spray a layer of shaving cream onto the paper plate. You want about a half an inch thick layer of shaving cream. Use your cardboard to level the layer of shaving cream.
 Choose which colors to use. I used Crayola Kids Paint. You can use any kind of paint you want, but I wouldn’t recommend watercolors.
Paint on top of the shaving cream. Try not to press your brush into the shaving cream. It’s not important that your painting look nice. Just make sure you’ve included all the colors you want on your marbled paper.
 Use the handle of your paint brush to swirl the colors together. You’ll need to wipe off the brush handle a few times because the shaving cream clings to it. This will cause the colors to mix together and get muddy.
 When you’re happy with your swirled colors, press a piece of paper onto the shaving cream. If you don’t press down hard enough, the paper won’t pick up the paint evenly. It will look like the paper at the top of this picture:
 When you press your paper onto the shaving cream, shaving cream will stick to it (of course). Use the clean side of your cardboard to scrape the shaving cream off of the paper. The paint will remain.
 You can make two good prints from the same painted shaving cream.
I made prints with copy paper, construction paper, and posterboard. The paint stuck well to all three types of paper.
If you want to make larger sheets of marbled paper, layer the shaving cream onto a cookie sheet instead of a paper plate.
Write a letter to a pen pal on your marbled paper, create your own journal using marbled paper, or hang your marbled paper on you wall.
Return to main page.
_________________
My Current NaNoWriMo Word Count:
10544 / 50000 words. 21% done!
I’m pretty pleased with this word count.
Last year it took me 7 days to reach
10,000 words.
Supplies Needed:
Foam Shaving Cream
Paint
Paintbrush
Cardboard
Paper
Paper plate
Cover your work space. Ask an adult to spray a layer of shaving cream onto the paper plate. You want about a half an inch thick layer of shaving cream. Use your cardboard to level the layer of shaving cream.Choose which colors to use. I used Crayola Kids Paint. You can use any kind of paint you want, but I wouldn’t recommend watercolors.Paint on top of the shaving cream. Try not to press your brush into the shaving cream. It’s not important that your painting look nice. Just make sure you’ve included all the colors you want on your marbled paper.
Use the handle of your paint brush to swirl the colors together. You’ll need to wipe off the brush handle a few times because the shaving cream clings to it. This will cause the colors to mix together and get muddy.When you’re happy with your swirled colors, press a piece of paper onto the shaving cream. If you don’t press down hard enough, the paper won’t pick up the paint evenly. It will look like the paper at the top of this picture:When you press your paper onto the shaving cream, shaving cream will stick to it (of course). Use the clean side of your cardboard to scrape the shaving cream off of the paper. The paint will remain.You can make two good prints from the same painted shaving cream.I made prints with copy paper, construction paper, and posterboard. The paint stuck well to all three types of paper.
If you want to make larger sheets of marbled paper, layer the shaving cream onto a cookie sheet instead of a paper plate.
Write a letter to a pen pal on your marbled paper, create your own journal using marbled paper, or hang your marbled paper on you wall.
Return to main page.
_________________
My Current NaNoWriMo Word Count:
I’m pretty pleased with this word count.
Last year it took me 7 days to reach
10,000 words.
Tuesday, November 4, 2008
Election Day
Whoever your choice may be, don't forget to vote, or remind the adults in your life to vote!
Paper Marbling
Marbled paper is created by floating ink on water. The inks can be blown or combed into patterns. Then, a sheet of paper is laid on top of the water and the ink leaves patterns on the paper. Marbled paper is sometimes used in books and as stationery. Like fingerprints, each sheet of marbled paper is unique.
By the 1100s, the Japanese were creating marbled papers. They used black and blue ink to make patterns that looked like smoke. The Japanese were very careful when they dropped the ink onto the water. They didn’t use combs to move the ink around so they wanted to be sure to drop it where they wanted it. They then blew across the water to make the smoky patterns.
In the 1400s, people in Turkey and Persia began creating marbled papers of their own. Their style was a little different, though. Ink floated on top of water but the Turks and Persians wanted to use many colors in their marbled papers. They added something called size to the water to make it thicker. This meant that they could float paint on the water. They then used combs to create patterns in the paint.
 The art of marbling spread through Europe. By the 1600s, artists were marbling paper in England, Holland, Italy, France, and Germany. Most books included marbled paper but the bookbinders didn’t know how to make it. The artists who created the paper wanted to keep their techniques secret so they could keep selling their papers.
 Bookbinders in England needed a lot of the marbled paper and it was the least expensive to buy it from Holland. They didn’t want to pay taxes on the paper though, so the Dutch used the marbled paper to wrap toys before shipping them to England. The bookbinders then flattened out the creased wrapping paper to use in their books.
In 1856 a paper marbler named Charles Woolnough wrote a book about paper marbling. It told all the secrets that paper marblers had kept to themselves for hundreds of years. They were very angry with Woolnough, but there was nothing they could do. Their secret was out.
Tomorrow, I’ll show you how to make your own marbled paper.
Return to main page.
________________
My Current NaNoWriMo Word Count:
8720 / 50000 words. 17% done!
By the 1100s, the Japanese were creating marbled papers. They used black and blue ink to make patterns that looked like smoke. The Japanese were very careful when they dropped the ink onto the water. They didn’t use combs to move the ink around so they wanted to be sure to drop it where they wanted it. They then blew across the water to make the smoky patterns.
In the 1400s, people in Turkey and Persia began creating marbled papers of their own. Their style was a little different, though. Ink floated on top of water but the Turks and Persians wanted to use many colors in their marbled papers. They added something called size to the water to make it thicker. This meant that they could float paint on the water. They then used combs to create patterns in the paint.
The art of marbling spread through Europe. By the 1600s, artists were marbling paper in England, Holland, Italy, France, and Germany. Most books included marbled paper but the bookbinders didn’t know how to make it. The artists who created the paper wanted to keep their techniques secret so they could keep selling their papers.Bookbinders in England needed a lot of the marbled paper and it was the least expensive to buy it from Holland. They didn’t want to pay taxes on the paper though, so the Dutch used the marbled paper to wrap toys before shipping them to England. The bookbinders then flattened out the creased wrapping paper to use in their books.In 1856 a paper marbler named Charles Woolnough wrote a book about paper marbling. It told all the secrets that paper marblers had kept to themselves for hundreds of years. They were very angry with Woolnough, but there was nothing they could do. Their secret was out.
Tomorrow, I’ll show you how to make your own marbled paper.
Return to main page.
________________
My Current NaNoWriMo Word Count:
Monday, November 3, 2008
Master the Art of Reading
NaNoWriMo began well. I'd hoped to be a lot farther along, word-count-wise, by now, but I'm pretty happy with my weekend. It may seem it from today's post, but I won't forget about you this month.
I wrote a post earlier today but I don't want to put it up. I'm a little uncomfortable writing about artists who are still living. Tomorrow's post will lead to a fun and simple project on Wednesday, though, so stay tuned.
I do have something pretty cool to share with you today. I was at my local library on Saturday and I noticed some new reading posters decorating the walls. There are twelve posters in all and each features a different famous work of art. The paintings have been changed so that they include books. There is the Mona Lisa, reading a book with a smile. There is Seurat's Sunday Afternoon on the Island of La Grande Jatte with books scattered across the lawn. And the subject of Edward Munch's The Scream is reading what must be a horror novel, judging by his expression.
Check out set 1 and set 2. I'm thinking of ordering them...
Return to main page.
_________________
My Current NaNoWriMo Word Count:
6756 / 50000 words. 14% done!
I wrote a post earlier today but I don't want to put it up. I'm a little uncomfortable writing about artists who are still living. Tomorrow's post will lead to a fun and simple project on Wednesday, though, so stay tuned.
I do have something pretty cool to share with you today. I was at my local library on Saturday and I noticed some new reading posters decorating the walls. There are twelve posters in all and each features a different famous work of art. The paintings have been changed so that they include books. There is the Mona Lisa, reading a book with a smile. There is Seurat's Sunday Afternoon on the Island of La Grande Jatte with books scattered across the lawn. And the subject of Edward Munch's The Scream is reading what must be a horror novel, judging by his expression.
Check out set 1 and set 2. I'm thinking of ordering them...
Return to main page.
_________________
My Current NaNoWriMo Word Count:
Friday, October 31, 2008
NaNoWriMo!!
No art post today. I just wanted to remind you all that National Novel Writing Month begins tomorrow!
In case you have not heard of National Novel Writing Month, called NaNoWriMo, it a free, month-long event during which people from all over the world try to write a 50,000-word novel in 30 days. That’s about 200 pages. More than 100,000 people are signed up to participate.
NaNoWriMo has a fantastic Young Writers Program as well. It is open to anyone under the age of 18. Young writers can set their own writing goals and then work toward them throughout November.
During the month you will receive pep-talks in your email that will help keep you working. Many of the pep-talks are written by famous authors. How cool would it be to get an email from the author of one of your favorite books?
On the Young Writers Program website you’ll find all kinds of tips and resources. There is even a workbook to help you create your characters and come up with a plot.
You may remember that I participated in NaNoWriMo last year. I reached the 50,000 word goal on the final day. I will again take part in this great program. You can track my progress in the little blue widget in the right-hand column.
If you decide to write your own novel this November, I would love to hear about it. Just leave a message in the comments.
Happy writing!! (And happy Halloween!)
Return to main page.
Thursday, October 30, 2008
Create Your Own Origami Pumpkin
I have already posted about origami. I have also posted about a few origami books. But origami is fun and this little origami pumpkin is a delightful Halloween project. Enjoy!
Supplies Needed:
Square of orange paper, any size
Green pipe cleaner
Black marker
I used orange construction paper but I recommend using a thinner paper. Origami paper is the best choice.
Fold your paper in half diagonally. Open it back up. Fold it in half diagonally the other way and open it back up. Fold it in half straight. It should look like a rectangle. Fold the rectangle in half to create a small square. Open it back up. It should look like this:
 Fold the paper back into a rectangle. Use the diagonal fold to help you make your paper look like this:
 Notice the fold down the middle of the triangle. Fold along that line. Do the same on the other side of the paper. It should now look like this:
 Fold up the two bottom corners of the triangle:
 Flip your paper over and do the same to the other side. It should now look like this:
 Fold the corners of the diamond in so that they touch the line. Flip your paper over and do the same to the other side. It should look like this:
 Fold down the loose flaps at the top of your origami and tuck them into the triangles on the side. Flip the paper over and do the same to the other side. It should look like this:
 Your paper now has four flaps that are attached in the center. Flip the flaps over until your paper looks like this:
 Draw a jack-o-lantern face on one side of the origami. Like this:
 One end of your origami is closed and the other end has a hole in it. Blow gently into the hole until your pumpkin puffs out.
Poke a hole in the top of the pumpkin and slip a piece of green pipe cleaner into it.
Your finished origami pumpkin should look something like this:
 Happy Halloween!
Return to main page.
Supplies Needed:
Square of orange paper, any size
Green pipe cleaner
Black marker
I used orange construction paper but I recommend using a thinner paper. Origami paper is the best choice.
Fold your paper in half diagonally. Open it back up. Fold it in half diagonally the other way and open it back up. Fold it in half straight. It should look like a rectangle. Fold the rectangle in half to create a small square. Open it back up. It should look like this:
Fold the paper back into a rectangle. Use the diagonal fold to help you make your paper look like this:Notice the fold down the middle of the triangle. Fold along that line. Do the same on the other side of the paper. It should now look like this:Fold up the two bottom corners of the triangle:Flip your paper over and do the same to the other side. It should now look like this:Fold the corners of the diamond in so that they touch the line. Flip your paper over and do the same to the other side. It should look like this:Fold down the loose flaps at the top of your origami and tuck them into the triangles on the side. Flip the paper over and do the same to the other side. It should look like this:Your paper now has four flaps that are attached in the center. Flip the flaps over until your paper looks like this:Draw a jack-o-lantern face on one side of the origami. Like this:One end of your origami is closed and the other end has a hole in it. Blow gently into the hole until your pumpkin puffs out.Poke a hole in the top of the pumpkin and slip a piece of green pipe cleaner into it.
Your finished origami pumpkin should look something like this:
Happy Halloween!Return to main page.
Wednesday, October 29, 2008
Create Your Own Pumpkin Lantern
You may have decorated your porch, balcony, or driveway with real jack-o-lanterns, but you wouldn’t want to keep them inside. But what if you want to decorate the inside of your house with lit pumpkins, too? Try making a few pumpkin lanterns!
Supplies Needed:
Orange construction paper
Green construction paper
Tape
Scissors
Fold one sheet of construction paper in half, lengthwise. Face the fold toward you and cut one-inch wide slits across the width of the paper. Do not cut all the way through. Your slits should stop about an inch from the edge.
 Unfold the paper and hold it so the slits run up and down and the fold points out. Bend the paper into a cylinder and tape the edges together.
Cut a one-inch-wide strip of green. It should be about 8 inches long. Tape the green strip to the top of the lantern. This is your handle. If you plan to light your lantern with a candle, angle the handle to the side. This will stop the candle from heating up the handle.
 Have an adult light a tea light candle, place it in a jar, and set it inside the lantern. If you or your parent are concerned about creating a fire, stand a short flashlight inside the lantern instead.
Create as many as you want and use your lanterns to light your house on Halloween night for a spooky, festive feel!
Return to main page.
Supplies Needed:
Orange construction paper
Green construction paper
Tape
Scissors
Fold one sheet of construction paper in half, lengthwise. Face the fold toward you and cut one-inch wide slits across the width of the paper. Do not cut all the way through. Your slits should stop about an inch from the edge.
Unfold the paper and hold it so the slits run up and down and the fold points out. Bend the paper into a cylinder and tape the edges together.Cut a one-inch-wide strip of green. It should be about 8 inches long. Tape the green strip to the top of the lantern. This is your handle. If you plan to light your lantern with a candle, angle the handle to the side. This will stop the candle from heating up the handle.
Have an adult light a tea light candle, place it in a jar, and set it inside the lantern. If you or your parent are concerned about creating a fire, stand a short flashlight inside the lantern instead.Create as many as you want and use your lanterns to light your house on Halloween night for a spooky, festive feel!
Return to main page.
Tuesday, October 28, 2008
Create Your Own Pumpkin Table Decoration
I hadn’t planned to post any Halloween crafts but, as it turned out, I missed creating them. So today is the first in a series of Pumpkin crafts. This pumpkin is a great table decoration. Make a bunch of them and decorate your whole house!
Supplies Needed:
Orange construction paper
Green construction paper
Pipe cleaner, either green or orange
Scissors
Hole punch
Cut eight or ten long strips of orange paper. Each strip should be about an inch wide. I folded my paper like an accordion so I would know where to cut. You might choose to measure and draw lines instead.
Cut a short, one-inch-wide strip of green paper.
Punch holes in both ends of every strip, including the green one. The hole should be about the width of your pinky from the end of the strip.
 Stack all the orange strips on top of each other. Slide the pipe cleaner through the holes at one end of the stack. Twist the end of the pipe cleaner into a little knot so that it won’t slip back through the holes. Arc the orange strips upward and slip the pipe cleaner through the other set of holes. Now slide the pipe cleaner through both ends of the green strip. Don’t make any folds. You want your pumpkin to be rounded.
Twist the end of your pipe cleaner into a little knot on the top of your pumpkin. You may need to trim away a bit of extra pipe cleaner. Ask and adult to help you with this.
Spread out the orange shapes until your pumpkin looks round. (You’ll notice that my pumpkin has holes punched through the middles of the strips. Yours should not have those holes.)
Place you pumpkin in a place of honor and enjoy!
Return to main page.
Subscribe to:
Posts (Atom)


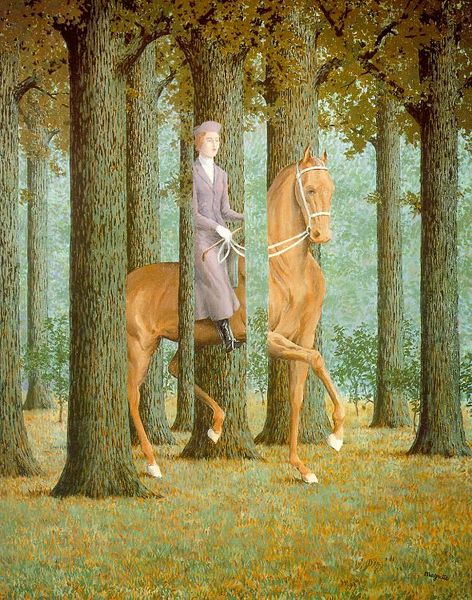