


No art post today. I just wanted to remind you all that National Novel Writing Month begins tomorrow!
In case you have not heard of National Novel Writing Month, called NaNoWriMo, it a free, month-long event during which people from all over the world try to write a 50,000-word novel in 30 days. That’s about 200 pages. More than 100,000 people are signed up to participate.
NaNoWriMo has a fantastic Young Writers Program as well. It is open to anyone under the age of 18. Young writers can set their own writing goals and then work toward them throughout November.
During the month you will receive pep-talks in your email that will help keep you working. Many of the pep-talks are written by famous authors. How cool would it be to get an email from the author of one of your favorite books?
On the Young Writers Program website you’ll find all kinds of tips and resources. There is even a workbook to help you create your characters and come up with a plot.
You may remember that I participated in NaNoWriMo last year. I reached the 50,000 word goal on the final day. I will again take part in this great program. You can track my progress in the little blue widget in the right-hand column.
If you decide to write your own novel this November, I would love to hear about it. Just leave a message in the comments.
Happy writing!! (And happy Halloween!)
Return to main page.
Friday, October 31, 2008
Thursday, October 30, 2008
Create Your Own Origami Pumpkin
I have already posted about origami. I have also posted about a few origami books. But origami is fun and this little origami pumpkin is a delightful Halloween project. Enjoy!
Supplies Needed:
Square of orange paper, any size
Green pipe cleaner
Black marker
I used orange construction paper but I recommend using a thinner paper. Origami paper is the best choice.
Fold your paper in half diagonally. Open it back up. Fold it in half diagonally the other way and open it back up. Fold it in half straight. It should look like a rectangle. Fold the rectangle in half to create a small square. Open it back up. It should look like this:
 Fold the paper back into a rectangle. Use the diagonal fold to help you make your paper look like this:
 Notice the fold down the middle of the triangle. Fold along that line. Do the same on the other side of the paper. It should now look like this:
 Fold up the two bottom corners of the triangle:
 Flip your paper over and do the same to the other side. It should now look like this:
 Fold the corners of the diamond in so that they touch the line. Flip your paper over and do the same to the other side. It should look like this:
 Fold down the loose flaps at the top of your origami and tuck them into the triangles on the side. Flip the paper over and do the same to the other side. It should look like this:
 Your paper now has four flaps that are attached in the center. Flip the flaps over until your paper looks like this:
 Draw a jack-o-lantern face on one side of the origami. Like this:
 One end of your origami is closed and the other end has a hole in it. Blow gently into the hole until your pumpkin puffs out.
Poke a hole in the top of the pumpkin and slip a piece of green pipe cleaner into it.
Your finished origami pumpkin should look something like this:
 Happy Halloween!
Return to main page.
Supplies Needed:
Square of orange paper, any size
Green pipe cleaner
Black marker
I used orange construction paper but I recommend using a thinner paper. Origami paper is the best choice.
Fold your paper in half diagonally. Open it back up. Fold it in half diagonally the other way and open it back up. Fold it in half straight. It should look like a rectangle. Fold the rectangle in half to create a small square. Open it back up. It should look like this:
Fold the paper back into a rectangle. Use the diagonal fold to help you make your paper look like this:Notice the fold down the middle of the triangle. Fold along that line. Do the same on the other side of the paper. It should now look like this:Fold up the two bottom corners of the triangle:Flip your paper over and do the same to the other side. It should now look like this:Fold the corners of the diamond in so that they touch the line. Flip your paper over and do the same to the other side. It should look like this:Fold down the loose flaps at the top of your origami and tuck them into the triangles on the side. Flip the paper over and do the same to the other side. It should look like this:Your paper now has four flaps that are attached in the center. Flip the flaps over until your paper looks like this:Draw a jack-o-lantern face on one side of the origami. Like this:One end of your origami is closed and the other end has a hole in it. Blow gently into the hole until your pumpkin puffs out.Poke a hole in the top of the pumpkin and slip a piece of green pipe cleaner into it.
Your finished origami pumpkin should look something like this:
Happy Halloween!Return to main page.
Wednesday, October 29, 2008
Create Your Own Pumpkin Lantern
You may have decorated your porch, balcony, or driveway with real jack-o-lanterns, but you wouldn’t want to keep them inside. But what if you want to decorate the inside of your house with lit pumpkins, too? Try making a few pumpkin lanterns!
Supplies Needed:
Orange construction paper
Green construction paper
Tape
Scissors
Fold one sheet of construction paper in half, lengthwise. Face the fold toward you and cut one-inch wide slits across the width of the paper. Do not cut all the way through. Your slits should stop about an inch from the edge.
 Unfold the paper and hold it so the slits run up and down and the fold points out. Bend the paper into a cylinder and tape the edges together.
Cut a one-inch-wide strip of green. It should be about 8 inches long. Tape the green strip to the top of the lantern. This is your handle. If you plan to light your lantern with a candle, angle the handle to the side. This will stop the candle from heating up the handle.
 Have an adult light a tea light candle, place it in a jar, and set it inside the lantern. If you or your parent are concerned about creating a fire, stand a short flashlight inside the lantern instead.
Create as many as you want and use your lanterns to light your house on Halloween night for a spooky, festive feel!
Return to main page.
Supplies Needed:
Orange construction paper
Green construction paper
Tape
Scissors
Fold one sheet of construction paper in half, lengthwise. Face the fold toward you and cut one-inch wide slits across the width of the paper. Do not cut all the way through. Your slits should stop about an inch from the edge.
Unfold the paper and hold it so the slits run up and down and the fold points out. Bend the paper into a cylinder and tape the edges together.Cut a one-inch-wide strip of green. It should be about 8 inches long. Tape the green strip to the top of the lantern. This is your handle. If you plan to light your lantern with a candle, angle the handle to the side. This will stop the candle from heating up the handle.
Have an adult light a tea light candle, place it in a jar, and set it inside the lantern. If you or your parent are concerned about creating a fire, stand a short flashlight inside the lantern instead.Create as many as you want and use your lanterns to light your house on Halloween night for a spooky, festive feel!
Return to main page.
Tuesday, October 28, 2008
Create Your Own Pumpkin Table Decoration
I hadn’t planned to post any Halloween crafts but, as it turned out, I missed creating them. So today is the first in a series of Pumpkin crafts. This pumpkin is a great table decoration. Make a bunch of them and decorate your whole house!
Supplies Needed:
Orange construction paper
Green construction paper
Pipe cleaner, either green or orange
Scissors
Hole punch
Cut eight or ten long strips of orange paper. Each strip should be about an inch wide. I folded my paper like an accordion so I would know where to cut. You might choose to measure and draw lines instead.
Cut a short, one-inch-wide strip of green paper.
Punch holes in both ends of every strip, including the green one. The hole should be about the width of your pinky from the end of the strip.
 Stack all the orange strips on top of each other. Slide the pipe cleaner through the holes at one end of the stack. Twist the end of the pipe cleaner into a little knot so that it won’t slip back through the holes. Arc the orange strips upward and slip the pipe cleaner through the other set of holes. Now slide the pipe cleaner through both ends of the green strip. Don’t make any folds. You want your pumpkin to be rounded.
Twist the end of your pipe cleaner into a little knot on the top of your pumpkin. You may need to trim away a bit of extra pipe cleaner. Ask and adult to help you with this.
Spread out the orange shapes until your pumpkin looks round. (You’ll notice that my pumpkin has holes punched through the middles of the strips. Yours should not have those holes.)
Place you pumpkin in a place of honor and enjoy!
Return to main page.
Monday, October 27, 2008
Beat the Story Drum, Pum-Pum by Ashley Bryan
Since it’s Monday, this is a very late edition of Fantastic Fiction Friday. While not necessarily an art book, Beat the Story Drum, Pum-Pum by Ashley Bryan is a great book to use as a read aloud when learning about African Djembe Drums or making your own drum.
Beat the Story Drum, Pum-Pum is a collection of African stories that have been passed down from generation to generation in story and song. During these storytelling session, someone often kept the beat on a drum. What I love about this book is the rhythm of the sentences. You can easily imagine the drum beat when you read this book. The stories beg to be read aloud.
The book includes five stories, each of which includes a lesson, though the lessons are a bit darker than what we are used to in the U.S. For example, the first story is about a frog and a hen who are trying to escape a storm. As the storm approaches, Hen builds a house and a bed, collects corn, and rolls some pumpkins onto the roof. Frog refuses to help. When his hole floods he weasels his way into Hen’s house by threatening to call the cat. In the end, Hen sends Frog to the roof to get a pumpkin where he is scooped up by a hawk. Hen eats her pumpkin with satisfaction.
I recommend this book for 3rd graders and older.
Return to main page.
Thursday, October 23, 2008
Create Your Own African Djembe Drum
Like the African artisans you learned about yesterday, you can create your own Djembe (Jem-Bay) drum. This is a fun project, though it does take a bit a time. I recommend it for third graders and older.
Supplies Needed:
Two plastic, Styrofoam, or paper cups
Scissors
Tape
Newspaper
Flour
Water
Paint
Paintbrush
Punching balloon
Rubber band
Yarn (optional)
Cover your workspace. You’ll notice in the pictures how messy my towel got. Mix one cup of flour with two cups of water to make your papier mache paste. Tear newspaper into strips.
Choose two cups. Try to pick cups with interesting shapes. Cut the bottom out of the cups. You may need an adult to help with this step. Tape the bottoms of the cups together.

Cover the outside of the cups with a thin layer of papier mache covered newspaper strips. You don’t need to use a lot of the mixture to make the newspaper stick, and the less you use the quicker your cups will dry.

When the cups are dry, paint over the newspaper with white paint. This is just meant to cover up the newsprint and make sure it doesn’t show through the designs you paint onto your drum later.

Let the white paint dry. While you wait, decide what patterns or designs you want to paint onto your drum.
When the white paint has dried, paint over it with a solid color. I painted the top of my drum brown and the bottom yellow. You can choose any colors you want.
Let the paint dry.
Now paint your patterns onto your drum.
Let the paint dry

Choose a punching balloon and cut it open. It’s best if you stick your scissors into the opening and just slit the balloon apart. This leaves it as whole as possible. Stretch the balloon over the top of the cup and wrap your rubber band around it to hold it in place. You want the balloon to be stretched tight. Ask an adult to help you if you have trouble with this. Cut off most of the extra balloon (careful—not too much
If you stop here, you have a lovely, working drum. You may choose to add yarn to your drum. This can be difficult but, if you’re up for the challenge, you can try it. Wrap a length of yarn about four times around the middle of your drum. Tie the ends together and tuck them back into the wraps. Wind another length of yarn around the top, tie the ends together and tuck them into the wraps.. Now weave a longer piece under the bottom wraps, then over the top wraps. Repeat until you’ve gone all the way around the drum. Tie the ends together and tuck them into the wraps.

Enjoy your drum!
Tomorrow: A story you can read when making your drum (while you wait for it to dry).
Wednesday, October 22, 2008
African Djembe Drums
Djembe (Jem-Bay) drums are traditional African drums. Each drum is carved by hand from a single piece of hardwood. The inside is carved with a special design that makes the sound more beautiful when the drum is played. Often the outside is decorated, too.
Goat skin is stretched over the top of the finished Djembe drum. The skin is attached to the drum by many strings. The strings can be tightened to change the sound that comes out of the drum. Sometimes, instead of goat skins, zebra, antelope, deer, calf, or camel skins are used.
A finished Djembe drum is believed to have three spirits inside of it. It has the spirit of the tree that the drum was made from, the spirit of the animal that gave its skin, and the spirit of the drum maker. This makes each drum special.
Check out this collection of African drums.
Listen to a clip of Djembe drumming. Click on the link that says “Main Instrument: Djembe, length 1min.” It’s worth a listen.
Return to main page.
Tuesday, October 21, 2008
Create Your Own Story Totem Pole
Yesterday you learned about Native American totem poles. You know that Native Americans often created totem poles to tell stories. Today, create your own story totem pole.
A Note to Teachers/Parents: This is a great project to help teach kids about the parts of a story. Read a story and then have the students create a totem pole that retells the tale. Tell students that their totem pole should include all the main characters, the problem, the solution, and three plot points. In my area, 2nd and 3rd graders have been learning about the parts of a story for at least a month and they have filled out more graphic organizers than anyone should ever be made to fill out. This totem pole project is a fun way to break up the monotony and to appeal to more visual, kinesthetic, or artistic learners.
Supplies Needed:
A good story (I used Goldilocks and the Three Bears)
Paper towel rolls
Construction paper
White paper
Markers/Colored pencils/Crayons
Scissors
Glue
Tape
Rubber bands
Read the story. Think about the main characters, the problem, the solution, and three plot points. All of these things should appear on your finished totem pole.
 Draw and color each item. My totem pole tells the story of Goldilocks and the Three Bears so I drew three bears, Goldilocks with porridge, Goldilocks in a chair, and Goldilocks sleeping in bed.
Cut out your pictures. Arrange them in the order of the story. I put the beginning of the story on the bottom of the totem pole and built each piece on top of the one before it.
 Choose a color for the background of your totem pole. I chose red. A sheet of construction paper is the same length as a paper towel roll, but you’ll need to cut the paper to the correct width. You want it to be about 6 ½ inches wide. If you want your totem pole to be longer than a paper towel roll, just fit another roll inside the first and attach with a little tape. You’ll then need to cut another piece of construction paper and tape it to the first piece.
 Glue your pictures, in a column, to the center of the construction paper. Let them dry.
Spread glue over the back of the construction paper. Wrap the paper around the paper towel roll. Carefully twist rubber bands around the ends to hold the construction paper in place while it dries. If you’re in a hurry, or the glue won’t hold, use a little bit of tape at the edges.
 Return to main page.
A Note to Teachers/Parents: This is a great project to help teach kids about the parts of a story. Read a story and then have the students create a totem pole that retells the tale. Tell students that their totem pole should include all the main characters, the problem, the solution, and three plot points. In my area, 2nd and 3rd graders have been learning about the parts of a story for at least a month and they have filled out more graphic organizers than anyone should ever be made to fill out. This totem pole project is a fun way to break up the monotony and to appeal to more visual, kinesthetic, or artistic learners.
Supplies Needed:
A good story (I used Goldilocks and the Three Bears)
Paper towel rolls
Construction paper
White paper
Markers/Colored pencils/Crayons
Scissors
Glue
Tape
Rubber bands
Read the story. Think about the main characters, the problem, the solution, and three plot points. All of these things should appear on your finished totem pole.
Draw and color each item. My totem pole tells the story of Goldilocks and the Three Bears so I drew three bears, Goldilocks with porridge, Goldilocks in a chair, and Goldilocks sleeping in bed.Cut out your pictures. Arrange them in the order of the story. I put the beginning of the story on the bottom of the totem pole and built each piece on top of the one before it.
Choose a color for the background of your totem pole. I chose red. A sheet of construction paper is the same length as a paper towel roll, but you’ll need to cut the paper to the correct width. You want it to be about 6 ½ inches wide. If you want your totem pole to be longer than a paper towel roll, just fit another roll inside the first and attach with a little tape. You’ll then need to cut another piece of construction paper and tape it to the first piece.Glue your pictures, in a column, to the center of the construction paper. Let them dry.Spread glue over the back of the construction paper. Wrap the paper around the paper towel roll. Carefully twist rubber bands around the ends to hold the construction paper in place while it dries. If you’re in a hurry, or the glue won’t hold, use a little bit of tape at the edges.
Return to main page.
Monday, October 20, 2008
Totem Poles
Along the northwestern coast of North America (America and Canada), some Native Americans create totem poles. These totem poles are carved from whole, full-grown Western Redcedar trees, and can be huge. They show people and animals stacked on top of each other, sometimes painted bright colors.
We don’t know how long Native American tribes have been carving totem poles because wood rots. Eventually, every totem pole must be taken down and destroyed. There are totem poles from the 1800s and stories about totem poles from much earlier.
Totem poles are used for different reason within different tribes. Some are used to show family history, some tell stories, and some are meant for protection. Native American tribes even used to use totem poles to embarrass other tribes who owed debts.
When a Native American totem pole artist creates a totem pole, he first decides what animals to include. He designs his pole. When he knows what his totem pole will look like, he begins to carve. This can take a year to finish. Imagine carving an entire tree! Depending on which tribe he belongs to, the artist may then paint the animals with bright colors.
When the totem pole is finished, the tribe stands it up. First, the base of the totem pole is burned using wood chips that were carved from the pole during its creation. This is supposed to help slow the rotting process. Then a wooden scaffold is built and attached to the totem pole to make it easier to pull the pole up. It takes hundreds of people to raise the totem pole. Next, there is a ceremony in which the artist is paid for his work. He then dances around the totem pole holding the tools he used to create it
Check out this site for pictures of totem poles.
EDITED TO ADD: Create Your Own Story Totem Pole
Friday, October 17, 2008
Fantastic Fiction Friday: Andy Warhol
This week’s Fantastic Fiction Friday post features Andy Warhol. You may remember that I had some difficulty finding Andy Warhol books. Jeremy, who writes a great blog at Scholastic, recommended the two I will share with you today. Thanks, Jeremy!
That’s right. It’s a double-feature.
First up is Andy Warhol’s Colors by Susan Goldman Rubin. This is nice board book illustrated with the oddly colored animals that Andy Warhol created. There is a green cat, a purple horse, and rows of pink cows. The simple, rhyming text has the perfect rhythm for repeated read alouds.
Today’s second selection is Uncle Andy’s: A faabbbulous visit with Andy Warhol by James Warhola. This book would make a great read-aloud for 2nd or 3rd graders.
James Warhola is Andy Warhol’s nephew. In this story, Warhola recalls a trip he took with his large family to visit Andy Warhol in New York City. Andy’s home is full of art. Some of it reminds James of the junk his father brings home from the junk yard and James loves it all.
I recommend this book highly if you want to experience a side of Andy Warhol you don’t often get to see.
Return to main page.
Wednesday, October 15, 2008
Paint Your Own Georgia O'Keeffe Flower
Yesterday you learned about Georgia O’Keeffe and the flower close-up paintings she is best known for. Today, paint your own flower close-up.
Supplies Needed:
White construction paper
Pencil
Watercolors
Water
Paintbrush
Gather your materials and cover your workspace. I recommend that you find a photo of a flower to inspire you. Below is the photo I used. (It was taken in the springtime at the Smithsonian Castle in D.C.)
Supplies Needed:
White construction paper
Pencil
Watercolors
Water
Paintbrush
Gather your materials and cover your workspace. I recommend that you find a photo of a flower to inspire you. Below is the photo I used. (It was taken in the springtime at the Smithsonian Castle in D.C.)
 Begin by sketching your flower onto your paper. Remember, you want the flower to fill up the whole page.
 When you’re happy with your sketch, choose which colors you’d like to use to fill in your flower. I chose all warm colors (red, yellow, and orange), but you can use any colors you want.
Paint your flower. Georgia O’Keeffe used bright colors. If you want your watercolors to look bright on the page, mix less water into them. Painting two coats of paint will also create brighter colors.
 Enjoy your flower painting!
Return to main page.
Tuesday, October 14, 2008
Georgia O'Keeffe
Georgia O’Keeffe was born in 1887 in Wisconsin. She grew up on a farm where she helped her family by cooking, sewing, and growing vegetables.
When she was five, O’Keeffe went to school at a one-room schoolhouse. She didn’t like school but she did enjoy the private art lessons she took after school. She knew she wanted to be an artist.
O’Keeffe’s family moved to Virginia where O’Keeffe started high school. Everyone at her school loved her drawings.
After high school, O’Keeffe went to study at the Art Institute of Chicago. She enjoyed it there but she got very sick after only one year and had to stop going. When she finally felt better, over a year later, O’Keeffe decided to study in New York instead. In 1912, she began taking drawing classes at the University of Virginia. She learned to paint in many different styles before she developed her own way of painting.
When O’Keeffe had finished school, she taught art lessons. She started to experiment with abstract art. She liked to draw curving lines with lots of shading. She even made some abstract paintings based on the things she saw in nature, like Evening Star IV, shown below.
 In 1916, a photographer named Alfred Stieglitz got a hold of some of O’Keeffe’s paintings. He showed them in his gallery without telling her. At first O’Keeffe was upset, but she forgave him. He helped make O’Keeffe’s art famous.
In 1918, O’Keeffe got sick again. While she recovered, she wrote letters back and forth with Stieglitz. The two fell in love and eventually got married.
O’Keeffe and Stieglitz bought a house on a lake where they lived in the summer time. O’Keeffe loved it there. She used an old barn as her studio and she painted many paintings that were inspired by her natural surroundings.
It was at the lake house that O’Keeffe began creating the paintings she is most known for. She painted close-ups of flowers in bright, bold colors. No one had ever painted close-ups of flowers before, but some photographers of the time were taking close-up photos of flowers.
From this point on, O’Keefe always painted subjects using strong colors. She simplified her subjects so that nothing remained except the most important parts. Click here to view more than 200 of O'Keeffe's paintings.
In the 1930s, O’Keeffe took some trips to New Mexico. She loved it so much that she eventually moved there. She painted lots of paintings of the mountains, the desert, and the adobe houses. She especially loved to paint pictures of animal skulls. Sometimes she even painted desert landscapes and skulls on the same canvases.
She continued to paint until she lost her eyesight. She died in 1986
Return to main page.
When she was five, O’Keeffe went to school at a one-room schoolhouse. She didn’t like school but she did enjoy the private art lessons she took after school. She knew she wanted to be an artist.
O’Keeffe’s family moved to Virginia where O’Keeffe started high school. Everyone at her school loved her drawings.
After high school, O’Keeffe went to study at the Art Institute of Chicago. She enjoyed it there but she got very sick after only one year and had to stop going. When she finally felt better, over a year later, O’Keeffe decided to study in New York instead. In 1912, she began taking drawing classes at the University of Virginia. She learned to paint in many different styles before she developed her own way of painting.
When O’Keeffe had finished school, she taught art lessons. She started to experiment with abstract art. She liked to draw curving lines with lots of shading. She even made some abstract paintings based on the things she saw in nature, like Evening Star IV, shown below.
In 1916, a photographer named Alfred Stieglitz got a hold of some of O’Keeffe’s paintings. He showed them in his gallery without telling her. At first O’Keeffe was upset, but she forgave him. He helped make O’Keeffe’s art famous.In 1918, O’Keeffe got sick again. While she recovered, she wrote letters back and forth with Stieglitz. The two fell in love and eventually got married.
O’Keeffe and Stieglitz bought a house on a lake where they lived in the summer time. O’Keeffe loved it there. She used an old barn as her studio and she painted many paintings that were inspired by her natural surroundings.
It was at the lake house that O’Keeffe began creating the paintings she is most known for. She painted close-ups of flowers in bright, bold colors. No one had ever painted close-ups of flowers before, but some photographers of the time were taking close-up photos of flowers.
From this point on, O’Keefe always painted subjects using strong colors. She simplified her subjects so that nothing remained except the most important parts. Click here to view more than 200 of O'Keeffe's paintings.
In the 1930s, O’Keeffe took some trips to New Mexico. She loved it so much that she eventually moved there. She painted lots of paintings of the mountains, the desert, and the adobe houses. She especially loved to paint pictures of animal skulls. Sometimes she even painted desert landscapes and skulls on the same canvases.
She continued to paint until she lost her eyesight. She died in 1986
Return to main page.
Monday, October 13, 2008
Ancient Greece Part IV- Hellenistic Period
I have posted on three earlier period of Greek art. Check out the Geometric Period, the Archaic Period, and the Classical Period.
Between 334 and 323 BCE, Greece took over many other countries. When the Greek ruler, Alexander the Great, died in 323 BCE, he had a huge empire. The people who lived in the areas the Greeks took over had art and culture of their own. Their styles blended with the Classical Greek artistic style to create something new. This began the Hellenistic Period of ancient Greek art.
 During the Hellenistic Period, sculptors still created sculptures of gods, like Nike of Samothrace (above) and Venus de Milo (below).
 They also sculpted children (such as Boy with Thorn, shown below), elderly people, and Africans. These subjects had not been popular before.
 Hellenistic sculptors created many copies of earlier, Classical Period sculptures, as well, because wealthy art collectors wanted them for their homes.
After 31 BCE, art began to change again. This marked the end of the Hellenistic Period.
Return to main page.
Between 334 and 323 BCE, Greece took over many other countries. When the Greek ruler, Alexander the Great, died in 323 BCE, he had a huge empire. The people who lived in the areas the Greeks took over had art and culture of their own. Their styles blended with the Classical Greek artistic style to create something new. This began the Hellenistic Period of ancient Greek art.
During the Hellenistic Period, sculptors still created sculptures of gods, like Nike of Samothrace (above) and Venus de Milo (below).They also sculpted children (such as Boy with Thorn, shown below), elderly people, and Africans. These subjects had not been popular before.Hellenistic sculptors created many copies of earlier, Classical Period sculptures, as well, because wealthy art collectors wanted them for their homes.After 31 BCE, art began to change again. This marked the end of the Hellenistic Period.
Return to main page.
Saturday, October 11, 2008
Ms. Julie's Venus
Ms. Julie has posted a great video that teaches, step-by-step, how to draw Boticelli's Venus. It's pretty amazing to watch Venus' face appear on the page.

Enjoy!
Friday, October 10, 2008
Leonard and the Flying Boy by Laurence Anholt
Welcome to Fantastic Fiction Friday!
Today’s pick is Leonard and the Flying Boy by Laurence Anholt, another book in the Anholt’s Artists series.
Zoro is a dutiful student of Leonardo da Vinci. He mixes paints and cleans brushes for Leonardo. Salai, another student, is not so well-behaved. He steals, cheats, and lies, but Leonardo loves him anyway.
While Leonardo is painting the Mona Lisa, Salai steals his flying machine and convinces Zoro to test it out. The boys take the flying machine to the top of a tall mountain and strap Zoro in for his flight.
Anholt’s illustrations are mixed with Leonardo da Vinci’s sketches and paintings. This allows readers to see Leonardo’s own designs for the flying machine, as well as designs for some of his other inventions.
I had chosen a different book for this week’s Fantastic Fiction Friday but today I had the pleasure of reading Leonardo and the Flying Boy with a group of 2nd graders. They loved it as much as I did. The book also inspired us to think of inventions of our own, just like Leonardo da Vinci did. The students drew pictures of their inventions and then shared their ideas. Maybe Leonardo and the Flying Boy with inspire you, too.
Return to main page.
Thursday, October 9, 2008
Create Your Own Soap Bubble Art
Today’s project was inspired by Jean Simeon Chardin’s Soap Bubble (below), which I showed you yesterday. I had so much fun with this one. I hope you will, too.
 Supplies Needed:
Washable kids paint
Plastic cups
Drinking straws
Bubble soap
Paper
Go outside!
I’m going to say that again. Put on an old t-shirt and go outside. This project can be messy.
 Pour a little bubble soap into a few plastic cups. You’ll want one cup for each color. Mix in a squirt of paint. This isn’t a science. The more paint you mix in, the darker the colors will be, but keep in mind that if you add too much paint your mixture will no longer create bubbles.
Lighter colors, like pink, don’t show up as well as darker colors, no matter how much paint you add. You might want to stick with colors like blue, red, green, and purple. Experiment with as many colors as you want.
Dip a straw into a color. Do not suck up the bubble soap. You want as little soap as possible on the end (and you don’t want to drink soapy paint!).
Blow bubbles onto your sheet of paper. I laid my paper in the grass, sat next to it, and let the breeze blow the bubbles onto the paper. If you have a friend to create bubble art with, take turns catching the bubbles with the paper.
 The longer the bubble sits on the paper before popping, the darker the ring of color will be. I found that larger bubbles popped more quickly than smaller bubbles.
 When you like the way your painting looks, let it dry. The colors get very light when they dry.
Younger kids can enjoy this project as well. Just use bubble wands instead of straws and be prepared for a bigger mess. Bubble wands blow way more bubbles at a time than straws do.
Return to main page.
Supplies Needed:Washable kids paint
Plastic cups
Drinking straws
Bubble soap
Paper
Go outside!
I’m going to say that again. Put on an old t-shirt and go outside. This project can be messy.
Pour a little bubble soap into a few plastic cups. You’ll want one cup for each color. Mix in a squirt of paint. This isn’t a science. The more paint you mix in, the darker the colors will be, but keep in mind that if you add too much paint your mixture will no longer create bubbles.Lighter colors, like pink, don’t show up as well as darker colors, no matter how much paint you add. You might want to stick with colors like blue, red, green, and purple. Experiment with as many colors as you want.
Dip a straw into a color. Do not suck up the bubble soap. You want as little soap as possible on the end (and you don’t want to drink soapy paint!).
Blow bubbles onto your sheet of paper. I laid my paper in the grass, sat next to it, and let the breeze blow the bubbles onto the paper. If you have a friend to create bubble art with, take turns catching the bubbles with the paper.
The longer the bubble sits on the paper before popping, the darker the ring of color will be. I found that larger bubbles popped more quickly than smaller bubbles.When you like the way your painting looks, let it dry. The colors get very light when they dry.Younger kids can enjoy this project as well. Just use bubble wands instead of straws and be prepared for a bigger mess. Bubble wands blow way more bubbles at a time than straws do.
Return to main page.
Wednesday, October 8, 2008
Jean Simeon Chardin
Jean Simeon Chardin was born in France in 1699. He lived in Paris all his life. He rarely travelled and when he did, he did not go far.
 Chardin apprenticed with two painters of history before earning his way into the Royal Academy of Painting and Sculpture.
In 1737, Chardin showed his work at the Paris Salon, the official exhibition of art in France, for many years. He was very involved in the Salon. He went to meetings and helped organize shows.
Even though Chardin’s artwork was different from most art of the time, a lot of people liked his worked. Other artists admired his art and the King of France even paid him to paint.
 As Chardin grew old, his eyesight got worse and worse. Eventually he couldn’t paint in his realistic style anymore. In his old age, Chardin created pastel drawings instead, like Self Portrait with Easel (above). They weren’t popular at the time but they are now. Chardin died in 1779.
During the mid-1700s, Rococo art was in style. These paintings were very decorative. There had curving shapes and soft colors. Rococo paintings often included mythological scenes or scenes of wealthy people having fun. Chardin did not paint in this style.
 As you can see, Chardin didn’t use bright colors. He chose subdued colors, like browns, tan, copper, and deep red, instead. His paintings were so realistic that other artists of the time were amazed by his talent. Chardin painted still-lifes of food or kitchen items, like The Silver Goblet (above), and paintings of middle-class people. Girl with Racket and Shuttlecock (below) shows a girl getting ready to play badminton. Boy with Playing Cards (below) shows a boy setting up cards the way we sometimes set up dominos.

I especially like Soap Bubbles, which is shown at the top of this page. The bubble wand may look different than what we’re used to, but even in the 1700s kids enjoyed blowing bubbles.
Return to main page.
Return to main page.
Tuesday, October 7, 2008
Sidney E. King's Jamestown
I posted recently about Charles Wilson Peale. He painted portraits of lots of important early Americans, such as George Washington, John Adams, and Lewis and Clark. Today, travel even further back in time to learn about the first English successful English settlement in the New World, Jamestown.
The links on this page will take you to paintings by Sidney E. King. In the 1950s, King painted a series of pictures of early 1600s Jamestown. These paintings can help us to understand what Jamestown looked like, how the settlers lived, and what the settlers did.
* * * * *
When the English settled Jamestown in 1607, it became the first lasting English settlement in the New World. The English had tried to build colonies in several other places but failed.
After five months at sea, three English ships, the Susan Constant, the Discovery, and the Godspeed, landed at Jamestown. Jamestown must have looked strange to the English settlers. The land was wild and Native Americans, who were very different than the English, lived in the area.
The settlers built homes at Jamestown and tried to get used to colonial life. It wasn’t easy. Most of the settlers did not have experience building houses or growing food. They also weren’t prepared for the cold Virginia winter. In 1607, 104 settlers arrived in Jamestown; by the end of the first winter, only 38 remained.
Ship-loads of settlers arrived in Jamestown, but they were no more prepared for life in the New World than the settlers who were already there. If the colonists didn’t have enough trouble, their relationship with the Natives Americans was only getting worse.
In 1610, another English ship arrived at Jamestown. It carried supplies that the colonists badly needed.
Many colonists died, but over time the settlement at Jamestown began to grow and the colonists began to plant on land that was being used by Native Americans. One of the crops that the settlers planted was tobacco (which is used to make cigarettes). The Native Americans were not happy that the settlers were taking over their land. This caused even more problems between the settlers and the Native Americans.
You may remember learning about Pocahontas. You probably learned that she saved Captain John Smith from her father. You may also have heard that she and John Smith got married. It’s possible that she saved him from her father, but she did not marry him. Pocahontas married a different colonist. His name was John Rolfe.
Pocahontas did help the colonists. It was because of Pocahontas that the Native Americans allowed the settlers to stay at Jamestown. After John Rolfe and Pocahontas got married, the colonists and the Native Americans enjoyed peace for awhile.
Return to main page.
Monday, October 6, 2008
Draw Your Own Underwater Scene
This is a simple way to make your fish look like they really are swimming underwater.
Supplies Needed:
Blue construction paper
Washable markers
Spray bottle with water
Cover your workspace and gather your materials.
Begin by drawing an underwater scene in pencil. Your picture could include a school of fish, a shark, a dolphin, an octopus, a starfish, or anything else you can imagine. Below is the inspiration for my drawing. My mom took this picture underwater last year and I love it!
 In marker, draw lots of blue water lines around your pencil drawing. Then, spray some water on your picture so the blue lines run a little.
 Let the paper dry.
Go over your pencil lines with marker until your underwater scene is complete. I encourage you to include lots of different underwater creatures in your drawing. You might even choose to make up your own animals.
 I love that the water lines look wet and smudgy. If you want your lines to run more, use blue copy paper instead of construction paper.
Return to main page.
Supplies Needed:
Blue construction paper
Washable markers
Spray bottle with water
Cover your workspace and gather your materials.
Begin by drawing an underwater scene in pencil. Your picture could include a school of fish, a shark, a dolphin, an octopus, a starfish, or anything else you can imagine. Below is the inspiration for my drawing. My mom took this picture underwater last year and I love it!
In marker, draw lots of blue water lines around your pencil drawing. Then, spray some water on your picture so the blue lines run a little.Let the paper dry.Go over your pencil lines with marker until your underwater scene is complete. I encourage you to include lots of different underwater creatures in your drawing. You might even choose to make up your own animals.
I love that the water lines look wet and smudgy. If you want your lines to run more, use blue copy paper instead of construction paper.Return to main page.
Friday, October 3, 2008
Leonardo's Horse by Jean Fritz
It’s Friday! You know what that means.
Today’s Fantastic (Non)Fiction Friday pick has nothing to do with Andy Warhol. Or Pop Art. Sorry if you were looking forward to that. Hopefully I’ll stumble upon a good Andy Warhol book in the future.
Leonardo da Vinci was an artist, an inventor, an architect, an engineer, a musician. He was many things other than an artist and he had widespread dreams. One of those dreams was to build a bronze horse that was three times the size of a living horse.
Da Vinci was hired by the duke of Milan to build this horse. He sculpted the massive horse out of clay but couldn’t figure out to cast it in bronze.
Jean Fritz tells this story in Leonardo’s Horse. But the story doesn’t stop there. Fritz shows us how Leonardo finally got his horse, 500 years later.
This is a lovely story that would be a good read aloud, especially for children in 2nd or 3rd grade. I especially love how clearly this book explains how such a large sculpture is cast into bronze.
Return to main page.
Thursday, October 2, 2008
Create Your Own Warhol Masterpiece
Yesterday I posted a Warhol-inspired portrait project. Today’s Andy Warhol project is much simpler and better matched to younger art-lovers.
Supplies Needed:
Small piece of poster board
Construction paper in four colors
White paper
Pencil
Scissors
Glue Stick
You may choose to make butterflies, like I did, or any other animal or object. Make sure that whatever you choose can be broken into four parts. If your subject has more parts, you’ll need more colors.
Cut stencils of each part of the butterfly or use stencils that an adult has already made.
Trace each stencil on each piece of construction paper. Cut out all the pieces. Also cut one square out of each piece of construction paper. These will form your backgrounds.
 Mix and match the colors. Be sure that you’re happy with the way the colors look together before gluing them down.
Glue the pieces together. Arrange the four squares, then glue them to your sheet of white paper.

Return to main page.
Supplies Needed:
Small piece of poster board
Construction paper in four colors
White paper
Pencil
Scissors
Glue Stick
You may choose to make butterflies, like I did, or any other animal or object. Make sure that whatever you choose can be broken into four parts. If your subject has more parts, you’ll need more colors.
Cut stencils of each part of the butterfly or use stencils that an adult has already made.
Trace each stencil on each piece of construction paper. Cut out all the pieces. Also cut one square out of each piece of construction paper. These will form your backgrounds.
Mix and match the colors. Be sure that you’re happy with the way the colors look together before gluing them down.Glue the pieces together. Arrange the four squares, then glue them to your sheet of white paper.
Return to main page.
Wednesday, October 1, 2008
Create Your Own Andy Warhol Portrait
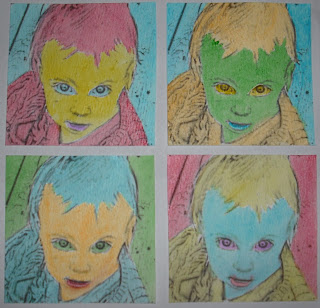
Andy Warhol created many copies of the same picture. He colored each picture different, using wild, unnatural colors. Today, create your own Andy Warhol-inspired portrait of yourself or someone you know.
A Note to Parents/Teachers: You will need a photo editing program for this project. I recommend that you prepare and print the photo before allowing your child to work on this project. There is a simple free program that you can download to turn a photo into a sketch, called Photo2Sketch. Download it here.
When you have downloaded the program, use the “open” option to locate the photo you want to turn into a sketch. Set the “Precision” to about 30 and the “Line” to about 4. Hit “Convert.” You can adjust the precision and line until the sketch looks the way you want it. Save the image.
Now print four copies of the image onto watercolor paper. If you don’t have watercolor paper, you can print onto plain copy paper but your child should use colored pencils instead of watercolors.
Supplies Needed:
Watercolor paper
Sheet of white paper
Watercolor paints
Paintbrush
Water
Scissors
Glue Stick
 Cover your work space. This is very important because you will be painting all the way to the edge of your pictures.
Cut out all four pictures so there is no border around them. Choose about 6 bright colors. The more water you use the more the lines will show through, but if your paint is too watery it will run.
Fill in your pictures with bright colors. Color the face one color, the body and hair another color, the background a third color, the eyes a fourth color, and the mouth and fifth color. Try not to use the same color twice for any section. Don’t pay too much attention to details.
This is Olivia:
 Isn’t she gorgeous? She’s my cousin’s daughter. I don’t know what that makes her to me, but I love her. Above is the photo I began with. Then I cropped it:
 I changed it into a sketch using Photo2Sketch:
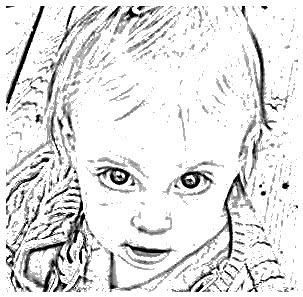 Then printed and painted:
Return to main page.
A Note to Parents/Teachers: You will need a photo editing program for this project. I recommend that you prepare and print the photo before allowing your child to work on this project. There is a simple free program that you can download to turn a photo into a sketch, called Photo2Sketch. Download it here.
When you have downloaded the program, use the “open” option to locate the photo you want to turn into a sketch. Set the “Precision” to about 30 and the “Line” to about 4. Hit “Convert.” You can adjust the precision and line until the sketch looks the way you want it. Save the image.
Now print four copies of the image onto watercolor paper. If you don’t have watercolor paper, you can print onto plain copy paper but your child should use colored pencils instead of watercolors.
Supplies Needed:
Watercolor paper
Sheet of white paper
Watercolor paints
Paintbrush
Water
Scissors
Glue Stick
Cover your work space. This is very important because you will be painting all the way to the edge of your pictures.Cut out all four pictures so there is no border around them. Choose about 6 bright colors. The more water you use the more the lines will show through, but if your paint is too watery it will run.
Fill in your pictures with bright colors. Color the face one color, the body and hair another color, the background a third color, the eyes a fourth color, and the mouth and fifth color. Try not to use the same color twice for any section. Don’t pay too much attention to details.
This is Olivia:
Isn’t she gorgeous? She’s my cousin’s daughter. I don’t know what that makes her to me, but I love her. Above is the photo I began with. Then I cropped it:I changed it into a sketch using Photo2Sketch:Then printed and painted:Return to main page.
Subscribe to:
Posts (Atom)


