Showing posts with label kids. Show all posts

Monday, February 15, 2010

Pairing Paintings with Poems

It certainly has been awhile! I’m student teaching this semester (and loving every minute of it) so things have been busy around here. I have had some time the last few days, though, because we got hit by a ton of snow and schools have been closed now for over a week! I’m sure the kids are loving it, but I’m ready to get back.

I spent some time last week working on a lesson for our poetry unit and I thought some of you might be interested in what I put together. Some time ago I read an article by Judith Jester in which she talked about how we “read” paintings in the same way we read literature. I wanted to use this idea so I went on a hunt for four poems that I could match to four paintings. This was a lot more difficult than you’d think! Below is what I found.

I matched Edna St. Vincent Millay’s “Afternoon on a Hill” with Claude Monet’s Poppies at Arguenteuil (shown above).

Deborah Chandra’s poem “Bubbles” matched Jean-Baptiste-Simeon Chardin’s Boy Blowing Bubbles.

Tiger in a Tropical Storm (Surprised!) by Henri Rousseau seemed a great illustration of “Tiger Dance” by Carconti Etva.

And “Wind Pictures” by Mary O’Neill (scroll toward the bottom of the page to find the poem) paired well with N.C. Wyeth’s The Giant.

All of the poems except Tiger Dance can be found in The 20th Century Children’s Poetry Treasury selected by Jack Prelutsky. It’s really a great book. It has so many wonderful poems, all illustrated superbly by Meilo So.

My thought is to have the students read each poem and look at each painting and decide which painting to pair with which picture. Then they’ll write about how they made the pairings.

I’m excited about this lesson. I’ll let you know how it goes.

Return to main page.

Saturday, December 19, 2009

Virtual Cookie Decorating

Cookie baking has always been a part of the Christmas season in my house.

But you can only make so many cookies before you run out of people to eat them. When you’ve made enough real cookies, head to this site to decorate some virtual cookies.

Return to main page.

Create Your Own Gingerbread Man Garland

This is another kindergarten project that’s fun for all ages. When my sister was in kindergarten she made a gingerbread man garland that still hangs on our tree every year. My sister would be perfectly happy if that garland ended up in the trash and each year she tries to convince our mother to leave it off the tree, but her arguments only cause our mother to choose ever more prominent placements for that piece of kindergarten artwork.

Supplies Needed:

Brown paper (a bag will do)

Scissors

Yarn

Glue

Glitter

Beads

Sequins

Crayons

Markers

etc.

I believe my sister’s teacher used a die cut to make the gingerbread men, but you can create your own tracer by copying and pasting this gingerbread man into a word document and resizing. You want the gingerbread men to be about 4 inches by 6 inches. They should fit neatly into a sandwich bag for storage. An adult will want to cut four of five gingerbread men for each garland. Kindergarteners and 1st graders will quickly become frustrated if they have to do it themselves.

Cover your work space! Glitter! Ahh!

Decorate each gingerbread man differently. Use any or all of the materials for each.

When everything is dry (this could take awhile), an adult can link the gingerbread men by stapling a length of yarn to the backs of the gingerbread men’s arms.

Hang on a tree or over a door and enjoy. Maybe it will still be around when you’re in your 20s!

Return to main page.

Create Your Own Patterned Candy Canes

I can’t take credit for this simple and easy project; I saw it in a kindergarten classroom this week. The idea is that the children practice making pattern using red and white beads. When they finish, they have an ornament to hang on the tree or in a window.

Supplies Needed:

Chenille stems

Red beads

White beads

String one bead onto the chenille stem and wrap the end of the stem around the bead to hold it in place. This may be a job for an adult.

Decide what pattern you will use. You could keep it simple and string one red bead, one white bead, one red bead, one white bead, and so on. Or you could be really tricky and string one red bead, one white bead, two red beads, one white bead, three red beads, one white bead, and so on. The limit is your imagination.

Return to main page.

Monday, June 1, 2009

Create Your Own Butterfly

I recently had the pleasure of spending a full week with a wonderful class of second graders. I was able to create my own lessons so, of course, there was an art project involved. The second graders had been studying butterflies and were even tracking their life cycle. When I arrived, the butterflies were hanging in chrysalises from the roof of a mesh tent. Over the course of the week, all of the butterflies emerged. It was very exciting. One even came out of its chrysalis into my hand! It was a magical experience.
The kids loved those butterflies and wanted to spend every minute looking at them or talking about them. On the last day of the week we learned about the parts of the butterfly's body. Rather than just labeling a blank image of a butterfly, the kids made their own butterflies, added the markings of the Painted Lady (the type of butterfly they were observing), and labeled the body parts. They did a great just.


The students had the option of showing the butterfly from the top with its wings spread out, or from the side. I created tracers for the wings and body and handed out black and orange construction paper. The kids traced and cut out the pieces and then glued them onto another sheet of construction paper. They colored the wings so the butterflies looked like Painted Ladies. Finally, the students labeled the parts of the body, being careful to spell everything correctly. Some of those words are tough to spell!

The kids cut around their butterflies so that all the artwork would fit on the bulletin board. The students were excited to share their butterflies with their teacher on Monday.

It was such a fantastic experience. I learned a lot of lessons I could never have learned in teacher classes and I discovered just how much work it is to prepare for each day. I am so inspired.

Return to main page.

Friday, May 1, 2009

Look! Look!

Look what just came in the mail!
I know what you're thinking: "Who did the art on that mug and where I can I get one???" It's one of Ms. Julie's tangles printed on a mug. Isn't she great? And yes, you can enjoy hot chocolate or tea or coffee or ice cream (Mm. Ice cream would be delicious out of a tangle mug.) or anything else you can put in a mug out of your very own tangle mug. Visit Ms. Julie's gallery at Zazzle to order your own. And don't forget to visit her awesome blog, too!

This one was a prize for helping title one of Julie's other fabulous pieces of art. Thanks, Julie!

Monday, April 27, 2009

Macaroni Self-Portrait Day

It seems that today is Macaroni Self-Portrait Day. Whose idea was this? I don't know. What I do know is that playing with macaroni and glue is fun and whoever thought that this activity should have its own holiday was on the right track.

Of course you don't need step-by-step directions for this one so I'll just show you my own self-portrait.
I hope you have as much fun with this as I did. Happy Macaroni Self-Portrait Day!

Return to main page.

Wednesday, April 22, 2009

Create Your Own Rainy Day Masterpiece

It’s a rainy day here in Maryland. We’ve been having a lot of those lately and I know that a lot of you, at least in the U.S., have, also. So today, or the next time it rains, look out your window at the trees. Don’t they look dark and gloomy against the green and blue-grey background of the leaves and rain?

I must admit that I did not think of this project on my own. I saw it in a school where I worked last week and was so impressed by the artwork the students created that I knew I had to share it with you.

I recommend this project for upper elementary students as the paper cutting can be a bit tricky. It can be adapted for younger students though. Instead of keeping the black paper in one piece, just cut out individual tree shapes and glue them down.
Supplies Needed:

Watercolor Paper
Watercolor Paints
Paintbrush
Water
Black Construction Paper
Scissors
Glue Stick
Gather your materials and cover your workspace.
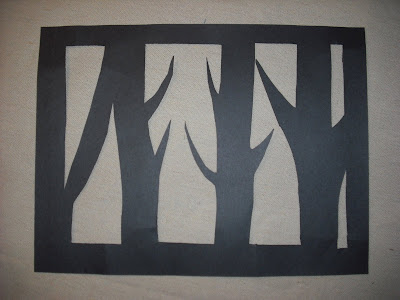
Begin by cutting tree shapes into your black construction paper. Leave a border around the edges. This will keep your paper in one piece. You’re just trying to create the impression of trees; they don’t have to be perfect.
Set your tree paper aside and turn to your watercolor paper. You will use cool colors (blue, green, purple) to cover your paper. Paint with broad strokes and layer your colors on top of each other.
Let your paper dry. This shouldn’t take too long.

Finally, use a glue stick to glue the trees on top of the watercolor paper.
Hang and enjoy!

Return to main page.

Tuesday, April 21, 2009

Mom's Chocolate Painting Inspired by Ms. Julie

My mom has become so annoyed by my lack of posts that she went ahead and created her own. I guess you guys missed me.

********


I have been looking at your chocolate painting post for so long now that I decided I needed to give it a try. First I needed to pick something to copy and I was inspired by “Parrot Paradise” on Ms. Julie’s Place – She however is much better at creating art than I am. Next I printed out her picture at a size that will fit the cheesecake it will grace. I then taped the picture to the back of a piece of parchment paper, traced a circle the size of the cake top and set it into a cookie sheet


I next collected all the different colored chocolate melts that I had and decided which colors to use as I did not have any purple. I have found from past experience that you really can’t make different colors with these melts. They are not pure colors so you mostly end up with different browns.


I then started filling in the various sections letting it cool and harden between colors. I used some drip painting to represent the leaves as it is quite difficult to paint with too much detail (artistic license?). A white chocolate background would look better with this picture so I painted a border around the edge with the intention of pouring the rest of the chocolate to hold it all together.

Then I put the picture in the refrigerator to harden. I have now discovered that white chocolate doesn’t melt thinly enough to pour so I had to spread it with a knife which had the unfortunate effect of smearing some of the painting. And there for next time I will use a true chocolate background.


Now I must go make the cheesecake!

To Peter: My chocolate art won’t last long either. But I did make it 24 hours ahead of the cheesecake, so it should last at least that long.

Monday, April 6, 2009

Chocolate Painting

I haven't dropped off the planet. I'm here! I hope you are all enjoying poetry month and the poems Gregory K has been posting at his site this month. I've been doing a little traveling so I haven't been around much. I haven't even done much writing, though I had planned to get to work this month!

I promise you all some real posts this week, but in the meantime enjoy this project. Turn any picture into a chocolate painting.

Return to main page.

Wednesday, April 1, 2009

Sculpt Your Own Clay Birthday Cake

Today I am 24. Unless I can somehow have a party in a hot air balloon, I can’t think of a better way to celebrate than to do a birthday art project with you all.
So today, sculpt your own clay birthday cake.

Supplies Needed:

Clay (flour, salt, water)
Paint
Paintbrush
Pipe cleaner
Wax paper
Aluminum foil
Scissors
This project would be much simpler if you use colored, store-bought polymer clay rather than making your own clay and painting it. That said, if you enjoy a challenge, follow these to directions to make your own clay for this project. A warning: it’s tough to mix the clay so an adult should at least help.

In a bowl, combine 2 cups of flour, ¾ of a cup of water, and ¾ of a cup of salt. Mix with a wooden spoon until it becomes too difficult to do so. You’ll want to add a little more water, about another 1/8 of a cup, as you continue to mix with your hands.
Spread a sheet of wax paper over your workspace. Begin with a ball of clay that is about two handfuls big. Roll it around in your hands until it is a smooth ball. Then, shape it into a rounded square by pressing each side gently onto the wax paper. When it is the shape of a small cake, set it aside.

Roll out a long snake of clay. This will be the icing around the bottom of the cake. When the snake is smooth, wrap it around the base of the cake.
Cut a square of aluminum foil. This is the cake tray. Place the cake on the tray.

Cut four pieces of pipe cleaner, about 1 inch long each, and press them into the cake. These are the candles. Remove them from the cake so you can paint.
Let the cake dry. It needs to dry at least over night before you paint it.

Mix a little bit of yellow paint with white to make a butter cream frosting (no vanilla on my cake!) and paint the cake with it. I had trouble making the paint look smooth so I used a palette knife to even out the paint, just like you would use a knife to smooth out frosting.

Choose a color for the icing around the base of the cake. Carefully paint the icing.

Paint decorations onto the top of the cake.

Finally, push the pipe-cleaner candles back into the cake.
Remember, this one’s just for decoration!

Return to main page.

Thursday, March 26, 2009

Create Your Own David Wiesner Cloud Scene

This is another project inspired by David Wiesner. To try the first project, click here.

I don't think you really need to see my attempt at this. It was fun and that's all that really matters.

Supplies Needed:

Construction Paper
Oil Pastels
Baby Oil
Q-tips

Read Sector 7. In fact, you should probably not read the rest of this project until you have read Sector 7. I don't want to ruin anything for you.

As you'll remember from the book, sector 7 is where all the clouds for the eastern coast of the U.S. are made. When the boy visits sector 7 he helps the clouds take on new shapes--as sea creatures.

Today, draw your own underwater scene made entirely of clouds. Use a dark colored piece of construction paper. Go with blue, green, or black. Fill your page with sea creatures such as fish, starfish, seahorses, dophins, and whales. Draw them with white oil pastel and then fill them in with white, black, and shades of grey.

Blend the colors with Q-tips. You may want to use a little baby oil to help the colors blend. The oil with also help the clouds look whispy. For big, fluffy-looking clouds, skip the oil.

Return to main page.

Create Your Own David Wiesner Picture Book

I’ll post two projects inspired by David Wiesner. The second will post later today. Enjoy!

Because there are only 24 hours in a day, and even fewer waking hours, there isn’t an unlimited amount of time for art (obviously). But art, and the opportunity for art, is everywhere. Teachers and homeschoolers may be interested in reading this before completing the following project. I know that if you found my site you think art is important, but sometimes we all need to be reminded.

Supplies Needed:

Paper
Construction Paper
Pencil
Crayons/Colored Pencils/Markers
A short story with no (or very few) pictures
Imagination

David Wiesner is able to tell a story in only pictures. Now it’s your turn to do the same.

Read a story. Fairy tales work especially well for this project. They are short and can be printed from the internet without pictures. As you read, try to picture the characters and the setting in your mind. Try to watch them as they move. Hear them when they speak. These are things that good readers do without thinking.

You may want to read the story a few times so you can clearly picture everything.

Retell the story in pictures. You’ll want to draw and color 1-3 pictures for each scene. Be careful to draw the characters, settings, and actions the way you saw them in your mind as you read.

If several of your friends all illustrate the same story, everyone will draw their pictures a little differently. This is because no two people see exactly the same thing in their minds when they read. And that’s okay.

You might instead each choose one scene to illustrate, put the scenes in order, and make a group picture book.

When you’ve finished illustrating the story, make a construction paper cover and staple your book together. Share your book with your friends and family.

Return to main page.

Tuesday, March 24, 2009

David Wiesner

Remember all the things that a picture book has to be to win a Caldecott Medal or Caldecott Honor? When I read that list, I think of David Wiesner. And I’m not the only one. He is only the second person ever to win three Caldecott Medals. Two more of his books are Caldecott Honor Books. This is extremely impressive but what really matters is how the books make you feel. Do you like his books?

I do!

I especially love the books that do not use words at all to tell the story, like the three I’ll tell you about today.

David Wiesner’s Caldecott Honor Book, Sector 7 is amazing. Using only pictures, Wiesner tells the story of boy who makes friends with a cloud while on a class trip. The cloud takes him to Sector 7 where all the clouds for the eastern coast of the U.S. are formed and sent into the world. There, the boy and the cloud cause some mischief that turns the sky into a giant, under-the-sea-themed art exhibit.

Tuesday, winner of a Caldecott Medal, uses words only to tell us that the story takes place through the night on a Tuesday. Just as you would expect from David Wiesner, the rest of the story is told with pictures. On this particular Tuesday, a collection of frogs rise out of the water and ride their lily pads like magic carpets through the town. I especially love when the frogs get caught up in the drying laundry.

And finally: Flotsam, another Caldecott Medal winner. In this story, again without text, an interesting piece of flotsam washes up on a beach and a boy discovers it. The underwater camera is ancient and filled with unbelievable pictures of sea life. In one picture, a family of octopi relax in their living room while fish swim between the pieces of furniture. In another picture, colonies live in seashells on the backs of turtles. But the best part of the story is the history of the camera. Generations of children have passed the secrets of the sea from one to the next by putting a new roll of film in the camera, taking a picture of themselves, and tossing the camera back into the ocean.

I recommend that you check out Houghton Mifflin’s webpage about David Wiesner if you’re interested in knowing more about this incredibly talented artist.

Return to main page.

Friday, March 20, 2009

Create Your Own Art Garden

Happy first day of spring! I promise to share more illustrators with you but today I want to celebrate spring. Today, create your own art garden by painting terracotta pots in the styles of famous artists.
Supplies Needed:

Three terracotta pots
Three terracotta saucers
Paints
Paintbrushes
Spray bottle
This is a messy one. If you’re having nice weather I recommend taking your whole art studio outside today. Wear old clothes and, no matter what, cover your workspace.

The first pot we’ll make is in the style of Jackson Pollock. If you don’t remember him, go refresh your memory.

I did my splatter painting in the sink, but it still made quite a mess:
You want to use a dry brush for this. A hard-bristled toothbrush would be better than a paintbrush. Squirt some paint onto the end of your brush. Aim the brush at the pot and run your thumb across the bristles. This will send the paint flying in all directions. That’s why you’re outside and wearing old clothes!
Rinse the brush and then squirt a new color onto the bristles. Splatter the paint across the pot. Continue adding colors until you are happy with your pot. Do the same with the saucer. It will save you some time and brush washings if you do the pot and the saucer at the same time.

The second pot is in the style of Piet Mondrian. Remember him? Paint squares, lines and rectangles in blue, red, yellow, and white until you have covered your whole pot. I left the lip clean but you may paint it if you wish. Let the pot dry.
When the pot has dried (about 30 minutes), paint black lines between each square, rectangle, and line.

The final pot is in the style of Morris Louis (sort of). Remember his stripe paintings? Place your pot in a box lid or some other container to catch the water and paint runoff. Stand the pot in the container with the lip down. Dab paint around the edge of the pot. Use a spray bottle to spray the paint down the side of the pot in stripes.
You may want to let the pot dry and do another coat of stripes in the opposite direction (from the lip to the base). I chose not to.
Use the same method to paint the saucer. Dab paint half way around the lip of the saucer. Then use a spray bottle to spray the paint into and across the saucer.
When your pots are dry, plant seeds, water, and watch spring bloom in your art garden. I’ll post pictures of my flowers when they bloom.

Return to main page.

Wednesday, March 18, 2009

Create Your Own Jasper Johns Map

Today, create your own Jasper Johns map. Click here to see a picture of Johns’ original painting before you begin your own.

This is a very simple, very quick project. You can practice finding and labeling the states while creating your own artwork. If you choose, use a map of just the original thirteen colonies, just New England, just the southern states, or even a map of Europe, Asia, or Africa.

This would make a fun and simple social studies center if you have a place to set it up.

Supplies Needed:

Blank Map
White crayon
Watercolors
Paintbrush
Water
Print a blank map like this one. You might consider enlarging it on a copy machine and printing onto larger paper.

Trace all the lines with a white crayon. It can be difficult to see which lines you have already traced and which ones you have not. When in doubt, run your finger over the line. If it feels smooth, you need to trace the line. If it feels waxy, you have already traced it.
Next, label the states. This is where having a larger map comes in handy. It might even be a good idea to print the map in sections onto several sheets of paper and then tape or glue them together when you finish. Use your white crayon to write the names of the states on the map. You’ll want to use abbreviations for some of the smaller states. In my example, I only labeled a few of the states. You should label them all.

When you have traced every line and labeled every state, paint the map with watercolors. It’s okay to color outside the lines. In fact, you should color outside the lines. Remember what Jasper John’s map looked like?
When you’ve finished, the state lines and names will stand out against the colors of your map. Hang and enjoy!

Return to main page.

Monday, March 16, 2009

Craft Contest at Plaid

Plaid is holding a craft contest over at their blog. This is a great opportunity to show off your artistic skills and possibly even win a prize. Head over to their site and check out the details. I wish you luck!

Jasper Johns

Jasper Johns was born in 1930 in Augusta, Georgia. He is still living and creating art so I will not say too much about him, but tomorrow I plan to post a project inspired by his art. You should certainly know a little something about him. Be sure to check out the links to his artwork so you’ll have something to inspire you when you create your own masterpiece.

Johns didn’t take any formal art lessons as a child but he knew he wanted to be an artist. In 1949 he moved to New York City to study at the Parsons School of Design. There were a lot of artists working in the city at that time and Johns made friends with some of them. He was drafted into the army soon after arriving in New York City, though.

When he returned from war, Johns began to experiment with different styles. At the time, Abstract Expressionism (the movement that included Jackson Pollock) was the popular artistic style. For the Abstract Expressionists, art was all about showing emotion. Johns work is the opposite. This may be one reason his art became as popular as it did.

Johns painted objects that everyone could recognize, like flags, numbers (and more numbers), targets, and maps. The paintings don’t show Johns’ opinions. In fact, the artwork may not have any particular meaning at all. His paintings show us things that we have seen hundreds of times and often just ignore. But we don’t ignore Johns’ paintings. Instead, we study them and find new meaning in the objects he shows us.
Johns has created more than just paintings. He has also made prints of his artwork and he has created sculptures out of found objects.

Tomorrow, create your own Jasper Johns map painting.

Return to main page.

Tuesday, March 10, 2009

Maurice Sendak

Maurice Sendak was born in New York in 1928. He decided to become an illustrator after watching Disney’s Fantasia when he was twelve years old. I can understand that. It is a pretty inspiring movie.

Before he began writing his own books, he made a name for himself by illustrating children’s books written by others. You may have read some of the Little Bear books by Else Holmelund Minarik. Sendak illustrated those books!

He then began writing and illustrating his own books. There were (and are) people who didn’t think his illustrations were appropriate for children and some of his books have been banned or challenged.

Maurice Sendak has also helped design sets for major ballets and operas.

He won several awards, including the Caldecott Medal for Where the Wild Things Are.

Which brings us today’s first book review. I hope you have all read Where the Wild Things Are, but if you haven’t, there’s still time! Where the Wild Things Are was published in 1963 but hasn’t lost any of its appeal in the 45 years since. In this tale, Max, dressed in a wolf suit, makes so much trouble that he is sent to bed without supper. But a magical thing happens when his room becomes a forest with an ocean rolling by. Max hops in his private boat and sails away to where the wild things are. He is made the king of the wild things and he has a fantastic time making trouble with the other wild things. Soon, though, he misses his real home.

Next up, Chicken Soup with Rice. This is perhaps the best children’s book for learning the months of the year. Each month gets its own rhyming poem about chicken soup with rice and its own illustration, colored in yellows, blues, grays, and greens. Sounds like a boring book, you say? Not so! During the winter, soup is eaten to celebrate a snowman’s birthday. In the spring, soup helps cure roses that have begun to droop. Who could write twelve fun and whimsical poems about chicken soup with rice but Maurice Sendak?

Sendak has also illustrated several simple nursery rhymes, like We Are All in the Dumps with Jack and Guy, and Hector Protector and As I Went Over the Water. His illustrations bring new meaning to these short stories. In the Hector Protector nursery rhyme, all we know about Hector Protector is that he is dressed all in green and when he goes to the queen she doesn’t like him so she sends him home. Sendak shows us that Hector Protector doesn’t want to be dressed in green. He also doesn’t want to go see the queen so he throws the cake he is supposed to take to her in the dirt, hops on the back of a lion, and delivers a snake instead. No wonder the queen sends him home!

And finally, Maurice Sendak recently published a pop-up book called Mommy? which he wrote and illustrated with Arthur Yorinks and Matthew Reinhart. Reinhart is one of the greatest pop-up artists out there and this book is a masterwork. In this fun story, a toddler wanders into a haunted house in search of his mother. He asks the creatures, Frankenstein, an Egyptian mummy, and others, if they are his mommy. When they try to scare him, he pulls pranks on them. The toddler pulls the pins out of Frankenstein’s neck, for instance. This book is so much fun. Kids could certainly destroy this pop-up with over-use but it is well put together. I highly recommend it.

Return to main page.

Wednesday, March 4, 2009

Randolph Caldecott and the Caldecott Medal

In the upcoming weeks I will be posting about several winners of the Caldecott Medal, as well as a few runners-up, also known as Caldecott Honor books. In many libraries you’ll see Caldecott Medal winners displayed along the tops of the shelves or in their own table displays. They each carry a medal on their covers. But what exactly does it mean to be a Caldecott Medal winner or Caldecott Honor book? Who decides which books should receive the award? And how did this all start, anyway?
Well, it all started with an illustrator named Randolph Caldecott. Throughout his life, he created artwork for magazines. He illustrated novels and drew cartoons. He sculpted and painted. He even illustrated his letters, drawing pictures around the edges of the pages.

In 1887, Caldecott was asked to illustrate two children’s books which were to be published for Christmas. The books were huge hits. Caldecott illustrated two picture books each year for Christmas for the next eight years (until his death). He wrote some of these books himself, but he always added something with his illustrations. The pictures in Caldecott’s books help to tell some of the story that the words do not. Below is one of his illustrations. It is from The Diverting History of John Gilpin. It should remind you of the picture on the Caldecott Medal pictured above.
In 1938, the Association for Library Service to Children awarded the first Caldecott Medal. The award was named in honor of Randolph Caldecott and the winner had to contribute to children’s literature the way Caldecott had. The illustrations had to be original artwork and they had to help tell the story.

Recently, there have been winners of the Caldecott Medal that do not include words at all. David Wiesner, who I’ll post about soon, has won three Caldecott Medals and two Caldecott Honors. He tells his stories all in pictures. He has definitely continued Randolph Caldecott’s tradition!

Return to main page.