 Yes! I did get to teach my pairing paintings and poems lesson! I thought it went very well. I began by displaying Rousseau's Surprised! (shown above) and brainstorming with the class everything we saw in the painting. Then we decided the main idea of the painting.
Though I had found a poem that matched this painting pretty well, I decided it was a little out of reach of some of my students. I wrote a poem (at the end of the post) to go along with the painting and we read it together. We compared the poem with the painting and looked for common details.
When I asked the students to complete this activity on their own with a different painting and poem pair, they were able to do so with little difficulty. The kids enjoyed the activity in part because I gave each student an individual print out of his or her painting (in color!) and poem. The students were excited to get to hold and study the paintings up close.
I recommend this activity. It was a hit with my class. If you would like a copy of the worksheet I used, email me and I'd be happy to send one along.
My tiger poem:
Tiger
A hungry tiger in the rain
crouched in windblown grass
and growled
and scowled
and bared her teeth
and waited for prey to pass.
Soundlessly she prowled
as lightning lit the sky.
Then thunder crashed
and forward she dashed,
determined not to let her prey slip by.

 Note: My aunt created the jazzy painting with the brown background, and I painted the picture of the dog walker with the blue background. We used a lot of small pieces because we wanted to have fun with the project, but you can use as few or as many shapes of any size. It would be interesting to create a collage painting using only circles, squares, rectangles, and triangles. You would really start to notice the way objects are just made up of shapes stuck together.


 Supplies Needed:
 Gather your materials and cover your workspace.
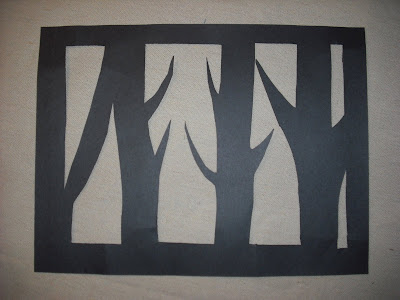 Set your tree paper aside and turn to your watercolor paper. You will use cool colors (blue, green, purple) to cover your paper. Paint with broad strokes and layer your colors on top of each other.
 Let your paper dry. This shouldn’t take too long.
 Hang and enjoy!


 Then I put the picture in the refrigerator to harden. I have now discovered that white chocolate doesn’t melt thinly enough to pour so I had to spread it with a knife which had the unfortunate effect of smearing some of the painting. And there for next time I will use a true chocolate background.
 Now I must go make the cheesecake!
 Supplies Needed:
 This is a messy one. If you’re having nice weather I recommend taking your whole art studio outside today. Wear old clothes and, no matter what, cover your workspace.
 You want to use a dry brush for this. A hard-bristled toothbrush would be better than a paintbrush. Squirt some paint onto the end of your brush. Aim the brush at the pot and run your thumb across the bristles. This will send the paint flying in all directions. That’s why you’re outside and wearing old clothes!
 Rinse the brush and then squirt a new color onto the bristles. Splatter the paint across the pot. Continue adding colors until you are happy with your pot. Do the same with the saucer. It will save you some time and brush washings if you do the pot and the saucer at the same time.
 When the pot has dried (about 30 minutes), paint black lines between each square, rectangle, and line.
 You may want to let the pot dry and do another coat of stripes in the opposite direction (from the lip to the base). I chose not to.


 Use a paper towel to catch the extra water. You may also want to use a paper towel to blot the bottom of your paper.
 Cover your workspace. Ask an adult to cut a piece of aluminum foil for you. Pour a little water into your cup and add about the same amount of glue. Mix the glue and water together. You don’t need a lot of this mixture.
 Spread another thin layer of the glue mixture over the tissue paper. Sprinkle glitter onto the “painting.”
 Enjoy!
 It was possible to tell which paintings had been created on top of other pictures, but experts hadn’t figured out to see and recreate the older images. Until now. A group of scientists has used a new x-ray method to find a hidden picture behind a Vincent van Gogh painting.
 In 1922, Rivera married his first wife, Guadalupe Marin. She was a model and a novelist. The marriage didn’t last and in 1929 Rivera married Frida Kahlo. She was also an artist. I’ll post about her tomorrow. When Kahlo died, Rivera married a third time. His final wife was Emma Hurtado, his agent (the person who sold his paintings).
 He enrolled at the New York School of Art and became interested in painting the grittiest and dirtiest details of American life. There was a group of artists in the early 1900s who painted mainly city scenes that showed the lives of the poor. The artists, members of the Ash Can School, only showed their work together once and, at that time, Bellow’s paintings weren’t included. The term “Ash Can School” is used today for artists who painted in New York City during the early twentieth century and portrayed city life. Above is Cliff Dwelers, below is Men of the Docks and Steaming Streets.
 Bellows gained fame when he helped organized a show of city landscapes. His fame grew as he showed his work at judged art shows across the country. As he became a recognized artist, wealthy art lovers began to ask for portraits. Bellow continued to paint city scenes but he also painted many portraits, like the one shown below, Portrait of Emme in Night Light.
 When the U.S. became involved in World War I, Bellows deeply and publicly supported the decision. He enlisted at age 35 but was never sent abroad to fight. He used his art to show his passion and began painting war scenes. These paintings are very intense and so I will not show any here.
 Besides painting, Bellows helped to spread the art of lithography. A lithograph is a copy of a painting made by applying the painting to a smooth, hard surface, and using certain chemicals to transfer the image to paper. Bellows had a lithography press in his studio and used it to create about 100 images.
 When the drawing was perfect, a thin layer of plaster was spread over the area to be painted. It was sanded and smooth until it was shiny. Some of the apprentices would then use cords dipped in red paint to create a grid on the wall. The image was then painted onto the wall in red paint by the apprentices. They had to be careful to paint the figure exactly the way it looked on the papyrus. The master craftsman corrected the pictures in black before the apprentices filled in the figure with colored paints.
 Check back tomorrow for the next post in this series on Egyptian art!
 Yes, that’s it. Gather your supplies and cover your workspace with newspaper. I chose to use red, green, and white paints and I think my ornament came out well. You can use any colors and glass paint comes in more colors that you can imagine. Silver and gold would be good additions to any ornament. Go crazy!
 A side note: You can use regular craft paint for this project since you won’t be washing the ornament or eat off of it, however, eventually the paint will begin to separate. The ornament pictured below was painted about ten years ago, by my estimation, and you can see that pigment (that is the color) is separating from the binder (the liquid that the color is mixed with to create paint). I still like it though, and hang it on my tree every year.
 Click the following links for a
  Mondrian soon became interested in cubism. Cubism, which I have not yet posted about, is an artistic style in which the subject is broken into meaningful pieces and rearranged in a new order to show the most important parts of the object. The painting shown below, Still Life with Ginger Pot, was painted by Mondrian in the cubist style. Because of the influence of cubism, Mondrian’s paintings became more and more abstract. Mondrian moved to Paris in 1912 so he could further study cubism.
 In 1914 Mondrian returned home just before World War I broke out. He was stuck there for the duration of the war (1914-1919). During this time he became friends with some other artists and together they began the new movement,
 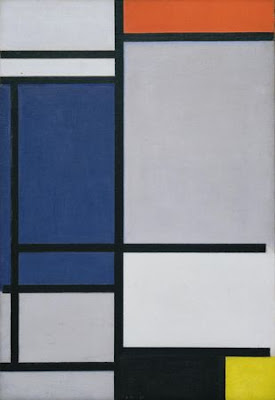 The members of the De Stijl movement were searching to paint an even more honest truth than the cubists. They believed the essence, the foundation of all things could be found in the simplest form: straight lines and primary colors. So Mondrian began painting pieces like the one shown above, Composition.