Friday, May 1, 2009

Look! Look!

Look what just came in the mail!
I know what you're thinking: "Who did the art on that mug and where I can I get one???" It's one of Ms. Julie's tangles printed on a mug. Isn't she great? And yes, you can enjoy hot chocolate or tea or coffee or ice cream (Mm. Ice cream would be delicious out of a tangle mug.) or anything else you can put in a mug out of your very own tangle mug. Visit Ms. Julie's gallery at Zazzle to order your own. And don't forget to visit her awesome blog, too!

This one was a prize for helping title one of Julie's other fabulous pieces of art. Thanks, Julie!

Monday, April 27, 2009

Macaroni Self-Portrait Day

It seems that today is Macaroni Self-Portrait Day. Whose idea was this? I don't know. What I do know is that playing with macaroni and glue is fun and whoever thought that this activity should have its own holiday was on the right track.

Of course you don't need step-by-step directions for this one so I'll just show you my own self-portrait.
I hope you have as much fun with this as I did. Happy Macaroni Self-Portrait Day!

Return to main page.

Wednesday, April 22, 2009

Create Your Own Rainy Day Masterpiece

It’s a rainy day here in Maryland. We’ve been having a lot of those lately and I know that a lot of you, at least in the U.S., have, also. So today, or the next time it rains, look out your window at the trees. Don’t they look dark and gloomy against the green and blue-grey background of the leaves and rain?

I must admit that I did not think of this project on my own. I saw it in a school where I worked last week and was so impressed by the artwork the students created that I knew I had to share it with you.

I recommend this project for upper elementary students as the paper cutting can be a bit tricky. It can be adapted for younger students though. Instead of keeping the black paper in one piece, just cut out individual tree shapes and glue them down.
Supplies Needed:

Watercolor Paper
Watercolor Paints
Paintbrush
Water
Black Construction Paper
Scissors
Glue Stick
Gather your materials and cover your workspace.
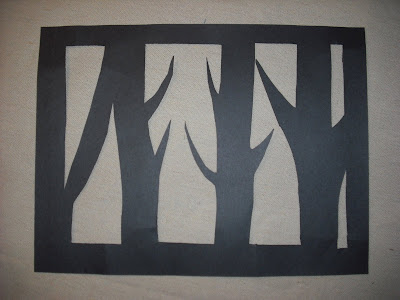
Begin by cutting tree shapes into your black construction paper. Leave a border around the edges. This will keep your paper in one piece. You’re just trying to create the impression of trees; they don’t have to be perfect.
Set your tree paper aside and turn to your watercolor paper. You will use cool colors (blue, green, purple) to cover your paper. Paint with broad strokes and layer your colors on top of each other.
Let your paper dry. This shouldn’t take too long.

Finally, use a glue stick to glue the trees on top of the watercolor paper.
Hang and enjoy!

Return to main page.

Tuesday, April 21, 2009

Mom's Chocolate Painting Inspired by Ms. Julie

My mom has become so annoyed by my lack of posts that she went ahead and created her own. I guess you guys missed me.

********


I have been looking at your chocolate painting post for so long now that I decided I needed to give it a try. First I needed to pick something to copy and I was inspired by “Parrot Paradise” on Ms. Julie’s Place – She however is much better at creating art than I am. Next I printed out her picture at a size that will fit the cheesecake it will grace. I then taped the picture to the back of a piece of parchment paper, traced a circle the size of the cake top and set it into a cookie sheet


I next collected all the different colored chocolate melts that I had and decided which colors to use as I did not have any purple. I have found from past experience that you really can’t make different colors with these melts. They are not pure colors so you mostly end up with different browns.


I then started filling in the various sections letting it cool and harden between colors. I used some drip painting to represent the leaves as it is quite difficult to paint with too much detail (artistic license?). A white chocolate background would look better with this picture so I painted a border around the edge with the intention of pouring the rest of the chocolate to hold it all together.

Then I put the picture in the refrigerator to harden. I have now discovered that white chocolate doesn’t melt thinly enough to pour so I had to spread it with a knife which had the unfortunate effect of smearing some of the painting. And there for next time I will use a true chocolate background.


Now I must go make the cheesecake!

To Peter: My chocolate art won’t last long either. But I did make it 24 hours ahead of the cheesecake, so it should last at least that long.

Monday, April 6, 2009

Chocolate Painting

I haven't dropped off the planet. I'm here! I hope you are all enjoying poetry month and the poems Gregory K has been posting at his site this month. I've been doing a little traveling so I haven't been around much. I haven't even done much writing, though I had planned to get to work this month!

I promise you all some real posts this week, but in the meantime enjoy this project. Turn any picture into a chocolate painting.

Return to main page.