


This project is best for older kids. The paper strips are small and the ornaments are made of glass. That said, I had a good time making mine!
Supplies Needed:
Clear glass ornament
Printed Christmas carol lyrics
Scissors
Yarn or ribbon
Printer and ink

Google search for the lyrics of the Christmas carol of your choice. Here’s a good place to start. I chose Joy to the World. Copy and paste the lyrics into a word document and change the font size and color. I found that 18 point font is about the right size. Print two copies of the lyrics.

Cut the lines into strips and trim off the extra white paper. Bend, but do not crease, the first strip and slip it through the mouth of the ornament, center first. Repeat with every strip. The strips will open up and lie against the inside of the glass ball. If, after two copies, you don’t think your ornament is full enough, print another copy and keep adding strips.

Hang your ornament and enjoy!


 When the salt ceramic is cool to the touch, mold it into three balls: a large, a medium-sized, and a small. These will be the bottom, middle, and head of your snowman. Your entire ornament should be no longer than four inches. Salt ceramic is heavy and your tree would be able to hold an ornament that is much larger. You can make a larger snowman if you want it to stand up. Just make sure it dries standing.
 Twist the bottom of your pipe cleaner into a knot. Push the pipe cleaner through the large ball, then the medium-sized ball, then the small ball. Twist the top of the pipe cleaner into a hook. Cut off the extra and set it aside.
 I chose to make a snow woman, as you can see. You could make a snow woman, a snowman, or even a snow animal by adding ears and painting on whiskers. Let your imagination guide you!
 Tape a sheet of heavy paper to your cookie sheet. Use your paint brush to dab blobs of red and green paint across the top of your paper.
 Let your paper dry.
 I began by tracing the shape of my note card onto my striped paper. I cut it out and then cut a window out of its center. I then cut a square of green construction paper and used a stamp to print a stocking in the middle. I sprinkled the stocking with glitter while it was still wet, then tapped off the extra. Finally, I glued all the pieces to the front cover of my note card.
 If you have trouble cutting perfect straight lines out of the middle of paper, try cutting abstract shapes instead. Notice my green card with the snowflake and the Christmas tree.
 If you’re careful with your striped paper, you can make five or more cards using the same sheet of paper.


 Remove the metal cap from your glass ornament and set it aside. Paint a thin coat of white glue onto the inside of the ornament where you would like the image to appear.
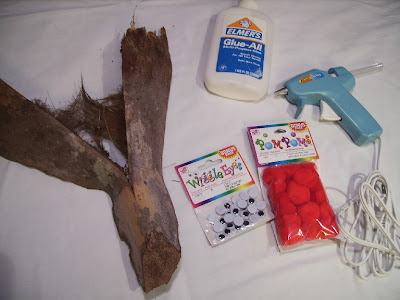 I’m not sure why there is white glue and a glue gun in this picture. You could use either so take your pick. Begin by collecting your supplies, including taking a palm frond from a palm tree. If the trees have recently been pruned, you may find the perfect frond on the ground just waiting for you to turn it into a masterpiece. If not, you’ll want an adult to help you retrieve one. Make sure the frond comes from the right kind of palm tree. See the picture below for help. (Yes, that’s my parent’s back yard... lucky, huh?)
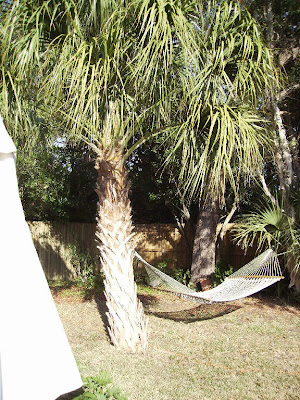 Attach the goggley eyes and the pom to the palm frond. If you use hot glue you won’t have to wait more than a moment for it to dry but if you use white glue be sure everything is firmly attached before you handle your Rudolph.
 If you wish to hang it, hot glue a loop of ribbon to the back. Hang and enjoy!
 Yes, that’s it. Gather your supplies and cover your workspace with newspaper. I chose to use red, green, and white paints and I think my ornament came out well. You can use any colors and glass paint comes in more colors that you can imagine. Silver and gold would be good additions to any ornament. Go crazy!
 A side note: You can use regular craft paint for this project since you won’t be washing the ornament or eat off of it, however, eventually the paint will begin to separate. The ornament pictured below was painted about ten years ago, by my estimation, and you can see that pigment (that is the color) is separating from the binder (the liquid that the color is mixed with to create paint). I still like it though, and hang it on my tree every year.
 Click the following links for a


