Showing posts with label Mondrian. Show all posts

Friday, March 20, 2009

Create Your Own Art Garden

Happy first day of spring! I promise to share more illustrators with you but today I want to celebrate spring. Today, create your own art garden by painting terracotta pots in the styles of famous artists.
Supplies Needed:

Three terracotta pots
Three terracotta saucers
Paints
Paintbrushes
Spray bottle
This is a messy one. If you’re having nice weather I recommend taking your whole art studio outside today. Wear old clothes and, no matter what, cover your workspace.

The first pot we’ll make is in the style of Jackson Pollock. If you don’t remember him, go refresh your memory.

I did my splatter painting in the sink, but it still made quite a mess:
You want to use a dry brush for this. A hard-bristled toothbrush would be better than a paintbrush. Squirt some paint onto the end of your brush. Aim the brush at the pot and run your thumb across the bristles. This will send the paint flying in all directions. That’s why you’re outside and wearing old clothes!
Rinse the brush and then squirt a new color onto the bristles. Splatter the paint across the pot. Continue adding colors until you are happy with your pot. Do the same with the saucer. It will save you some time and brush washings if you do the pot and the saucer at the same time.

The second pot is in the style of Piet Mondrian. Remember him? Paint squares, lines and rectangles in blue, red, yellow, and white until you have covered your whole pot. I left the lip clean but you may paint it if you wish. Let the pot dry.
When the pot has dried (about 30 minutes), paint black lines between each square, rectangle, and line.

The final pot is in the style of Morris Louis (sort of). Remember his stripe paintings? Place your pot in a box lid or some other container to catch the water and paint runoff. Stand the pot in the container with the lip down. Dab paint around the edge of the pot. Use a spray bottle to spray the paint down the side of the pot in stripes.
You may want to let the pot dry and do another coat of stripes in the opposite direction (from the lip to the base). I chose not to.
Use the same method to paint the saucer. Dab paint half way around the lip of the saucer. Then use a spray bottle to spray the paint into and across the saucer.
When your pots are dry, plant seeds, water, and watch spring bloom in your art garden. I’ll post pictures of my flowers when they bloom.

Return to main page.

Wednesday, April 16, 2008

Create Your Own Mondrian Masterpiece, Project 2

In December you learned about Piet Mondrian. Mondrian’s art became more abstract over time until his paintings contained only lines and rectangles of five colors: black, white, red, blue, and yellow. I recommend that you reread that post to refresh your memory before continuing with this project.
Also in December, I posted a Mondrian-inspired painting project. The project I am sharing with you today is much simpler. It’s also not nearly as messy and requires fewer supplies. I’m pleased with how my artwork came out and I think you’ll have good results, too.

Supplies Needed:

Construction Paper: Black, White, Red, Yellow, Blue
Glue Stick
Scissors

Gather your materials. You will use a full sheet of black and less than one sheet each of the other colors.

Do not cut your sheet of black construction paper. It will be the background of your artwork and will form the black lines between colors. Cut various sized rectangles, strips, and squares of white, red, yellow, and blue.

Lay your colors onto your black paper. If necessary, cut the rectangles so they fit onto the paper. Play with the rectangles until you like the look of your artwork.

To complete your artwork, use your glue stick to attach the rectangles to the black paper.

This is a great project to do with a group of kids. It is not too difficult or time consuming, and each child will create a unique piece.


Don’t forget to check out my post on De Stijl, the art movement to which Piet Mondrian belonged.

You may also be interested to create your own edible Mondrian painting.

Return to main page.

Wednesday, February 27, 2008

Degenerate Art

In 1927, the Nazis created a society that would control art. They said they were trying to prevent it from becoming dirty or corrupted. The Nazis wanted to create a society in which everyone looked alike and had like ideas and opinions. What better way to control thinking than to control art?

Imagine if the government decided to destroy any record of any music that wasn’t classical. And then they did it. Suddenly you couldn’t listen to anything with lyrics. There would be no more rock or hip hop or country or anything else. These music styles have helped to shape our culture and our ideas and after awhile I believe that our thinking would begin to change in their absence. This is what the Nazis were trying to do.

Anyway, they took more than 20,000 works of art, including paintings, drawings, and sculpture, by about 200 artists and chose 650 or so for their exhibit of “Degenerate Art.” The exhibit traveled around Germany, making 12 stops in large cities, before many of the works of art were destroyed.

The exhibit was set up to poke fun at the displayed works of art. The walls were often covered with graffiti, and the artists’ names and titles of paintings were sloppily handwritten on note cards next to the works. Click here to watch a short video clip of people looking at paintings in the Degenerate Art exhibit.

Several artists about whom you have already read, were included in the Degenerate Art exhibit, including Pablo Picasso, Wassily Kandinsky, and Piet Mondrian.

Return to main page.

Monday, December 24, 2007

Create Your Own Edible Painting

Merry Christmas Eve! This is the last project before Christmas so enjoy. Paint a few of these while you’re baking other cookies for a little edible art.

Supplies Needed:

Sugar Cookie Dough
Rolling Pin
Parchment Paper
Cookie Cutter
Light Corn Syrup
Food Coloring
Paintbrushes
Small Cups

Bake your sugar cookies according the direction on the package. You can, instead, use your own recipe or buy undecorated sugar cookies already made from the grocery store. If you bake your own, let them cool completely before painting on them.

Pour some light corn syrup into several small cups. You’ll want about a teaspoon in each. Squeeze one drop of food coloring into each cup and stir to make your paints. To make the black color I just mixed one drop of each color (and two drops of red) to one of the cups. The other colors are standard food coloring colors.

Use a clean paintbrush, preferably one that has never been used, and paint your cooled sugar cookies. The paint is very sticky and you must wash the paintbrush in the sink between each color. For this reason, it would be useful to have a different paintbrush for each color.

Please note that the colors run together if you don’t wait for the paint to dry between each; however, the paint dries extremely slowly. I painted mine all in one sitting and I think they came out fine.


Also note that the Jackson Pollock inspired cookies are very messy to make. Place a cookie on a plate, set it in the sink, and then splatter paint like I did (shown in the picture below). Have a parent help you with this one.
Below are pictures of my cookie masterpieces, inspired by Frank Lloyd Wright stained-glass windows, Jackson Pollock, and Piet Mondrian. I thought I had posted on Wright stained-glass but I guess not. So below the cookie, notice the inspiration.


I think they turned out quite nicely. Use any artist for inspiration or paint your own pictures using the fun recipe.

Return to main page.

Thursday, December 13, 2007

Create Your Own Mondrian Masterpiece

Piet Mondrian wanted to find the heart of the things around him so that he could paint it onto his canvas. As he grew older, he art became simpler. The result, for you, is an easy-to-copy style. Today, learn to make your own Mondrian-inspired painting.

Supplies Needed:

Heavy sketch paper (white)
Paints in red, yellow, blue, and black
Paintbrush
Water (for rinsing the brush)
Ruler
Construction paper
Scissors
Pencils

Begin by drawing lines on your paper with your pencil. Use your ruler to make sure the lines are straight horizontal or vertical by measuring from the sides and marking several points along the line before drawing it. Use your imagination to decide where to draw the lines.

Next, fill in some of the squares formed by your intersecting lines with red, yellow, or blue paint. Make sure to leave some of the squares white. If your colors aren’t perfectly within the lines, that’s okay; you’ll paint your black lines next and they’ll cover the edges.

You will now paint over the pencil lines with black paint. The other colors need to dry first and in the meantime, you can make a stencil for painting the black lines. This will make them look crisp.

Cut a sheet of construction paper in half. Place the outer edges together. The edges that you just cut will be to the outside now. Cut a strip from another sheet of construction paper and then cut the strip in half. You’ll use this strip to connect the two halves of your construction paper.

You want to leave an opening about half an inch thick so measure a half an inch somewhere in the middle of the strip and mark it off. Do the same to the second strip. Now tape one strip to each end of the half-sheets of construction paper with the straight edges faces into the gap.

Mark the center of the gap by drawing a line on each strip. Now line up the pencil lines on your painting with these lines and use your stencil to paint black lines where the pencil lines used to be. You may need to fill in your lines a few at a time and let them dry before filling in a few more. You don’t want to set your stencil in wet paint.

Alternatively, you could use a thick black marker to draw the lines but paint will look better.

After you have painted all the lines, your masterpiece is complete! Let it dry, hang, and enjoy.

Return to main page.

Wednesday, December 12, 2007

Piet Mondrian

Piet Mondrian was born in the Netherlands in 1872. He was influenced by many artistic styles and even helped found an artistic movement called De Stijl. He died in 1944, have created about 250 paintings in his lifetime.

The paintings that Piet Mondrian is most famous for are rectangles of white and primary colors, dissected by black lines. He did not always paint this way, however. Mondrian’s first paintings depicted scenes found in real life. They were done in a style similar to impressionism. As his style grew and changed, he stopped using any colors besides the three primaries: red, yellow, and blue. The painting shown below is Avond. This is the first painting in which Mondrian used only primary colors but you can still see the influence of impressionism.

Mondrian soon became interested in cubism. Cubism, which I have not yet posted about, is an artistic style in which the subject is broken into meaningful pieces and rearranged in a new order to show the most important parts of the object. The painting shown below, Still Life with Ginger Pot, was painted by Mondrian in the cubist style. Because of the influence of cubism, Mondrian’s paintings became more and more abstract. Mondrian moved to Paris in 1912 so he could further study cubism.
In 1914 Mondrian returned home just before World War I broke out. He was stuck there for the duration of the war (1914-1919). During this time he became friends with some other artists and together they began the new movement, De Stijl, which I posted about yesterday. The movement was called De Stijl because that was the name of the journal that Mondrian and his friends started. They called the movement neoplasticism and today both names are correct.
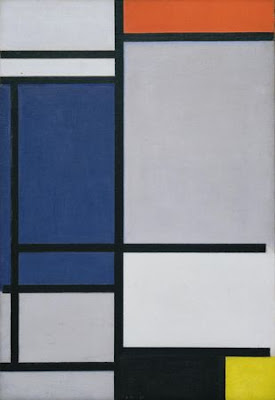
The members of the De Stijl movement were searching to paint an even more honest truth than the cubists. They believed the essence, the foundation of all things could be found in the simplest form: straight lines and primary colors. So Mondrian began painting pieces like the one shown above, Composition.

Tomorrow I’ll teach you to make your own Mondrian-inspired painting.

EDITED TO ADD: Create Your Own Edible Mondrian Painting,
Create Your Own Mondrian Masterpiece

Return to main page.

Tuesday, December 11, 2007

De Stijl

De Stijl (sounds like ‘duh style’) was an artistic movement in the Netherlands from 1917 to around 1928. Artists such as Piet Mondrian, who you’ll learn about tomorrow, wanted to simplify the subjects of their painting as much as possible until they were left with only lines and simple colors. They used only red, yellow, and blue, and black, white, and grey.

De Stijl was confined to the Netherlands because the country did not involve itself in World War I so the Dutch couldn’t leave the country during the war. The art produced in other countries still influenced the de stijl movement, though.

In this 1921 painting, entitled Composition, you can see the simple colors and lines. Notice how few black lines there are in this painting, yet how beautiful the effect.
These ideas were used not only in paintings, but in architecture as well. Look at this house, for instance, designed by Gerrit Rietveld. It is completely black and white with details in primary colors, and uses only rectangles formed by horizontal and vertical lines. The inside also uses simple lines. If you’ve ever seen a Frank Lloyd Wright designed building, you may be thinking that this house reminds you of his work. You’d be right to think that because Wright’s designs from the 1900s and 1910s influenced the later work of these Dutch architects. (You’ll learn about Wright next week.)

Return to main page.