


Andy Warhol created many copies of the same picture. He colored each picture different, using wild, unnatural colors. Today, create your own Andy Warhol-inspired portrait of yourself or someone you know.
A Note to Parents/Teachers: You will need a photo editing program for this project. I recommend that you prepare and print the photo before allowing your child to work on this project. There is a simple free program that you can download to turn a photo into a sketch, called Photo2Sketch. Download it here.
When you have downloaded the program, use the “open” option to locate the photo you want to turn into a sketch. Set the “Precision” to about 30 and the “Line” to about 4. Hit “Convert.” You can adjust the precision and line until the sketch looks the way you want it. Save the image.
Now print four copies of the image onto watercolor paper. If you don’t have watercolor paper, you can print onto plain copy paper but your child should use colored pencils instead of watercolors.
Supplies Needed:
Watercolor paper
Sheet of white paper
Watercolor paints
Paintbrush
Water
Scissors
Glue Stick
 Cover your work space. This is very important because you will be painting all the way to the edge of your pictures.
Cut out all four pictures so there is no border around them. Choose about 6 bright colors. The more water you use the more the lines will show through, but if your paint is too watery it will run.
Fill in your pictures with bright colors. Color the face one color, the body and hair another color, the background a third color, the eyes a fourth color, and the mouth and fifth color. Try not to use the same color twice for any section. Don’t pay too much attention to details.
This is Olivia:
 Isn’t she gorgeous? She’s my cousin’s daughter. I don’t know what that makes her to me, but I love her. Above is the photo I began with. Then I cropped it:
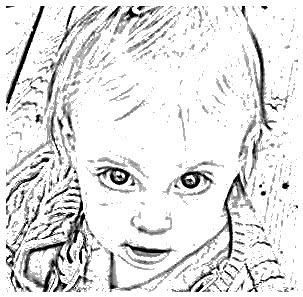
 I changed it into a sketch using Photo2Sketch:
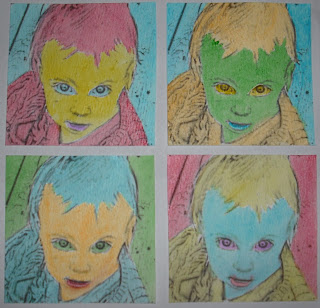
 Then printed and painted:
Return to main page.
A Note to Parents/Teachers: You will need a photo editing program for this project. I recommend that you prepare and print the photo before allowing your child to work on this project. There is a simple free program that you can download to turn a photo into a sketch, called Photo2Sketch. Download it here.
When you have downloaded the program, use the “open” option to locate the photo you want to turn into a sketch. Set the “Precision” to about 30 and the “Line” to about 4. Hit “Convert.” You can adjust the precision and line until the sketch looks the way you want it. Save the image.
Now print four copies of the image onto watercolor paper. If you don’t have watercolor paper, you can print onto plain copy paper but your child should use colored pencils instead of watercolors.
Supplies Needed:
Watercolor paper
Sheet of white paper
Watercolor paints
Paintbrush
Water
Scissors
Glue Stick
Cover your work space. This is very important because you will be painting all the way to the edge of your pictures.Cut out all four pictures so there is no border around them. Choose about 6 bright colors. The more water you use the more the lines will show through, but if your paint is too watery it will run.
Fill in your pictures with bright colors. Color the face one color, the body and hair another color, the background a third color, the eyes a fourth color, and the mouth and fifth color. Try not to use the same color twice for any section. Don’t pay too much attention to details.
This is Olivia:
Isn’t she gorgeous? She’s my cousin’s daughter. I don’t know what that makes her to me, but I love her. Above is the photo I began with. Then I cropped it:I changed it into a sketch using Photo2Sketch:Then printed and painted:Return to main page.


8 comments:
You can get a similar effect in other photo editing software by converting the image to b&w and playing with the brightness and contrast. I've then had kids trace their image from there as well.
Fun project. It would make her your second cousin by the way.
God Bless,
Julie Moses
That's a good tip, Julie. It's always best when you don't have to download programs. Photo2Sketch is just really simple to use. It only has that one function so it was simple to explain. If you have photo editing software that you like, definitely try that first.
Thanks, Julie!
nice portrait
Hey Jess!! This is an amazing little activity. I will forward it to all staff in my district. As a School-Based Occupational Therapist, I am constantly trying to find new and innovative activities that my students' can participate in!!
Ashlie (Olivia's mom)
Thanks, Ashlie! I hope it will be a useful and fun project!
Hey jess, nice job. I like the final outcome of the project. BTW, many people may have the option to photograph images of this type by changing a setting on their digital camera. It is usually called "Sketch" or "Outline" photo.
^^^Greg^^^
If you go to picnik.com it has some awesome free software that is easy to use and you can turn a photo into a sketch in seconds. No downloading the software needed! It is an awesome website.
Post a Comment