This week’s Fantastic Fiction Friday post features Andy Warhol. You may remember that I had some difficulty finding Andy Warhol books. Jeremy, who writes a great blog at Scholastic, recommended the two I will share with you today. Thanks, Jeremy!
That’s right. It’s a double-feature.
First up is Andy Warhol’s Colors by Susan Goldman Rubin. This is nice board book illustrated with the oddly colored animals that Andy Warhol created. There is a green cat, a purple horse, and rows of pink cows. The simple, rhyming text has the perfect rhythm for repeated read alouds.
Today’s second selection is Uncle Andy’s: A faabbbulous visit with Andy Warhol by James Warhola. This book would make a great read-aloud for 2nd or 3rd graders.
James Warhola is Andy Warhol’s nephew. In this story, Warhola recalls a trip he took with his large family to visit Andy Warhol in New York City. Andy’s home is full of art. Some of it reminds James of the junk his father brings home from the junk yard and James loves it all.
I recommend this book highly if you want to experience a side of Andy Warhol you don’t often get to see.
Return to main page.
Showing posts with label pop art. Show all posts
Showing posts with label pop art. Show all posts
Friday, October 17, 2008

Thursday, October 2, 2008
Create Your Own Warhol Masterpiece
Yesterday I posted a Warhol-inspired portrait project. Today’s Andy Warhol project is much simpler and better matched to younger art-lovers.
Supplies Needed:
Small piece of poster board
Construction paper in four colors
White paper
Pencil
Scissors
Glue Stick
You may choose to make butterflies, like I did, or any other animal or object. Make sure that whatever you choose can be broken into four parts. If your subject has more parts, you’ll need more colors.
Cut stencils of each part of the butterfly or use stencils that an adult has already made.
Trace each stencil on each piece of construction paper. Cut out all the pieces. Also cut one square out of each piece of construction paper. These will form your backgrounds.
 Mix and match the colors. Be sure that you’re happy with the way the colors look together before gluing them down.
Glue the pieces together. Arrange the four squares, then glue them to your sheet of white paper.

Return to main page.
Supplies Needed:
Small piece of poster board
Construction paper in four colors
White paper
Pencil
Scissors
Glue Stick
You may choose to make butterflies, like I did, or any other animal or object. Make sure that whatever you choose can be broken into four parts. If your subject has more parts, you’ll need more colors.
Cut stencils of each part of the butterfly or use stencils that an adult has already made.
Trace each stencil on each piece of construction paper. Cut out all the pieces. Also cut one square out of each piece of construction paper. These will form your backgrounds.
Mix and match the colors. Be sure that you’re happy with the way the colors look together before gluing them down.Glue the pieces together. Arrange the four squares, then glue them to your sheet of white paper.
Return to main page.
Wednesday, October 1, 2008
Create Your Own Andy Warhol Portrait
Andy Warhol created many copies of the same picture. He colored each picture different, using wild, unnatural colors. Today, create your own Andy Warhol-inspired portrait of yourself or someone you know.
A Note to Parents/Teachers: You will need a photo editing program for this project. I recommend that you prepare and print the photo before allowing your child to work on this project. There is a simple free program that you can download to turn a photo into a sketch, called Photo2Sketch. Download it here.
When you have downloaded the program, use the “open” option to locate the photo you want to turn into a sketch. Set the “Precision” to about 30 and the “Line” to about 4. Hit “Convert.” You can adjust the precision and line until the sketch looks the way you want it. Save the image.
Now print four copies of the image onto watercolor paper. If you don’t have watercolor paper, you can print onto plain copy paper but your child should use colored pencils instead of watercolors.
Supplies Needed:
Watercolor paper
Sheet of white paper
Watercolor paints
Paintbrush
Water
Scissors
Glue Stick
 Cover your work space. This is very important because you will be painting all the way to the edge of your pictures.
Cut out all four pictures so there is no border around them. Choose about 6 bright colors. The more water you use the more the lines will show through, but if your paint is too watery it will run.
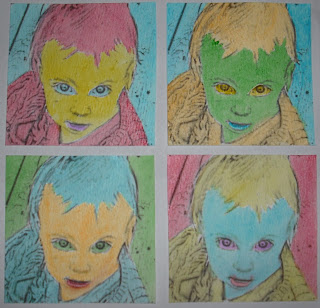
Fill in your pictures with bright colors. Color the face one color, the body and hair another color, the background a third color, the eyes a fourth color, and the mouth and fifth color. Try not to use the same color twice for any section. Don’t pay too much attention to details.
This is Olivia:
 Isn’t she gorgeous? She’s my cousin’s daughter. I don’t know what that makes her to me, but I love her. Above is the photo I began with. Then I cropped it:
 I changed it into a sketch using Photo2Sketch:
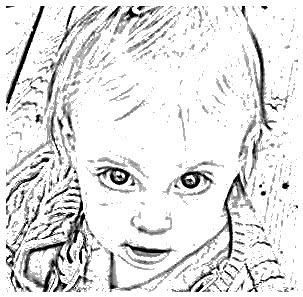 Then printed and painted:
Return to main page.
A Note to Parents/Teachers: You will need a photo editing program for this project. I recommend that you prepare and print the photo before allowing your child to work on this project. There is a simple free program that you can download to turn a photo into a sketch, called Photo2Sketch. Download it here.
When you have downloaded the program, use the “open” option to locate the photo you want to turn into a sketch. Set the “Precision” to about 30 and the “Line” to about 4. Hit “Convert.” You can adjust the precision and line until the sketch looks the way you want it. Save the image.
Now print four copies of the image onto watercolor paper. If you don’t have watercolor paper, you can print onto plain copy paper but your child should use colored pencils instead of watercolors.
Supplies Needed:
Watercolor paper
Sheet of white paper
Watercolor paints
Paintbrush
Water
Scissors
Glue Stick
Cover your work space. This is very important because you will be painting all the way to the edge of your pictures.Cut out all four pictures so there is no border around them. Choose about 6 bright colors. The more water you use the more the lines will show through, but if your paint is too watery it will run.
Fill in your pictures with bright colors. Color the face one color, the body and hair another color, the background a third color, the eyes a fourth color, and the mouth and fifth color. Try not to use the same color twice for any section. Don’t pay too much attention to details.
This is Olivia:
Isn’t she gorgeous? She’s my cousin’s daughter. I don’t know what that makes her to me, but I love her. Above is the photo I began with. Then I cropped it:I changed it into a sketch using Photo2Sketch:Then printed and painted:Return to main page.
Tuesday, September 30, 2008
Andy Warhol
Andy Warhol was born in Pittsburgh, Pennsylvania in 1928. His parents had only recently moved to the United States from what is now Slovakia. As a child Warhol, was often sick, or thought he was sick, so he spent a lot of time in bed. During this time, Warhol drew many pictures. He also listened to the radio and collected pictures of celebrities.
After studying fine art in college, Warhol moved to New York City and began illustrating for magazines and creating advertisements. He became very popular, especially for his drawings of shoes.
During the 1960s, Warhol began creating the paintings he is best known for today. Warhol loved pop culture and he decided to paint what he loved. You may have guessed that he was a Pop Artist like Roy Lichtenstein. Warhol painted large pictures of Coca-Cola bottles, Campbell’s soup cans, and dollar bills. He also painted pictures of celebrities.
Because he was creating pictures of mass-produced items, Warhol thought it would be fitting to mass produce the artwork. He did this by creating screen prints rather than painting each picture separately. This allowed him to make many copies of each painting, but each copy was an original Warhol painting. Click here for an example.
Warhol founded “The Factory” which was his studio. At the Factory, he was always surrounded by people. Some of these people were in films that he made, some were writers or artists, some were celebrities. Warhol wanted to create an image for himself and he chose carefully the people in his circle.
Andy Warhol was criticized for turning art into a business. Many people didn’t like the idea that he was just making copies of the same picture to sell and make money. Warhol believed in what he was creating, though. He continued to make screen printed paintings of celebrities.
Warhol died in 1987.
Check out this great website all about Andy Warhol: Pop Mag Children’s Activity Book. I love the idea of a magazine about Andy Warhol because Warhol founded his own magazine, Interview. This is also a great place to see some of Warhol's artwork.
EDITED TO ADD: Create Your Own Andy Warhol Portrait,
Create Your Own Andy Warhol Masterpiece,
Fantastic Fiction Friday Starring Andy Warhol
Return to main page.
After studying fine art in college, Warhol moved to New York City and began illustrating for magazines and creating advertisements. He became very popular, especially for his drawings of shoes.
During the 1960s, Warhol began creating the paintings he is best known for today. Warhol loved pop culture and he decided to paint what he loved. You may have guessed that he was a Pop Artist like Roy Lichtenstein. Warhol painted large pictures of Coca-Cola bottles, Campbell’s soup cans, and dollar bills. He also painted pictures of celebrities.
Because he was creating pictures of mass-produced items, Warhol thought it would be fitting to mass produce the artwork. He did this by creating screen prints rather than painting each picture separately. This allowed him to make many copies of each painting, but each copy was an original Warhol painting. Click here for an example.
Warhol founded “The Factory” which was his studio. At the Factory, he was always surrounded by people. Some of these people were in films that he made, some were writers or artists, some were celebrities. Warhol wanted to create an image for himself and he chose carefully the people in his circle.
Andy Warhol was criticized for turning art into a business. Many people didn’t like the idea that he was just making copies of the same picture to sell and make money. Warhol believed in what he was creating, though. He continued to make screen printed paintings of celebrities.
Warhol died in 1987.
Check out this great website all about Andy Warhol: Pop Mag Children’s Activity Book. I love the idea of a magazine about Andy Warhol because Warhol founded his own magazine, Interview. This is also a great place to see some of Warhol's artwork.
EDITED TO ADD: Create Your Own Andy Warhol Portrait,
Create Your Own Andy Warhol Masterpiece,
Fantastic Fiction Friday Starring Andy Warhol
Return to main page.
Friday, September 19, 2008
Create Your Own Roy Lichtenstein Starburst
If you really liked Roy Lichtenstein’s artwork, try this project and make your own Lichtenstein-inspired drawing. This project is best for kids in upper elementary grades or higher.
Supplies Needed:
White paper
Graph paper
Tag board
Pencil
Markers
Ruler
Hole Punch
Scissors
 Gather your supplies and cover your workspace. You’ll want to color all the way to the edge of the paper and this could get messy.
First, create a star stencil out of tag board. (You can choose any shape you want but I chose a star.) Then create a stripe stencil. Just cut a thin strip from your tag board. Finally, use a hole punch to create a Benday dot stencil. Punch holes in every other square of your graph paper. Make two rows of holes. Then, line up the graph paper with the edge of your piece of tag board and punch through each hole.
 Trace your star in the center of the page. Draw some diagonal lines from the edge of the star to the edge of the page. Begin to fill in the spaces on the page with either stripes (using your stripe stencil) or with dots (using your Benday dot stencil). Choose any colors you want to fill in your designs.
 Continue until you’ve filled every space.
Check out Roy Lichtenstein: Artist at Work by Lou Ann Walker.
Enjoy your weekend!
Return to main page.
Supplies Needed:
White paper
Graph paper
Tag board
Pencil
Markers
Ruler
Hole Punch
Scissors
Gather your supplies and cover your workspace. You’ll want to color all the way to the edge of the paper and this could get messy.First, create a star stencil out of tag board. (You can choose any shape you want but I chose a star.) Then create a stripe stencil. Just cut a thin strip from your tag board. Finally, use a hole punch to create a Benday dot stencil. Punch holes in every other square of your graph paper. Make two rows of holes. Then, line up the graph paper with the edge of your piece of tag board and punch through each hole.
Trace your star in the center of the page. Draw some diagonal lines from the edge of the star to the edge of the page. Begin to fill in the spaces on the page with either stripes (using your stripe stencil) or with dots (using your Benday dot stencil). Choose any colors you want to fill in your designs.Continue until you’ve filled every space.Check out Roy Lichtenstein: Artist at Work by Lou Ann Walker.
Enjoy your weekend!
Return to main page.
Roy Lichtenstein's ABCs by Bob Adelman
Roy Lichtenstein’s art stars in Bob Adelman's Roy Lichtenstein's ABCs. This is a great ABC book. If you have young children you should check it out.
Each letter, taken straight from a Lichtenstein painting, occupies its own page with a short list of words that begin with that letter. On the facing page is a painting that contains the objects listed. Kids can search for the items in the painting while studying a great artist’s work and learning their ABCs.
Adults who like Lichtenstein’s work will enjoy sharing this book with their children.
There are lots of ABC books out there but this one is special.
Return to main page.
Each letter, taken straight from a Lichtenstein painting, occupies its own page with a short list of words that begin with that letter. On the facing page is a painting that contains the objects listed. Kids can search for the items in the painting while studying a great artist’s work and learning their ABCs.
Adults who like Lichtenstein’s work will enjoy sharing this book with their children.
There are lots of ABC books out there but this one is special.
Return to main page.
Roy Lichtenstein: The Artist at Work
Welcome to Fantastic Non-Fiction Friday!
I didn’t tell you much yesterday about how Roy Lichtenstein creates his giant Pop paintings. He uses some unusual tools and techniques. For example, after he has sketched what he wants his painting to look like, he uses a projector to make the image larger. He then copies the larger picture onto his canvas. He also uses tape to help him paint sharp, clear lines.
It’s not often that we get to watch an artist at work in his studio but Lou Ann Walker gives us that opportunity in Roy Lichtenstein: The Artist at Work. Walker tells the story of how Lichtenstein creates his paintings, from the idea to the sketch to the finished product.
What I really love about this book is the photographs. You get to see Lichtenstein in his studio, studying a canvas, sketching, taping, and mixing paint. He looks joyful as he paints. You can’t help but smile at the pictures.
Check back later in the day for another book recommendation!
Return to main page.
I didn’t tell you much yesterday about how Roy Lichtenstein creates his giant Pop paintings. He uses some unusual tools and techniques. For example, after he has sketched what he wants his painting to look like, he uses a projector to make the image larger. He then copies the larger picture onto his canvas. He also uses tape to help him paint sharp, clear lines.
It’s not often that we get to watch an artist at work in his studio but Lou Ann Walker gives us that opportunity in Roy Lichtenstein: The Artist at Work. Walker tells the story of how Lichtenstein creates his paintings, from the idea to the sketch to the finished product.
What I really love about this book is the photographs. You get to see Lichtenstein in his studio, studying a canvas, sketching, taping, and mixing paint. He looks joyful as he paints. You can’t help but smile at the pictures.
Check back later in the day for another book recommendation!
Return to main page.
Thursday, September 18, 2008
Roy Lichtenstein
Roy Lichtenstein was born in 1923 in New York. He went to a high school that did not offer art classes but he liked to draw and did so in his free time. After high school, Lichtenstein went to Ohio State University where he earned a bachelor’s degree and a master’s degree in fine art.
He taught art classes as Ohio State University, State University of New York at Oswego, and then Rutgers University. His art evolved during this time from Cubism and Expressionism to Abstract Expressionism.
In 1961, Lichtenstein created his first Pop Art painting. He liked the way commercial art looked and he liked the sharp, black outlines in comic book art. The Pop paintings he is known for combined the two styles.
Lichtenstein used thick, horizontal stripes and Benday Dots in his paintings. Benday Dots were originally used for printing pictures inexpensively. By spacing four different colors of dots close together, far apart, or on top of each other, all the colors can be made. Lichtenstein liked the way the dots looked and so he borrowed the technique. You’ll notice that the faces of the people in many of his paintings are made up of Benday Dots.
Lichtenstein’s Pop Art portrays things from popular culture. That’s why it’s called Pop Art. He drew inspiration from cartoons, newspapers, advertisements, and things he saw in real life (like his art studio). He used this inspiration to create enormous paintings as well as sculptures as you can see in the pictures here, here, and here.
At first, critics didn’t like his work, but today Lichtenstein’s Pop Art can found in most museums that house modern art.
Lichtenstein died in 1997.
Check back throughout the day tomorrow for two Fantastic (Non)Fiction Friday posts and a bonus third post!
Return to main page.
He taught art classes as Ohio State University, State University of New York at Oswego, and then Rutgers University. His art evolved during this time from Cubism and Expressionism to Abstract Expressionism.
In 1961, Lichtenstein created his first Pop Art painting. He liked the way commercial art looked and he liked the sharp, black outlines in comic book art. The Pop paintings he is known for combined the two styles.
Lichtenstein used thick, horizontal stripes and Benday Dots in his paintings. Benday Dots were originally used for printing pictures inexpensively. By spacing four different colors of dots close together, far apart, or on top of each other, all the colors can be made. Lichtenstein liked the way the dots looked and so he borrowed the technique. You’ll notice that the faces of the people in many of his paintings are made up of Benday Dots.
Lichtenstein’s Pop Art portrays things from popular culture. That’s why it’s called Pop Art. He drew inspiration from cartoons, newspapers, advertisements, and things he saw in real life (like his art studio). He used this inspiration to create enormous paintings as well as sculptures as you can see in the pictures here, here, and here.
At first, critics didn’t like his work, but today Lichtenstein’s Pop Art can found in most museums that house modern art.
Lichtenstein died in 1997.
Check back throughout the day tomorrow for two Fantastic (Non)Fiction Friday posts and a bonus third post!
Return to main page.
Subscribe to:
Posts (Atom)