


Seen Art? by Jon Scieszka and Lane Smith is a fun story about a boy who is trying to find his friend in New York City. The confusion starts when the boy asks a passerby, “seen Art?” You see, the boy’s friend’s name is Art! The boy heads into the Museum of Modern Art to look for him and he finds art, just not the Art he was looking for.
Jon Scieszka always writes with a humor that boys love. This book would make a great gift for that kindergarten or first grade art lover on your list. Bundle it with art supplies and maybe some instructions for art projects that you found here at Art Smarts 4 Kids!
Return to main page.
Friday, December 12, 2008
Wednesday, December 10, 2008
Create Your Own Snowman Ornament
I love making Christmas ornaments. This weekend it snowed enough to stick to the ground, if only briefly, and I thought about all the wonderful things that snow allows you to do. And then I realized that there are no snowmen on my Christmas tree! That was an easy problem to solve. Today, create your own snowman Christmas ornament.
Supplies Needed:
Salt Ceramic (see instructions here)
*Salt
*Cornstarch
*Water
Pipe Cleaner
Googley Eyes
Beads
Ribbon
Paint
Small Paintbrush
Scissors
Ask an adult to make some salt ceramic for you. Directions can be found here.
 When the salt ceramic is cool to the touch, mold it into three balls: a large, a medium-sized, and a small. These will be the bottom, middle, and head of your snowman. Your entire ornament should be no longer than four inches. Salt ceramic is heavy and your tree would be able to hold an ornament that is much larger. You can make a larger snowman if you want it to stand up. Just make sure it dries standing.
 Twist the bottom of your pipe cleaner into a knot. Push the pipe cleaner through the large ball, then the medium-sized ball, then the small ball. Twist the top of the pipe cleaner into a hook. Cut off the extra and set it aside.
Choose two googley eyes and press them into the face of your snowman. Add a bead for the nose. Then press three more beads into the middle ball. These are the snowman’s buttons.
Cut the piece of leftover pipe cleaner into two pieces. Push these into the snowman’s body. They are the arms.
Tie a piece of ribbon around the snowman’s neck.
Finally, paint on the snowman’s mouth.
 I chose to make a snow woman, as you can see. You could make a snow woman, a snowman, or even a snow animal by adding ears and painting on whiskers. Let your imagination guide you!
Let the snowman dry. Then hang it on your Christmas tree.
Return to main page.
Supplies Needed:
Salt Ceramic (see instructions here)
*Salt
*Cornstarch
*Water
Pipe Cleaner
Googley Eyes
Beads
Ribbon
Paint
Small Paintbrush
Scissors
Ask an adult to make some salt ceramic for you. Directions can be found here.
When the salt ceramic is cool to the touch, mold it into three balls: a large, a medium-sized, and a small. These will be the bottom, middle, and head of your snowman. Your entire ornament should be no longer than four inches. Salt ceramic is heavy and your tree would be able to hold an ornament that is much larger. You can make a larger snowman if you want it to stand up. Just make sure it dries standing.Twist the bottom of your pipe cleaner into a knot. Push the pipe cleaner through the large ball, then the medium-sized ball, then the small ball. Twist the top of the pipe cleaner into a hook. Cut off the extra and set it aside.Choose two googley eyes and press them into the face of your snowman. Add a bead for the nose. Then press three more beads into the middle ball. These are the snowman’s buttons.
Cut the piece of leftover pipe cleaner into two pieces. Push these into the snowman’s body. They are the arms.
Tie a piece of ribbon around the snowman’s neck.
Finally, paint on the snowman’s mouth.
I chose to make a snow woman, as you can see. You could make a snow woman, a snowman, or even a snow animal by adding ears and painting on whiskers. Let your imagination guide you!Let the snowman dry. Then hang it on your Christmas tree.
Return to main page.
Tuesday, December 9, 2008
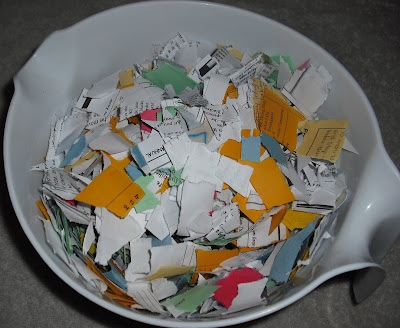
Handmade Gift: Make Your Own Paper
Handmade Gifts are great. Taking the time to make your own gifts shows your loved ones how much you care. It’s also fun!
Today, I’ll show you how to make your own paper. You can then turn that paper into stationery sets or bind it together to create beautiful, handmade journals.
Supplies Needed:
Paper from your recycle bin
Large bowl
Blender
Brownie pan
Acrylic paint
Mesh screen
Towels
Water
Tear your paper into small pieces and place them in your bowl. Squares about 1 inch by 1 inch are fine. Add hot water and soak your paper for about 30 minutes.
 Have and adult help you pour your paper-and-water mixture into your blender. Blend the paper until it becomes thick and pulpy.
Pour the mixture back into the bowl and take it to your protected work space.
 Choose a color for your paper. I decided to make mine blue. Add paint to the pulp and mix with your hands until the pulp is the color you wish your paper to be. Keep in mind that the paper with look lighter after it dries.
Move a few handfuls of the pulp into your brownie pan. Cover with more water.
Cut a piece of screen slightly larger than you want your sheets of paper. You want to use a sturdy piece of screen. I choose a flexible piece of screen and it was difficult to keep the pulp on the screen.
 Dip the screen into the mixture and cover with a thin layer of pulp. Allow the water to drain through the screen, then move your screen to a towel. Flip the screen so the pulp is directly on the towel and the screen is facing up. Fold your towel over the screen and let it soak up some of the water.
 Remove the screen and repeat.
Your paper will need to dry for about a day.
Finally, cut the paper to the size you want, or leave the edges unfinished. You may wish to decorate your paper with a stamp at the top or bottom. Be sure to leave enough room to write on it.
I hope you enjoy creating your own handmade paper gifts and I’m sure your friend or family member will love your creation!
Return to main page.
Today, I’ll show you how to make your own paper. You can then turn that paper into stationery sets or bind it together to create beautiful, handmade journals.
Supplies Needed:
Paper from your recycle bin
Large bowl
Blender
Brownie pan
Acrylic paint
Mesh screen
Towels
Water
Tear your paper into small pieces and place them in your bowl. Squares about 1 inch by 1 inch are fine. Add hot water and soak your paper for about 30 minutes.
Have and adult help you pour your paper-and-water mixture into your blender. Blend the paper until it becomes thick and pulpy.Pour the mixture back into the bowl and take it to your protected work space.
Choose a color for your paper. I decided to make mine blue. Add paint to the pulp and mix with your hands until the pulp is the color you wish your paper to be. Keep in mind that the paper with look lighter after it dries.Move a few handfuls of the pulp into your brownie pan. Cover with more water.
Cut a piece of screen slightly larger than you want your sheets of paper. You want to use a sturdy piece of screen. I choose a flexible piece of screen and it was difficult to keep the pulp on the screen.
Dip the screen into the mixture and cover with a thin layer of pulp. Allow the water to drain through the screen, then move your screen to a towel. Flip the screen so the pulp is directly on the towel and the screen is facing up. Fold your towel over the screen and let it soak up some of the water.Remove the screen and repeat.Your paper will need to dry for about a day.
Finally, cut the paper to the size you want, or leave the edges unfinished. You may wish to decorate your paper with a stamp at the top or bottom. Be sure to leave enough room to write on it.
I hope you enjoy creating your own handmade paper gifts and I’m sure your friend or family member will love your creation!
Return to main page.
Monday, December 8, 2008
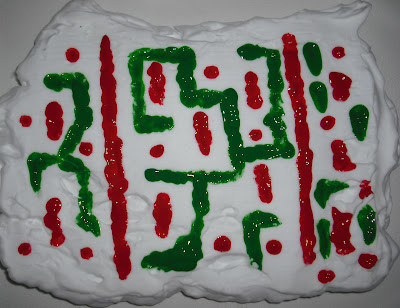
Create Your Own Marbled Christmas Cards
You may remember the marbling project I posted awhile back. I thought red and green marbled paper would make lovely Christmas cards. Mine can out nicely. Try it for yourself.
Supplies Needed:
Foam Shaving Cream
Blank Note Cards or Heavy Paper
Paint
Paintbrush
Cardboard
Plate or Tray
 Spray a layer of shaving cream, about half and inch thick, onto the plate. Use the edge of a piece of cardboard to smooth the surface.
 Paint on the surface of the shaving cream. Just scatter your colors across the top. The pattern doesn’t matter unless you’re trying to create a picture (see below). If you use washable paint for this project, your paint will run together when you remove the shaving cream from the card. I do not recommend it.
 Use the back of your paintbrush to swirl the paint around. When you like the marbled effect, press the front of your card into the shaving cream. Lift the card straight up and set aside.
Allow your card to dry for a few minutes, then use the edge of a clean piece of cardboard to scrape the shaving cream off the note card. Only the paint will remain.
 If you wish to make a picture, like a Christmas tree or a stocking, dab the paint in the general shape you wish to make. Swirl each part of the picture separately. For example, in the Christmas tree card below, I swirled the green, then wiped the end of my brush, then swirled the blue. I didn’t want my colors to mix.
 If you want, decorate your cards with words, glitter, or colored paper.
Place in envelopes and send to your friends and family. They are sure to enjoy these beautiful, handmade cards!
Return to main page.
Supplies Needed:
Foam Shaving Cream
Blank Note Cards or Heavy Paper
Paint
Paintbrush
Cardboard
Plate or Tray
Spray a layer of shaving cream, about half and inch thick, onto the plate. Use the edge of a piece of cardboard to smooth the surface.Paint on the surface of the shaving cream. Just scatter your colors across the top. The pattern doesn’t matter unless you’re trying to create a picture (see below). If you use washable paint for this project, your paint will run together when you remove the shaving cream from the card. I do not recommend it.Use the back of your paintbrush to swirl the paint around. When you like the marbled effect, press the front of your card into the shaving cream. Lift the card straight up and set aside.Allow your card to dry for a few minutes, then use the edge of a clean piece of cardboard to scrape the shaving cream off the note card. Only the paint will remain.
If you wish to make a picture, like a Christmas tree or a stocking, dab the paint in the general shape you wish to make. Swirl each part of the picture separately. For example, in the Christmas tree card below, I swirled the green, then wiped the end of my brush, then swirled the blue. I didn’t want my colors to mix.If you want, decorate your cards with words, glitter, or colored paper.Place in envelopes and send to your friends and family. They are sure to enjoy these beautiful, handmade cards!
Return to main page.
Thursday, December 4, 2008
Create Your Own Striped Christmas Cards
Today you’ll use the method you learned yesterday to make beautiful, handmade Christmas cards that your friends and family will love.
Supplies Needed:
Heavy Paper
Washable Paints
Paintbrush
Spray Bottle
Cookie Sheet
Tape
Pencil
Colored papers
Stamps
Markers
Glitter
 Tape a sheet of heavy paper to your cookie sheet. Use your paint brush to dab blobs of red and green paint across the top of your paper.
Set your spray bottle to mist and sprits the paint with water until it runs down the page. I found that the red paint overpowered the green paint, so I added more dots of green and continued to spray.
 Let your paper dry.
Now for the card making. I used blank note cards but you can use heavy paper, folded in half if you don’t have any blank note cards.
What you do next is completely up to you. Use your imagination to combine your materials and see what you come up with.
 I began by tracing the shape of my note card onto my striped paper. I cut it out and then cut a window out of its center. I then cut a square of green construction paper and used a stamp to print a stocking in the middle. I sprinkled the stocking with glitter while it was still wet, then tapped off the extra. Finally, I glued all the pieces to the front cover of my note card.
 If you have trouble cutting perfect straight lines out of the middle of paper, try cutting abstract shapes instead. Notice my green card with the snowflake and the Christmas tree.
 If you’re careful with your striped paper, you can make five or more cards using the same sheet of paper.
Write your holiday wishes inside your cards, slide them into envelopes, and mail them to your friends and family. They will certainly smile at your thoughtfulness.
More Christmas card ideas to come next week. Check back tomorrow for Fantastic Fiction Friday.
Return to main page.
Supplies Needed:
Heavy Paper
Washable Paints
Paintbrush
Spray Bottle
Cookie Sheet
Tape
Pencil
Colored papers
Stamps
Markers
Glitter
Tape a sheet of heavy paper to your cookie sheet. Use your paint brush to dab blobs of red and green paint across the top of your paper.Set your spray bottle to mist and sprits the paint with water until it runs down the page. I found that the red paint overpowered the green paint, so I added more dots of green and continued to spray.
Let your paper dry.Now for the card making. I used blank note cards but you can use heavy paper, folded in half if you don’t have any blank note cards.
What you do next is completely up to you. Use your imagination to combine your materials and see what you come up with.
I began by tracing the shape of my note card onto my striped paper. I cut it out and then cut a window out of its center. I then cut a square of green construction paper and used a stamp to print a stocking in the middle. I sprinkled the stocking with glitter while it was still wet, then tapped off the extra. Finally, I glued all the pieces to the front cover of my note card.If you have trouble cutting perfect straight lines out of the middle of paper, try cutting abstract shapes instead. Notice my green card with the snowflake and the Christmas tree.If you’re careful with your striped paper, you can make five or more cards using the same sheet of paper.Write your holiday wishes inside your cards, slide them into envelopes, and mail them to your friends and family. They will certainly smile at your thoughtfulness.
More Christmas card ideas to come next week. Check back tomorrow for Fantastic Fiction Friday.
Return to main page.
Wednesday, December 3, 2008
Create Your Own Morris Louis Stripe Painting
Morris Louis created his paintings a little differently, but you can create your own stripe paintings like his.
Supplies Needed:
Cookie Sheet
Heavy Paper
Washable Paints
Paintbrush
Spray Bottle
Tape
Paper Towels
This project is a lot of fun, but it can get messy. Make sure you cover your work space and have paper towels handy.
Use a small piece of tape to attach your paper to the cookie sheet.
Dab blobs of different colored paint in a line across the top of your paper. You don’t need a lot of paint to create stripes.
 Set your spray bottle to a wide spray. Water should mist out of the bottle. Angle your bottle downward and spray the paint blobs until they begin to run. Continue to spray until most of the paint has run down the page.
 Use a paper towel to catch the extra water. You may also want to use a paper towel to blot the bottom of your paper.
Voila! Your very own stripe painting!
Tomorrow I’ll show you how to use this technique to make fun, homemade Christmas cards.
Return to main page.
Supplies Needed:
Cookie Sheet
Heavy Paper
Washable Paints
Paintbrush
Spray Bottle
Tape
Paper Towels
This project is a lot of fun, but it can get messy. Make sure you cover your work space and have paper towels handy.
Use a small piece of tape to attach your paper to the cookie sheet.
Dab blobs of different colored paint in a line across the top of your paper. You don’t need a lot of paint to create stripes.
Set your spray bottle to a wide spray. Water should mist out of the bottle. Angle your bottle downward and spray the paint blobs until they begin to run. Continue to spray until most of the paint has run down the page. Use a paper towel to catch the extra water. You may also want to use a paper towel to blot the bottom of your paper.Voila! Your very own stripe painting!
Tomorrow I’ll show you how to use this technique to make fun, homemade Christmas cards.
Return to main page.
Monday, December 1, 2008
Morris Louis
Morris Louis was born in Baltimore, Maryland in 1912. His name was Morris Louis Bernstein but he dropped the Bernstein in the late 1930s. He studied art at the Maryland Institute of Fine and Applied Arts but he left school before finishing the program.
He went to New York in 1936. Louis helped with some workshops that helped artists use unusual tools, like spray guns, to create art. These workshops helped grow the Abstract Expressionist movement.
Louis didn’t stay in New York for long. In 1940 he moved back to Baltimore and began showing his work. A group of local artists liked his work and convinced him to teach them.
Louis moved to Washington, D.C. in 1952 and started teaching at the Washington Workshop Center of the Arts. He didn’t have many friends in the art world and didn’t travel much to learn about new styles of painting. While in D.C., Louis met artist Kenneth Noland. Noland took Louis to New York where he saw the work of many new artists. One artist, Helen Frankenthaler, really inspired Louis. This painting, Mountains and Sea, especially moved him. Frankenthaler had stained the canvas rather than just painting it. Louis would try this method when he returned to D.C.
Louis began a series of paintings that he called Veils. To create his Veils, Louis poured paint onto a canvas and then poured thin black paint over the colors. Check out this Veil painting.
When he had finished his Veil paintings, Louis didn’t know what to paint next. He wasn’t happy with anything he created and he destroyed about 300 paintings.
Finally, in 1960, Louis began painting another series, called Unfurleds. In these paintings, Louis painted stripes of bright color that began in the upper corners and met at the bottom center in a V-shape. This is a great example on an Unfurled painting.
Morris Louis created one more famous series of paintings, called Stripes. The Stripes paintings featured slightly overlapping stripes of bright colors that began part way down the canvas and ran off the bottom. Louis’ Stripe paintings are my favorites. Check out this one and this one.
Louis died in 1962.
Tomorrow: A Morris Louis project.
Return to main page.
Final NaNoWriMo Update 2008
Now that NaNoWriMo has ended, I want to tell you how I fared in this year's National Novel Writing Month. As you know, I reached 50,000 words on November 25th. Today, I finished the month at 60,040 words! And THE END were the final two! This year was very successful, mainly because there was a great group of other writers in my area who were also working on NaNovels. We helped each other a lot this month with support and encouragement.
In case you're interested, below is a graph that shows my progress throughout NaNoWriMo 2008 in comparision to last year. Can't wait to add a third line next year!

In case you're interested, below is a graph that shows my progress throughout NaNoWriMo 2008 in comparision to last year. Can't wait to add a third line next year!
And now, on to December. May it be filled with art projects.
Subscribe to:
Posts (Atom)


